


Introduction
Damocles Wars
Damocles Wars
Welcome to Damocles, a world shaped by endless war.Across this resource-rich planet, factions rise and fall in a constant struggle for survival and dominance. Ancient civilizations, forgotten empires, and emerging powers collide on battlefields where every decision matters.
Alternating Activation
Damocles is a tabletop wargame focused on fast, tactical, and decisive battles. You command squads, characters, and war machines in a dynamic alternating activation system that keeps both players constantly engaged.
Whether you play a 40-minute skirmish or a large-scale battle with hundreds of miniatures, the intensity never drops. Every activation matters, you are constantly planning, reacting, hoping, celebrating, or watching your plans collapse as the battle unfolds. The game is designed to keep both players fully involved from start to finish, with no downtime and constant shifts in momentum.
Damocles is also built to be played directly from your smartphone. The rulebook and army lists are fully integrated: special rules are accessible in a single tap, allowing you to start playing quickly without memorizing everything. Learn the core rules, try the tutorial, build an army from your own miniatures collection, and you’re ready to go.
Large, and Free Army Building
In Damocles, every unit is viable, and every unit has a counter. Victory doesn’t come from picking the “best” option, but from how you combine your forces and adapt them on the battlefield.
Your strategy is never fixed. Key characters can make critical decisions during the battle through multiple-choice abilities, allowing you to constantly adjust your plan as the situation evolves.
No unit is ever guaranteed to perform. A squad can fail at a crucial moment, or completely turn the tide under the right conditions. Even the most powerful forces can collapse if caught unprepared. This creates a battlefield where anticipation, positioning, and timing matter more than raw stats, and where creative strategies and bold decisions are often rewarded.
Miniature Agnostic, Versatile Setting
Damocles is a fully open system. It is designed to support fantasy, historical, and sci-fi settings alike, and encourages players to use any miniatures they love: plastic, metal, or 3D printed. Whether you play official models or proxies from your favorite creators, the battlefield remains yours.
All rules and armies are continuously updated in one place, for free. No outdated books, no hidden updates. Every change is automatically reflected across all factions and universes. The system is designed to evolve without breaking its core, giving you the freedom to explore fantasy, historical, or sci-fi settings while relying on a stable and familiar foundation.
Balance, Precision and Adaptability
Designed through over 20 years of iteration and refinement, Damocles is built on a carefully balanced system where every unit and every weapon is precisely costed.
This foundation allows new units and army lists to be added quickly without breaking the game’s balance, ensuring a constantly evolving yet stable competitive environment.
There are no overpowered choices. Every strength has a counter. Victory doesn’t come from exploiting broken rules, but from building the right combinations and adapting to the evolving meta.
Proposition
At its core, Damocles is designed to deliver cinematic battles. Epic duels, decisive charges, and sudden reversals shape every game, supported by rules that balance immersion and realism with a pragmatic, fast-paced approach. There is multiple stories inside the same battle. Because the system is built to create constant tension: limited downtime, frequent turning points, and battles that naturally reach their conclusion when one side is truly overwhelmed.
The rules of Damocles are designed to be precise and unambiguous. Every effort has been made to minimize interpretation and eliminate grey areas that can lead to disputes or unfair advantages. And I'll keep working in that dirrection. More than just saving time, movement trays and terrain management bring clarity to the battlefield, keeping distances, line of sight, and orientation obvious at a glance. The system is built to provide clear, consistent outcomes that players can trust. When a decisive move happens, it is because it was earned, not because it was arguable. Victory should come from smart decisions, calculated risks, battlefield awarenes, and sometimes madness.
Every moment at the table is meant to matter. Whether you play small engagements or large-scale battles, the goal remains the same: to create intense, memorable experiences where strategy and narrative unfold together.
How to Start
How to Start
Playing over Reading
Damocles is a deep game, but getting started is simple.
The best way to start is not by reading the entire rulebook, but by playing. Begin with the Initiation, try the tutorial, and learn through action. Whenever a question comes up, simply jump to the relevant sectionm the rules are structured for quick access, so you can find precise answers in just a few clicks.
Layer-by-layer learning
To guide your progression, the rules are organized in layers:
| Core rules are all you need to start playing. They cover the most common situations and allow you to enjoy your first battles immediately. | |
| Situational rules handle more specific cases. You’ll naturally discover them as new situations arise during your games. | |
| Advanced rules add depth, immersion, and realism. They are best introduced after a few games, once you are comfortable with the system. | |
| Expert rules are optional and more complex. Designed to enrich the experience further without being required. |
When building your army, start small. Play on smaller tables with simple units and limited special rules. This allows you to focus on the core mechanics and understand how units interact. As you gain experience, you can progressively introduce more complex units, abilities, and combinations.
You can enjoy the game at every stage. Each layer simply adds more depth and possibilities. Damocles is designed so that rules make sense together. You don’t need to memorize everything, you grow into it. And once you understand the system, you can move from one setting to another without starting over.
It’s best to learn with someone. A friend, another player, someone to share the experience with. After all, this game was born from campaigns between friends that continued until morning. The first games may take a bit of time to get used to the system, but once it clicks, everything becomes very natural.
Play with what you have
You don’t need a new army to start. In fact, Damocles is built to work with proxies. If you already play wargames, you probably have everything you need. Pick miniatures from your collection, build a small force, and start playing.
The game is designed to support multiple settings: fantasy, historical, and sci-fi. Some are already available, others are expanding, but the goal is simple, you can use what you already own. There will always be a way to match your miniatures to the system.
Free printable content
Free printable content
To make Damocles Wars as accessible and enjoyable as possible, a wide range of free resources is available to support your games.
You will find a growing collection of printable materials, including both 2D and 3D assets such as terrain, movement trays, tokens, and various gameplay accessories. These elements are designed to make setting up battles faster, clearer, and more immersive, whether you play casually or in a more competitive environment.
A large terrain library is already available, offering a variety of environments to fight in. Alongside this, the range of gameplay accessories will continue to expand over time. Movement trays, markers, tokens, and other practical tools used during development and playtesting will progressively be made available, allowing you to use the same systems and aids used to shape the game itself.
All these resources are provided to help you focus on what matters most: playing, experimenting, and enjoying the depth of the game.
Initiation
Our first battle
Our first battle
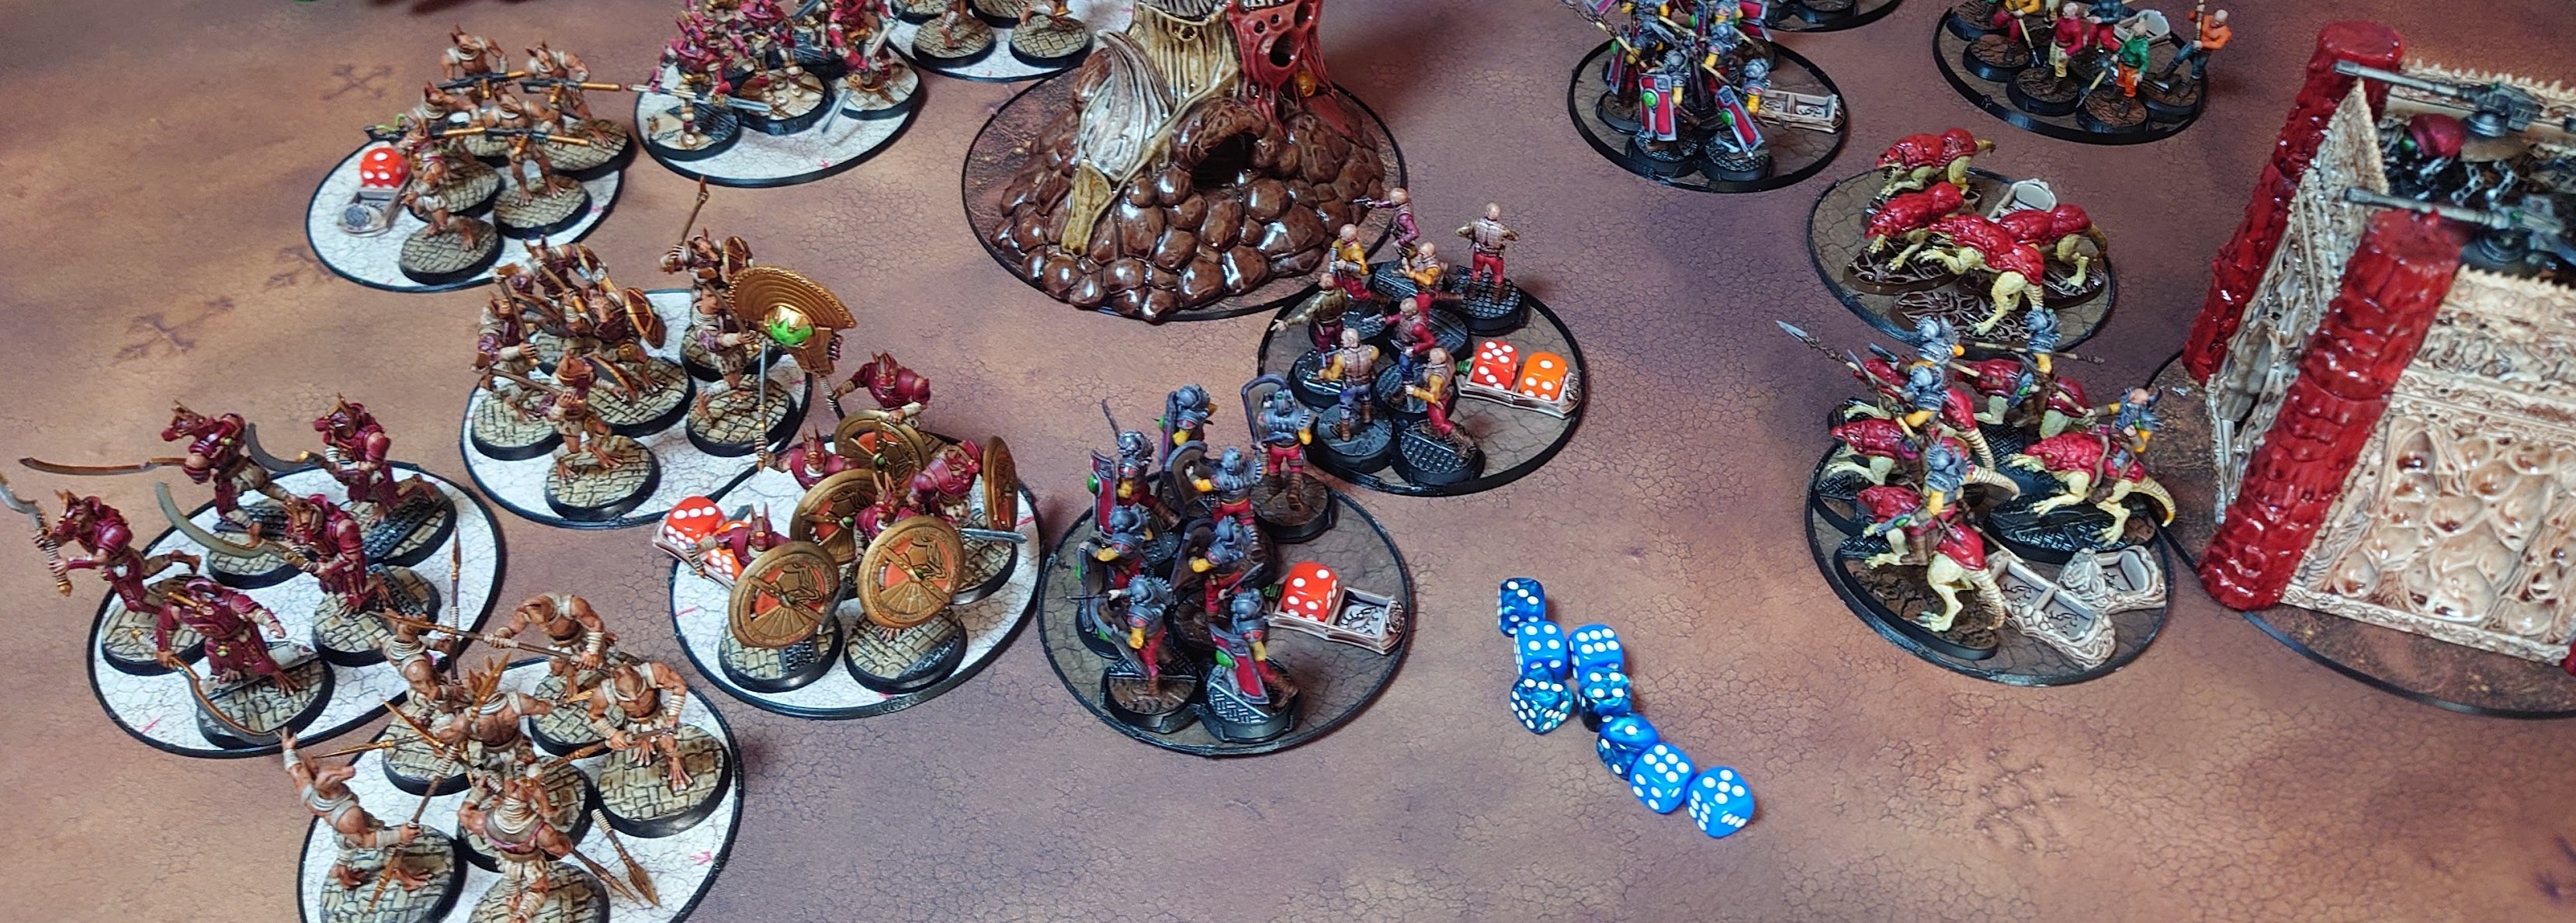
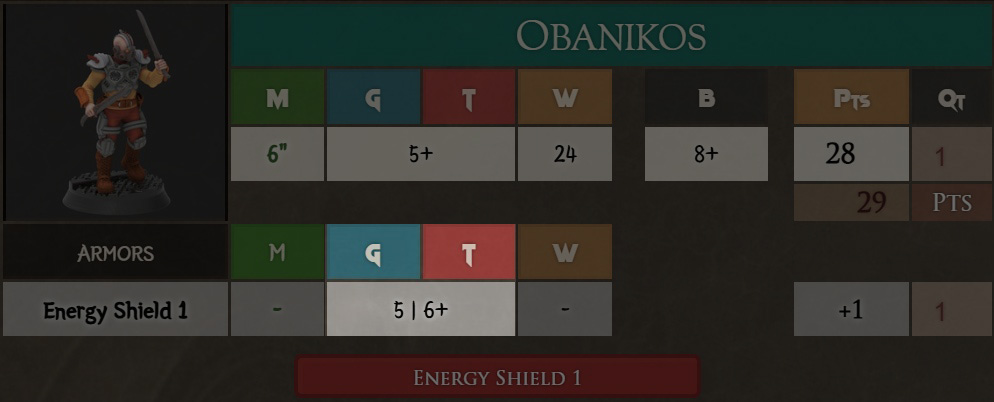
This training battle pits a squad of Apintas (player 1) against a squad of Obakinos (player 2). Two small forces meet in open terrain, testing their tactics before the real war begins.

Round 1
Movement Phase
The two units are 22" apart. Player 2 activates their Obakinos first and move their full movement (M) of 6" toward their ennemies. The Apintas respond immediately, moving forward 5". The distance between the two units is now reduced to 11".
Shooting Phase
The Apintas carry javelins, which have the Throwing Weapon rule. This allows them to add the distance they moved toward the target to their weapon range (Rg), enabling them to shoot from further away than expected.
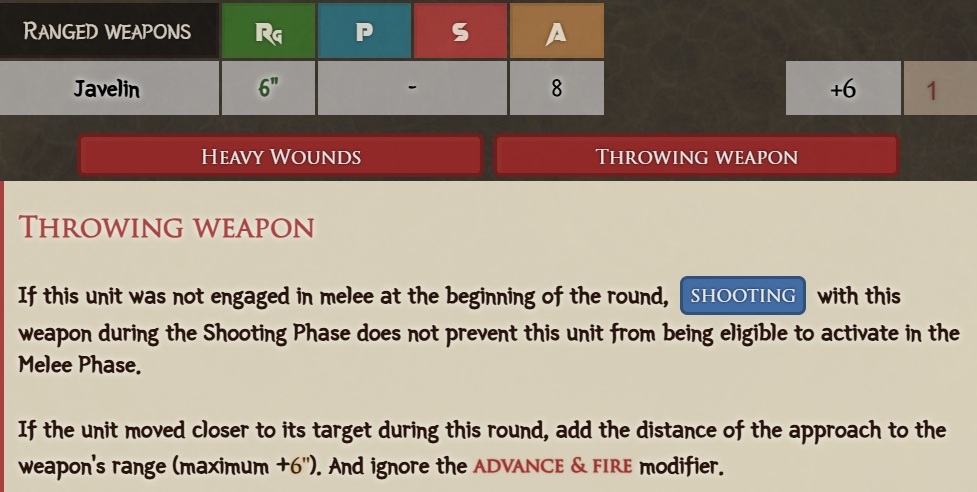
They decide to throw as they advance.

The Obakinos must choose between Dodge (G) or block the attack with their Toughness (T) to resist the attack. Their energy shields equiped make them more resilient against ranged attacks, giving them a T of 6+ instead of 5+ in melee.
Because the attackers are more than 6" away, the Obakinos gain a defense bonus of +1, bringing their total T to 7+.
The Apintas roll their 8 attacks. They must roll a 6 and then a 2+ to wound. Only one attack succeeds, inflicting 1 wound.
Round 2
Tactical Phase
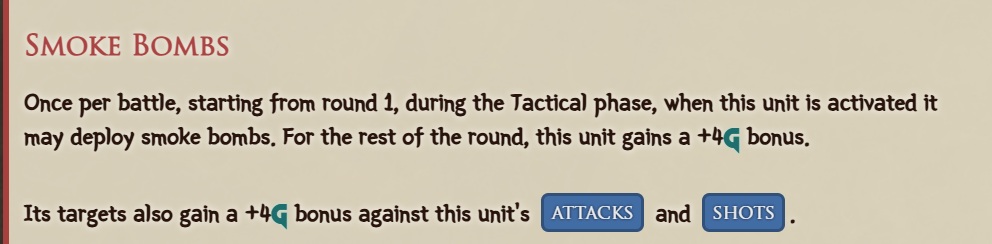
Sensing the incoming threat, Player 2 activates Smoke Bombs. A dense cloud spreads across the battlefield, granting the Obakinos a +4 defense bonus.
Movement Phase
This time, Player 1 takes the initiative. The Apintas move carefully by 2", trying to maintain pressure without overextending.
Player 2 positions the Obakinos at 3", preparing for a decisive engagement.
Shooting Phase
The smoke heavily obscures the battlefield. The Obakinos now have an exceptional G of 9+. The Apintas attempt to throw their javelins, but the conditions are extremely unfavorable. They must roll a 6 followed by a 4+ to wound.
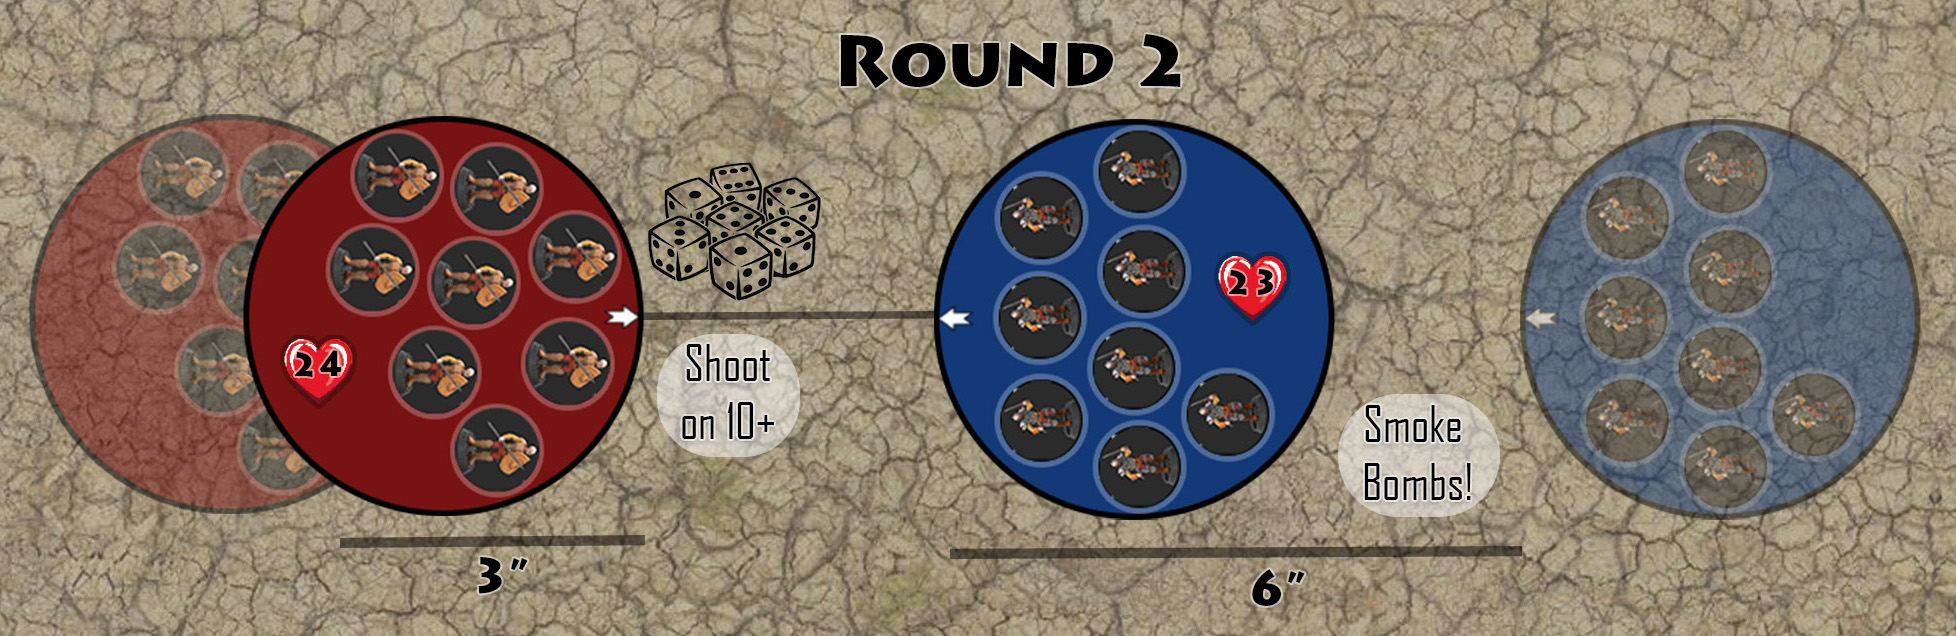
None of the attacks succeed.
Round 3
Movement Phase
The smoke begins to dissipate. Seizing the moment, the Obakinos launch a full charge, closing the distance rapidly.
Shooting Phase
Thanks to the special rule throwing weapon, and because the Apintas were not engaged in melee at the start of the turn, they are allowed to perform a final shot before the clash, while still being able to attack in melee after. They throw their last remaining javelins just moments before impact, then prepare their spears.
At a range of less than
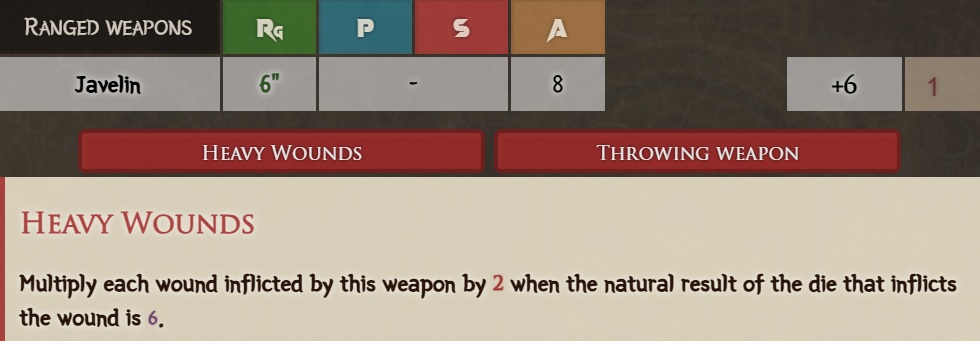
One javelin scores a perfect strike: a 6 followed by another 6. This triggers the Heavy Wound rule, which inflicts 2 wounds instead of 1 on an attack roll with a natural result of 6.
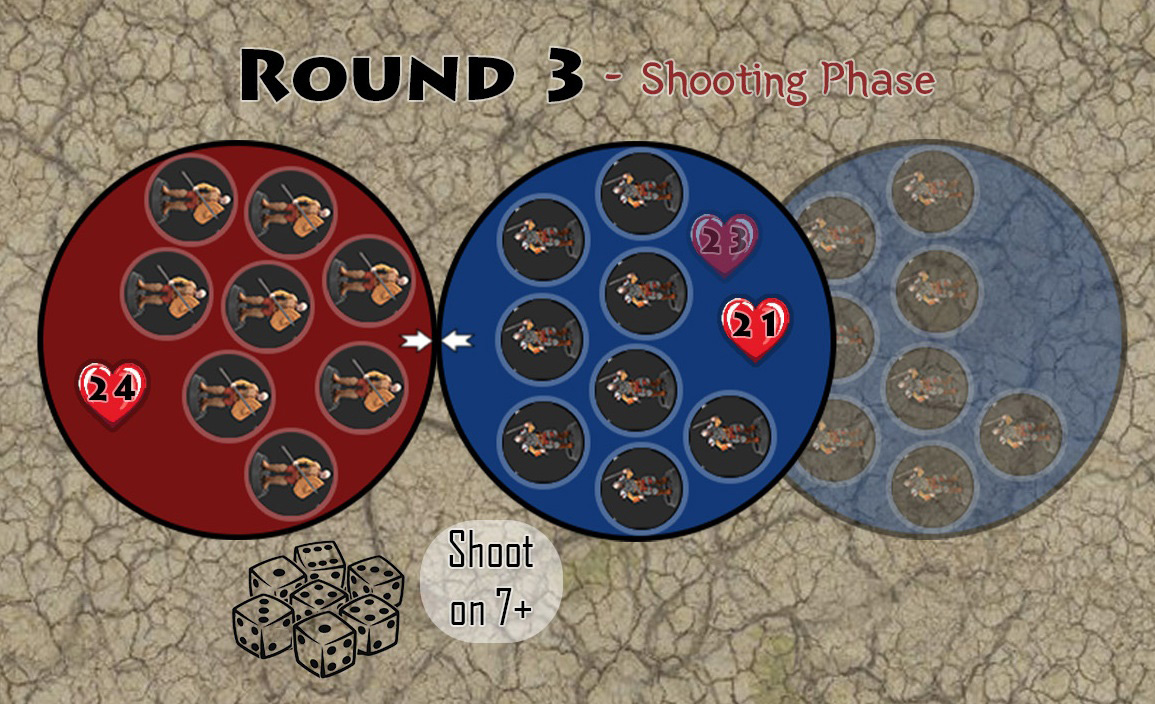
The Obakinos suffered a total of 3 wounds so far.
Melee Phase
The Apintas switch to their spears. With a Rank (Rk) of 1, they strike first.

The Obakinos have a melee defense of 5+. The Apintas' weapons apply a -1 modifier, reducing the required roll to 4+.
They inflict 4 wounds.
Despite losing more than a quarter of their Wounds (W), with a Bravery (B) of 8 the Obakinos hold their ground and do not flee. They retaliate with 12 attacks rolls. Their cleavers also apply a -1 modifier (to both G an T), meaning they wound the Apintas on 4+ too.
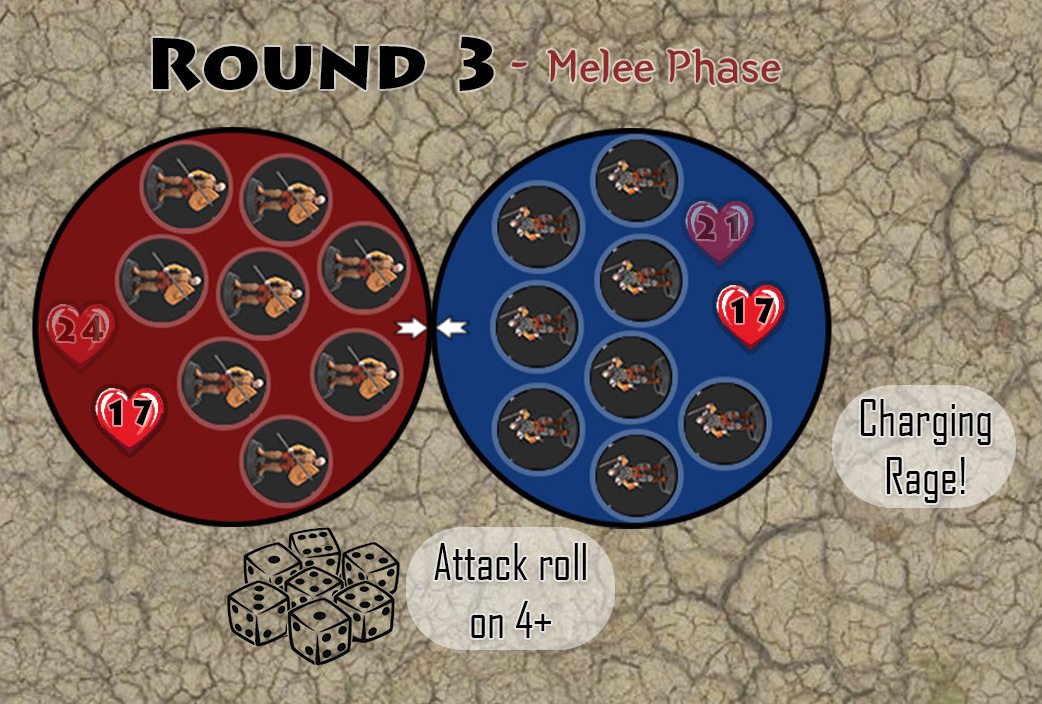
They succeed on 6 attacks rolls initially. And because they charged, they benefit from the Rage rule, allowing them to reroll failed attacks rolls when charging. This increases their total to 7 wounds inflicted.
Round 4
Melee Phase
The Apintas strike first again and inflict 4 wounds.
The Obakinos are reduced to 13W, just enough to avoid triggering a rout roll, allowing them to continue fighting at full efficiency.
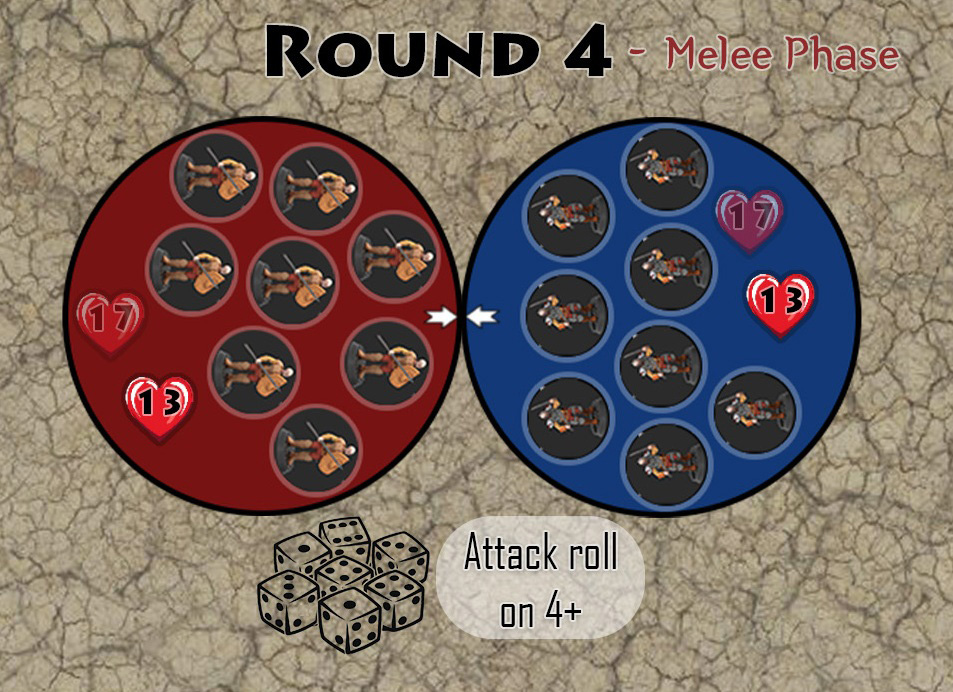
They counterattack and inflict 4 wounds on the Apintas, who are also reduced to 13W.
Round 5
Melee Phase
The Apintas press their attack and inflict 2 wounds. This is enough to trigger a rout roll on the Obakinos now below half of their starting W.
Player 1 rolls 2d6 and gets a total of 6, which is not sufficient to overcome the Obakinos' Bravery (B) of 8. The Obakinos stand firm.
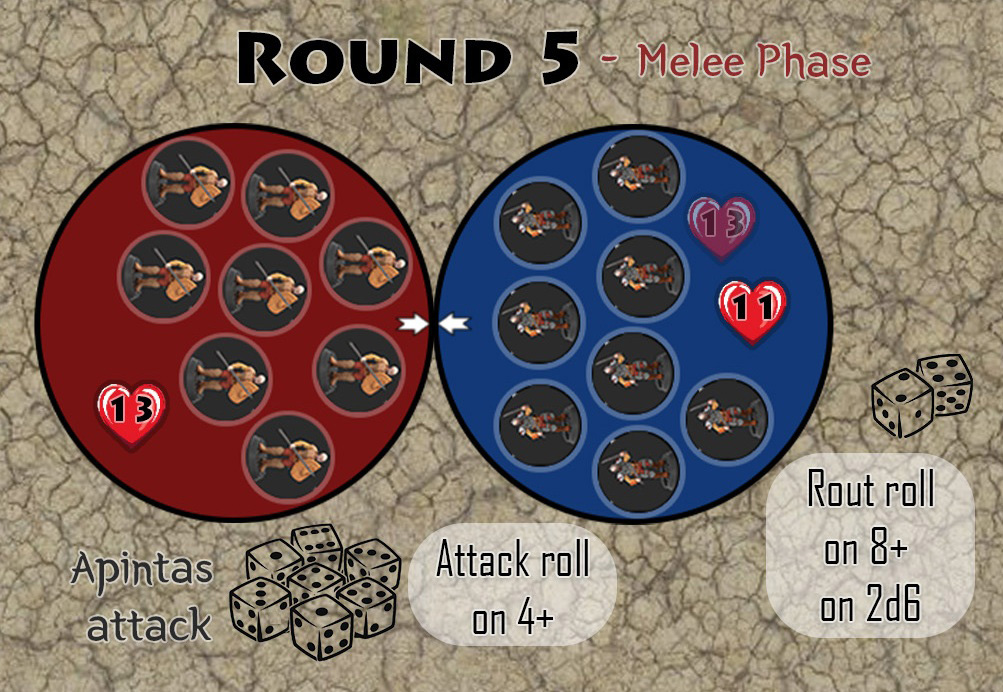
Now reduced to 11W, their offensive capacity is diminished, and their attacks (A) are halved.
They inflict 2 wounds in return, which triggers a rout roll for the Apintas now with 11W remaining.
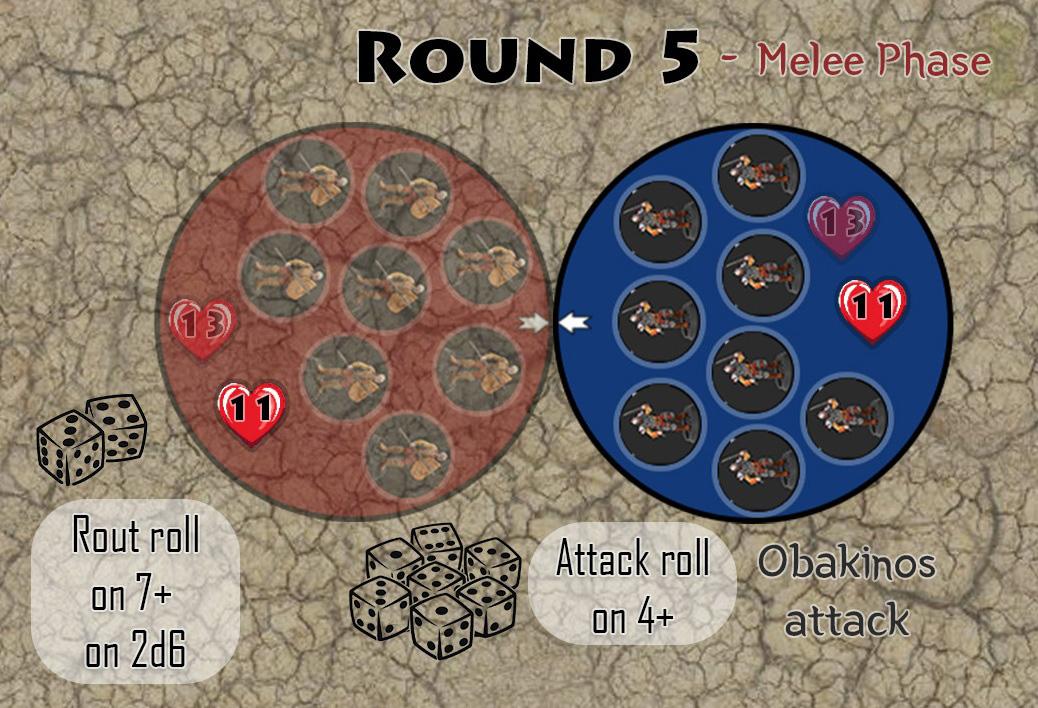
Player 2 rolls a 7 on 2d6, successfully breaking the Apintas with a B of 7. The unit is removed from play. The Obakinos hold the field after a brutal close-quarters fight.
Replay this confrontation at home to familiarize yourself with the combat system.
Dodge or Block System
Dodge or Block System
In Damocles Wars, a unit under attack does not simply endure it. Instead, the defender must decide how to resist. Let us start with a concrete example.
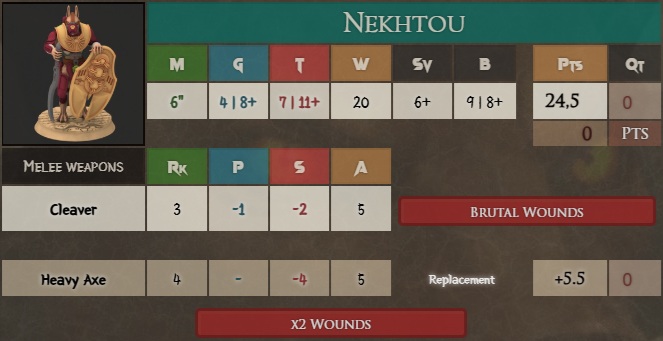
Two squads of Nekhtou are fighting in melee. One squad attacks with Cleavers, which apply a -1 modifier to G and a -2 modifier to T.
When resolving the attack, the defender must choose between two options. If they choose to Dodge, they use their G value. With the -1 modifier, their "Dodge" defense becomes 3+. If they choose to Block, they use their T value. With the -2 modifier, their "Block" defense becomes 5+. In this situation, the defender will choose to block the attack, and will lose a Wound (W) on each attack roll of 5+.
Now imagine the same unit is attacked with a Heavy Axe, which applies a much stronger penalty to T but no penalty to G. In this case, trying to absorb the blow becomes too dangerous: 7-4 = 3+. The defender will instead prefer to dodge, relying on agility rather than resilience, and will lose a Wound (W) on each attack roll of 4+.
This is the core idea of the system: before each attack is resolved, the defender chooses whether to avoid the hit or to withstand it. This replaces the traditional hit roll and wound roll sequence found in many other wargames. Here, the defender actively chooses the best way to survive.
As a result, different weapons excel against different types of targets. Weapons with high Precision (P) are more effective against agile units, while weapons with high Strength (S) are better at breaking through heavily resistant targets.
This creates two distinct forms of survivability. Some units rely on agility and are difficult to hit, while others rely on resilience and can absorb powerful blows. And others are balanced, more versatile but more expensive too.
Characteristics
Profil
Profil
M - Movement
The number of inches the model can normally move in one turn.
G - Dodge
The minimum roll required to hit the model, both in shooting and hand-to-hand combat.
T - Toughness
The minimum roll required to break the defense of the model, both in shooting and hand-to-hand combat.
W - Wound
The number of times a model can be wounded before being removed from the table.
B - Bravery
The minimum roll required to make the model flee, and remove it from the table.
Weapons
Weapons
Rg - Range
The range in inches of ranged weapons.
Rk - Rank
The attack order of melee weapons.
P - Precision
The bonus to add to hit rolls. This increases the chances of injuring a target that attempts to dodge the attack.
S - Strength
The bonus to add to wound rolls. This increases the chances of injuring a target that attempts to block the attack.
A - Attacks
The number of d6 the model can roll to attempt to hit or wound its target. This value represents both the number of times the blows are struck and/or the total power of the attack.
Others values
Others values
Pts - Points
The cost of the model or the group, it reflects its quality.
Category
The category determines how soldiers interact with the terrain. Specific rules also apply to each category; for example, Infantrymen and Riders fight in formation.
Keywords
Basic rules corresponding to this type of soldier and interacting with the rulebook rules.
Special rules
Special rules which characterizes the soldier or his weaponry.
Rolls
Attack roll
Attack roll
Every clash of steel and every arrow loosed boils down to a simple truth: attack and defense are measured in moments of chance and skill. Whether striking true or piercing through flesh and armor, attack rolls decide the fate of warriors on the battlefield.When you target an enemy unit, start by choosing your weapon, then your opponent can choose to dodge or block. If the target dodges, roll 1 hit roll for each A of your weapon. If the target chooses to block, roll 1 wound roll for each A of your weapon.
Hit rolls and wound rolls are collectively referred to as attack rolls. When a modifier applies to attack rolls, it applies to both wound rolls and hit rolls.
For each successful attack roll, remove 1W from the target. When a group of the target or the entire target have no more W it is lost. Remove it from the battlefield.
Doomed Roll
An attack roll with a natural result of 1 always counts as a failure.
Hit roll
Roll 1D6 per attack. To hit a target, you must roll at least its G value. Add the P value of your weapon to the G value of the target. Other modifiers may apply, for example, if the target is far away or under cover.
| Hit roll |
|---|
| 1D6 ≥ G + P |
| -1W |
Wound roll
Roll 1D6 per attack. To wound a target, you must roll at least its T value. Add the S value of your weapon to the T value of the target. Other modifiers may apply, for example, if the target is far away or under cover.
| Wound roll |
|---|
| 1D6 ≥ T + S |
| -1W |
Defense Modifiers
In certain situations, the target's defense can be improved or reduced. For example, an attack from behind will be both more penetrating and more accurate, while a long-range shot will be both less powerful and less accurate.
When a rule reduces the target's defense by -X, it decreases its G and T by X, for that attack roll.
When a rule improves the target's defense by +X, it increases its G and T by X, for that attack roll.
Double Value
Protection Against Shooting
Some soldiers have two values for G or T. In this case, use the first value when the attacker is less than 1" away (or attacking in melee) and the second value when the attacker is more than 1".
Impact Bonus
Some soldiers have two values for S. In this case, use the second value if they are charging and the first value if they are not charging.
Merged Value
Balanced Defense
If a soldier has the same G and T values, their defense will be displayed as a single value to simplify their profile. The soldier can still choose to dodge or block attacks.
Balanced Weapon
If a weapon has the same P and S values, it will be displayed as a single value to simplify its profile. The weapon does indeed have a P value and an S value; they are simply identical.
Wound multiplier
If several rules allow for the multiplication of the wounds inflicted, the multiplications are combined.
If other rules allow you to increase the number of wounds inflicted, apply them after any multiplication. Excess wounds inflicted after multiplications are not multiplied.
Applying Modifiers and Responsibilities, fluidity
This system also defines a clear responsibility for each player: The attacker must identify and apply all modifiers that reduce the defender’s values, such as Precision (P), Strength (S), and any situational effects that weaken Dodge (G) or Toughness (T).
The defender, on the other hand, must apply all bonuses that improve their defense, such as range advantages, cover, or special rules that increase G or T. In other words, the attacker brings the penalties, and the defender brings the protection. Once the dice have been rolled and the wounds have been resolved, the result stands. If a rule was forgotten by either player, it is not applied retroactively.
Improved roll
Improved roll
Even the mightiest foes cannot be felled by ordinary strikes alone. When raw strength and precision push beyond the limits of chance, warriors may call upon an improved roll to pierce the unyielding defenses of their enemies.Sometimes, a simple dice roll will not allow you to wound your target because the required result with modifiers will be higher than 6+. For example, 7+ or 8+. In this case, you can attempt to improve your roll by rolling the dice once first. Then, for the attack roll, only roll the dice that rolled a natural 6 on the initial roll and add +5 to their result.
Improved Roll Table
| Initial Roll |
|---|
| 1D6 = 6 |
| Final Result |
| 5 + 1D6 |
Control roll
Control roll
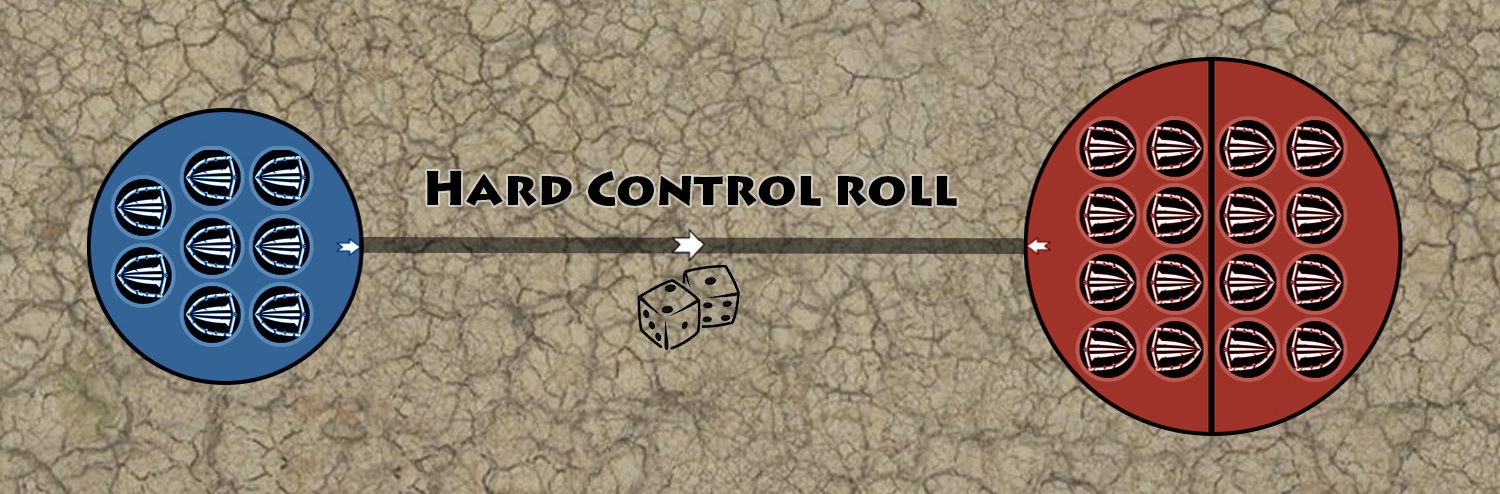
Discipline and composure are often the thin line between order and collapse. A control roll represents the soldiers’ ability to hold their ground, follow orders, or muster the courage to act when chaos threatens to overwhelm them.Roll 1 to 5D6 for the unit concerned. If you get less than its B value, it can react or achieve the action it was trying to do.
When a rule affects Control Rolls, it also affects Hard Control Rolls.
Control Roll Table
| W | Condition | Control Roll | Hard Control Roll |
|---|---|---|---|
| 76 - 100% | Stable | 1D6 < B | 2D6 < B |
| 51 - 75% | Shaken | 2D6 < B | 3D6 < B |
| 26 - 50% | Destabilized | 3D6 < B | 4D6 < B |
| 0 - 25% | Destroyed | 4D6 < B | 5D6 < B |
Rout roll
Rout roll
Even the bravest warriors can break when the tide of battle turns against them. A rout roll reflects the moment when fear, exhaustion, and mounting losses overwhelm discipline, forcing soldiers to abandon the fight.Roll 1 to 3D6 for the unit concerned. If the result is equal to or greater than its B value, it flees. Remove it from the battlefield. The number of D6 rolled depends on the proportion of W lost by the squad.
Rout Roll Table
| W | Condition | Rout Roll |
|---|---|---|
| 76 - 100% | Stable | 1D6 ≥ B |
| 51 - 75% | Shaken | 1D6 ≥ B |
| 26 - 50% | Destabilized | 2D6 ≥ B |
| 0 - 25% | Destroyed | 3D6 ≥ B |
If the natural result of each of your rolled dice is 1, this roll is always a failure.
Double Value
Some soldiers have two values for B. In this case, use the first value when they suffer a rout roll and the second value when they have to pass a control roll.
Psychological Effects on Attacks
The clash of steel is one thing—but when the enemy strikes with overwhelming cruelty or unnatural dread, the soldiers’ hearts falter before their blades do. This fear does not always come from every foe, but when it does, it leaves scars deeper than wounds.Some enemies possess rules that reduce the B of their attack's targets or otherwise affect Rout Rolls. Only apply the penalties and modifiers inflicted by the unit that caused the most wounds to the target during this round.
Timing
Rout rolls are performed sequentially. For example, a unit that suddenly loses 80% of its W must roll a first rout roll with 1d6, then a second with 2d6, and then a third with 3d6.
The effects of each rout roll are resolved immediately afterward. For instance, if a special rule allows ignoring the result of a failed rout roll, it applies immediately but does not prevent subsequent rout rolls from being performed.
Applying Modifiers and Responsibilities, Rout Rolls
This system also assigns clear responsibility during Rout Rolls. The player causing the Rout Roll must identify and apply all effects that make the test easier to succeed: penalties to the target’s B, rules that increase the number of dice rolled, rerolls, or any special effects that improve the chances of forcing the enemy to flee.
The player taking the Rout Roll must apply all effects that strengthen their bravery and cohesion: bonuses to B, rules that cancel enemy penalties, reduce the number of dice rolled, allow rerolls, or ignore successful rout roll.
In short, the attacker brings panic, and the defender brings resolve. Once the Rout Roll has been made and its effects resolved, the result stands. If either player forgot a rule, it is not applied retroactively.
Panic roll
Panic roll
When terror spreads across the battlefield, even the strongest lines can collapse. A panic roll represents the breaking point of an entire army, when morale shatters and soldiers abandon the fight en masse.A panic roll affects all your units. If you fail, your entire army flees and the battle ends. Roll 1D6 and add your VP. If you get a natural 1 or less than your opponent’s VP, you fail.
Panic rolls can be improved like attack rolls.
Panic Roll
| Condition | Result |
|---|---|
| 1D6 = 1 | Defeat |
| 1D6 + VP < opponent’s VP | Defeat |
Superiority roll [X]
Superiority roll [X]
A superiority roll represents a direct contest of skill, strength, or will between opposing forces. It determines which side gains the upper hand when two units face each other in a decisive clash.Roll 1D6 for your unit, and your opponent rolls 1D6 for all his units concerned. Add the value of the characteristic X taken into account. Your opponent can choose, among those concerned, the unit whose value is used. The player with the highest result wins the superiority roll.
Superiority roll
| Condition | Result |
|---|---|
| 1D6 + X > opponent’s X + 1D6 | Success |
Save roll
Save roll
Some soldiers benefit from advanced technologies, mystical protection, a unique fighting style, or a favorable destiny.If your soldiers have a save: Sv, each time they suffer a successful attack roll, or a critical damage roll they can attempt to negate it by succeeding on the following roll on 1D6. Multiple special rules and bonuses can provide Sv points, which are cumulative.
Save Calculation
When a model benefits from multiple sources of Sv, sum up all sources of Sv and refer to the Save Roll Table below to determine the required dice rolls.
A unit’s Sv can never exceed 9. Any bonuses that would increase Sv beyond 9 are ignored. If a rule reduces Sv while another improves it, first apply the bonuses up to the maximum of 9, then apply the reduction.
Save Roll Table
| Sv | 1st Save | 2nd Save |
|---|---|---|
| 1 | 6+ | |
| 2 | 5+ | |
| 3 | 5+ | 6+ |
| 4 | 4+ | |
| 5 | 4+ | 6+ |
| 6 | 3+ | |
| 7 | 3+ | 6+ |
| 8 | 3+ | 5+ |
| 9 | 2+ |
Timing & large wounds
When an attack can potentially inflict multiple wounds, if the target has a save roll, the defender can choose to use it before or after the wounds are multiplied.
For example, if an attack inflicts 1d6 wounds, the target can roll a save roll to negate the entire attack, or roll as many save rolls as the final number of wounds inflicted. In this case, the decision must be made before the total number of wounds inflicted is determined.
Exceptional saves
If a rule grants a save roll without adding Sv, roll this save roll separately after any normal save rolls.
Critical damage roll
Critical damage roll
The shortest path is not always the easiest. Engaged on perilous ground, your soldiers risk finding death without their enemies having to give it to them.Roll 1D6. If you get a 1:
If the unit has only one model, remove it from the game.
If the unit has multiple models, remove the remaining W to kill one model.
Critical Damage Roll
| 1D6 = 1 | Effect |
|---|---|
| Individual model | Remove it from the game |
| Squad | Remove the remaining W to kill one model |
Trophy
Only the deadliest blow leaves a lasting mark. This rule ensures that only the unit dealing the most damage can affect the target’s Critical Damage rolls.Some enemies possess rules that inflict more Critical Damage rolls of their attack's targets or otherwise affect Critical Damage rolls. Only apply the penalties and modifiers inflicted by the unit that caused the most wounds to the target during this round.
Skill Roll X+
Skill Roll X+
The din of the battlefield sometimes drowns out the words of the greatest leaders.Roll 1D6. If you get X or more, the skill can be activated. In case of failure, the skill cannot be activated.
Skill rolls can be improved like attack rolls.
Skill Roll
| Condition | Result |
|---|---|
| 1D6+ ≥ X | Skill Activated |
Arrival Roll
Arrival Roll
Not all reinforcements arrive on cue—dust, confusion, or sheer chaos may delay their entry into battle. Commanders must gamble on when and how their troops appear.By default, each time an unit is deployed during the Tactical Phase through a delayed deployment, the controlling player must first deploy the unit and then roll 1d6:
| Roll | Effect |
|---|---|
| 0-1 | The unit is delayed and cannot be deployed this round. Remove it from the battlefield and place it back in reserve. |
| 3-4 | The unit is deployed normally but cannot be activated during the Movement or Shooting phases of this round. It may still react as normal. |
| 5+ | The unit is deployed and may be activated normally during this round. |
Units
Squads
Squads
Squads form the backbone of every army. Their strength lies in discipline and cohesion, but as losses mount, their resolve is tested and they may be forced to regroup under fire.Groups
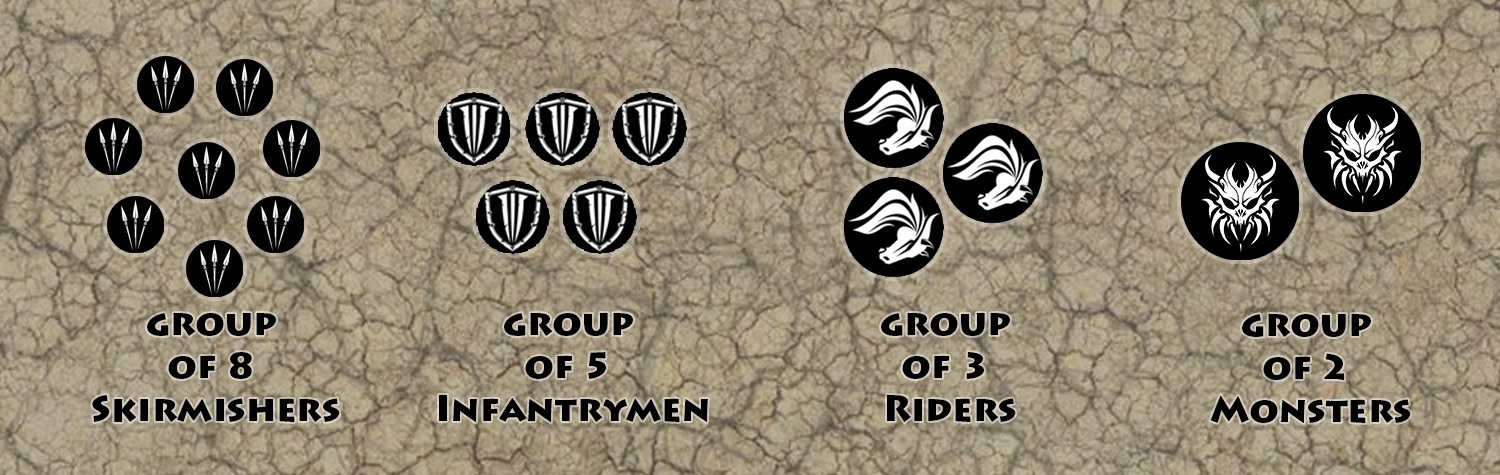
The groups consist of 2 to 10 models. The composition is in the profile. Unless otherwise specified, members of a group share the same profile and the same options.
Squad's Composition
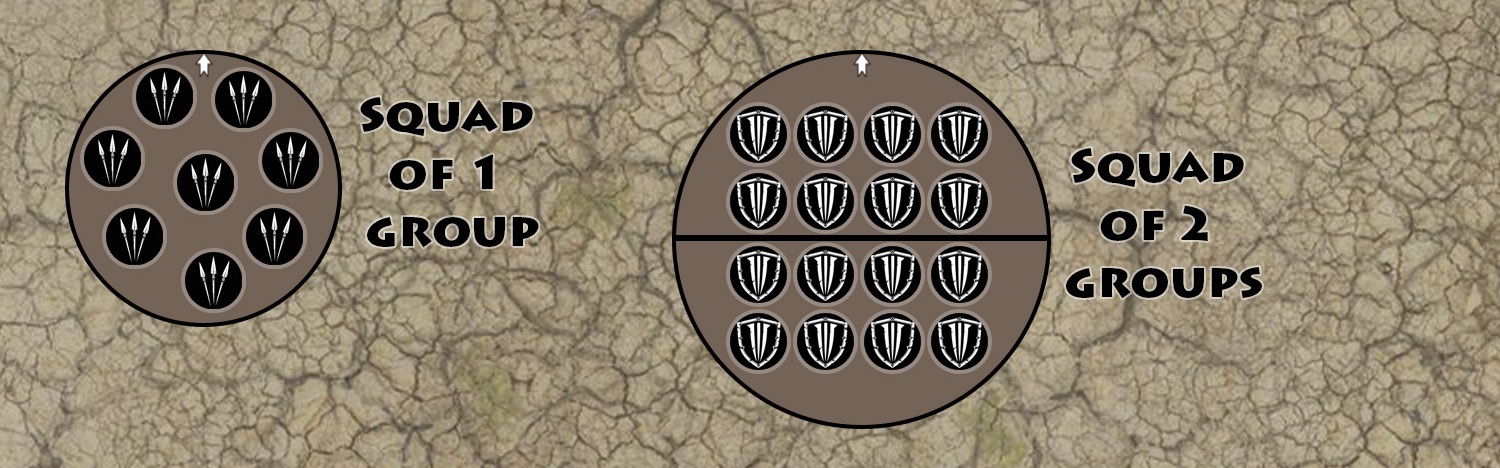
Unless otherwise specified, squads consist of 1 to 2 groups of soldiers with the same profile and options. Declare your squads before deployment begins.
Cohesion
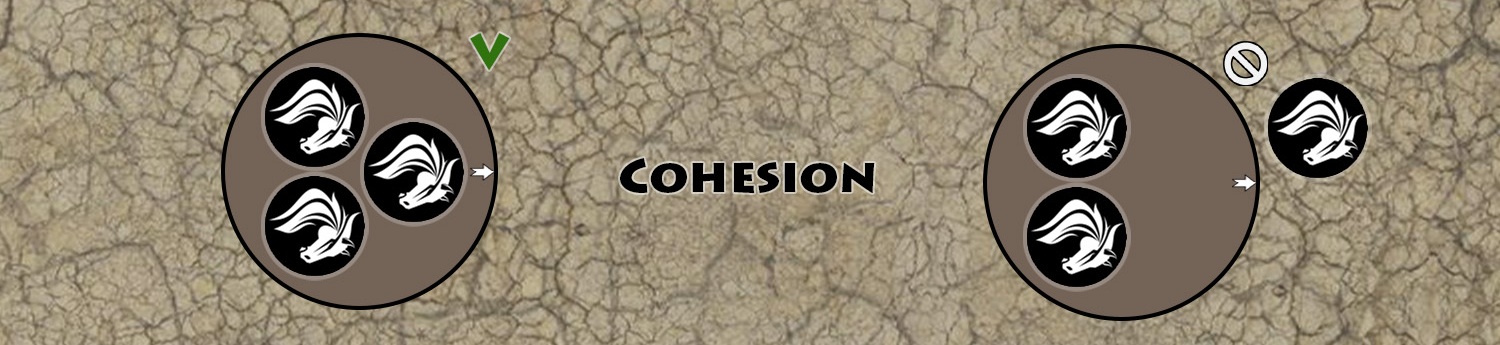
The base of each model in the squad must be within the base of the squad.
Losses
Record with a wound tracker the number of W suffered by your squad. The effectiveness of your squad will decrease based on the losses it has suffered.
If the W (Wounds) drop to 0 or less, remove it as a loss.
Reform
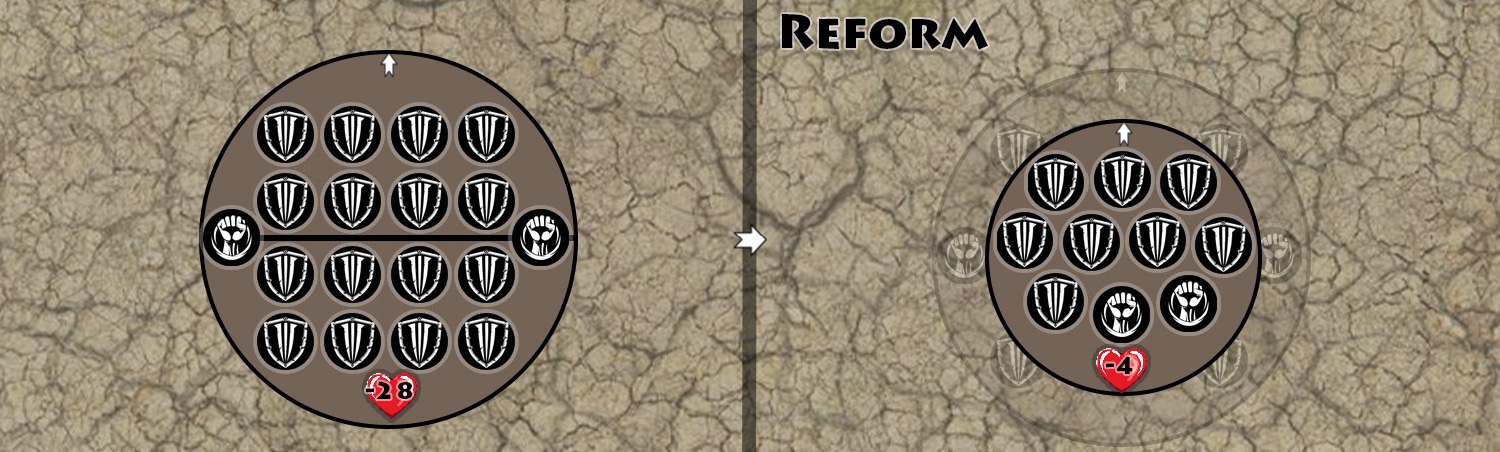
During a Tactical phase, a squad of 2 groups that has lost at least half of its W and is not within 1’’ of any enemy unit may reform into a single squad of 1 group.
When reforming, the max W and the condition of the squad is reset, but it must make Rout Rolls again if it suffers further degradation.
If the squad originally included 2 characters, both may remain in the newly reformed squad.
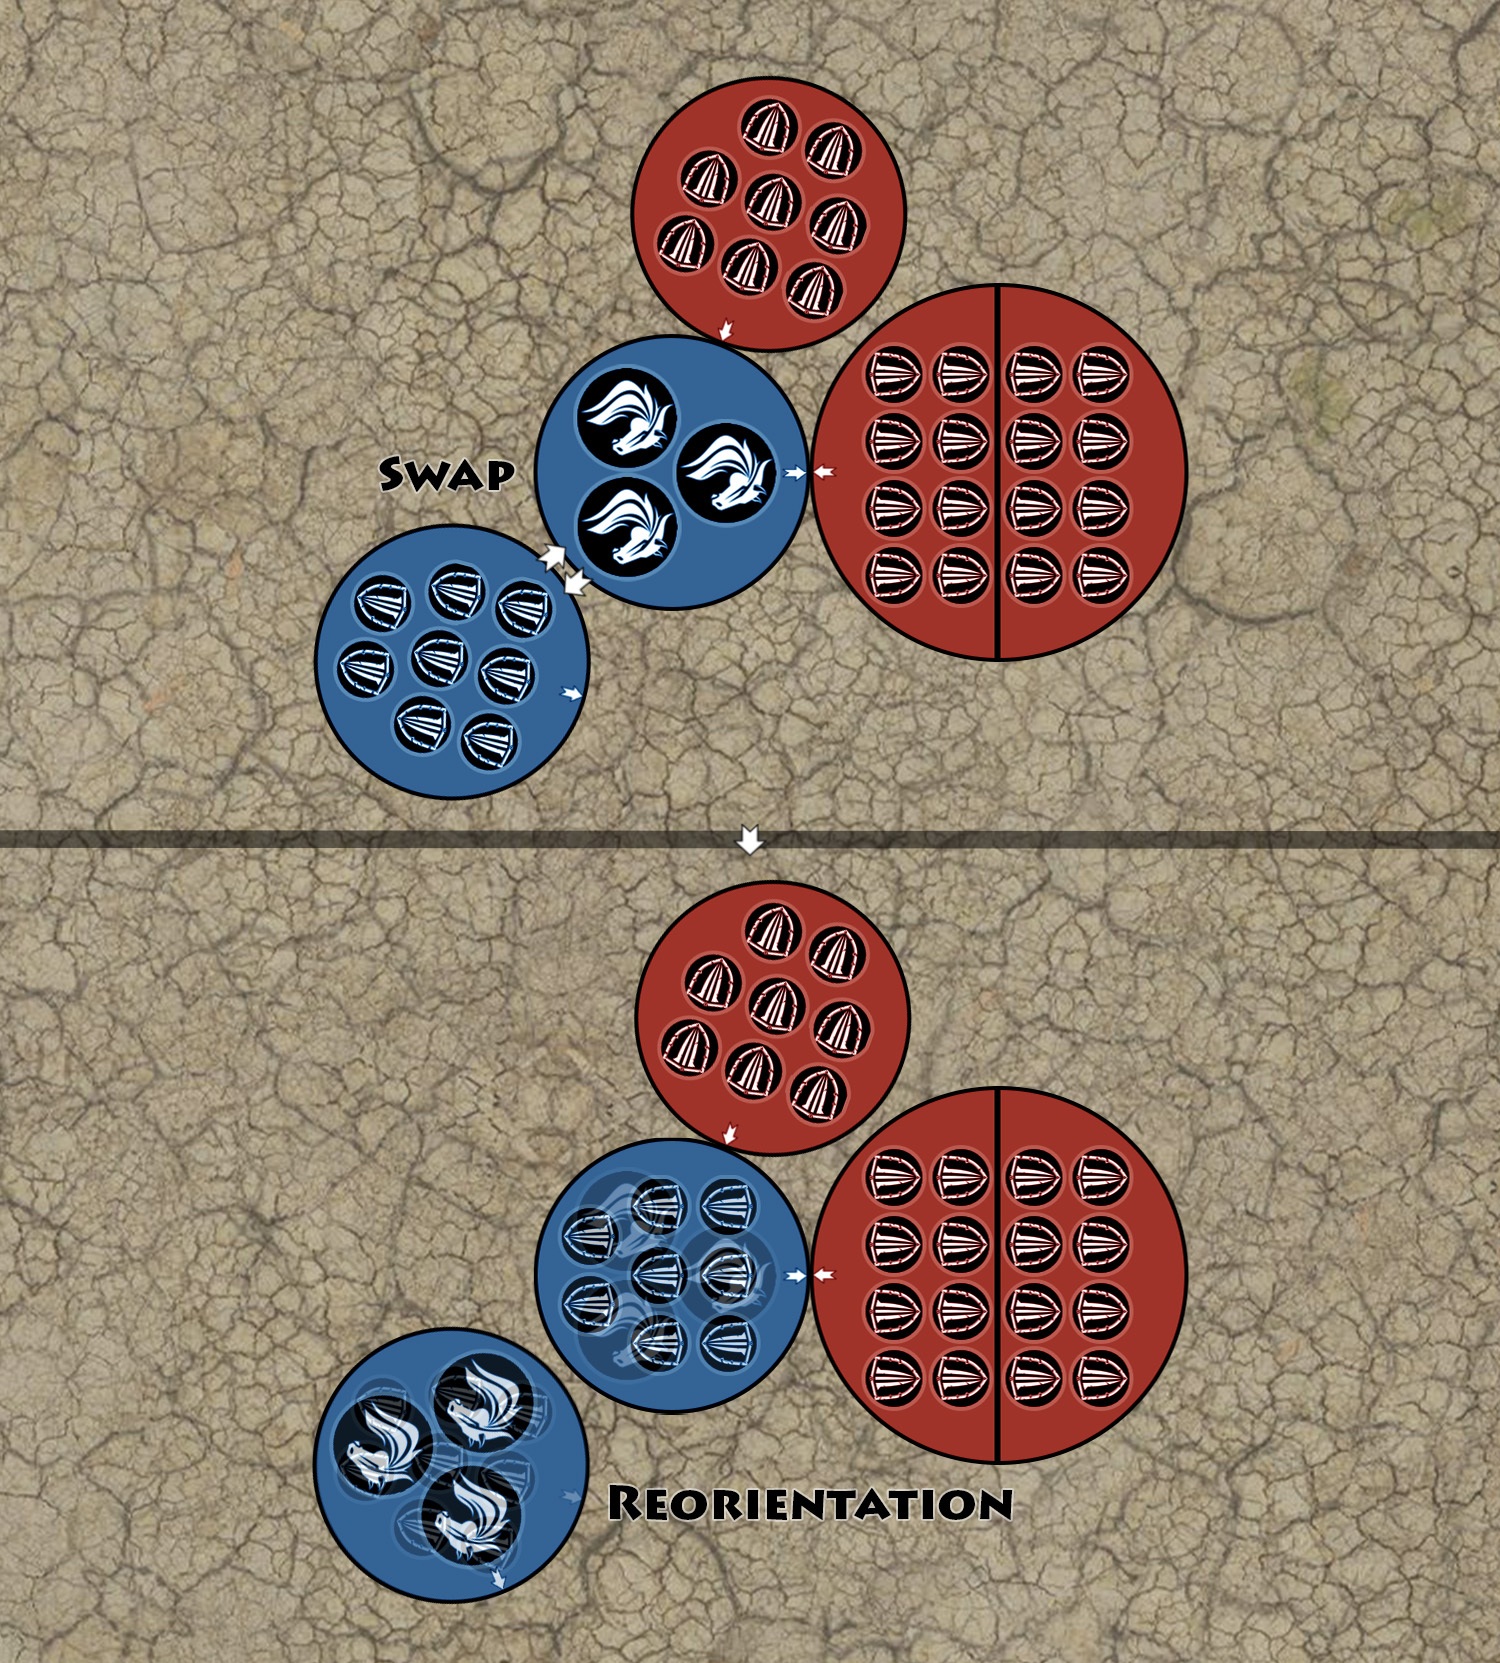
Split
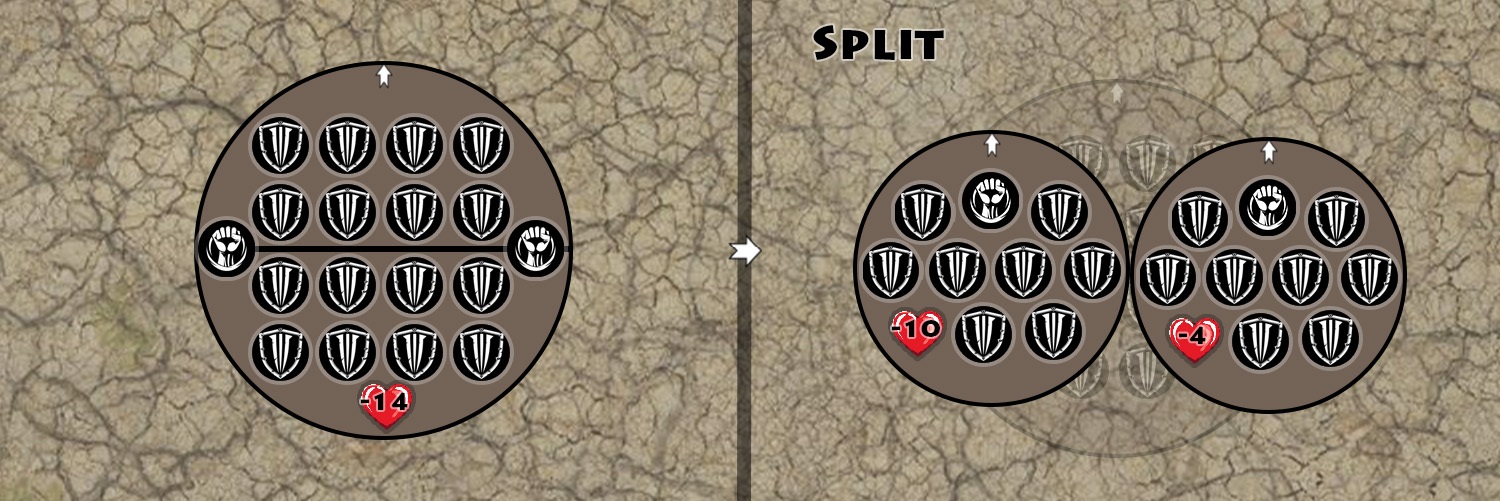
During a Tactical phase, a squad of 2 groups may be split into two separate squads of 1 group each, provided that no enemy unit is within 1’’ of it. Each new squad must be placed in contact with the center of the original large squad. And freely reoriented.
The controlling player may freely distribute existing W and characters between the two new squads (1 characters max by squad). The max W and the condition of each squad is reset, but it must make Rout Rolls again if it suffers further degradation.
If, after the squad splits, one of the two new squads has a lower condition than the original large squad, immediately resolve the corresponding Rout Rolls.
Each part of the split squad, now a new squad, must succeed on a Hard Control Roll to be able to Move or Charge during this round, and suffer a -3 M penalty.
Individual models
Individual models
Not every force fights in formation—some stand alone as towering engines of war or monstrous beasts, whose presence on the battlefield can turn the tide by themselves.Composition
Imposing miniatures, mainly monsters, vehicles, titans, are recruited and deployed individually.
Wounds
Individual miniatures usually have several W. Record with a wound tracker the number of wounds they have suffered. If the W drop to 0 or less, remove them as a loss.
Units
When a rule applies indiscriminately to squads and individual miniatures, it will group them together under the name: unit.
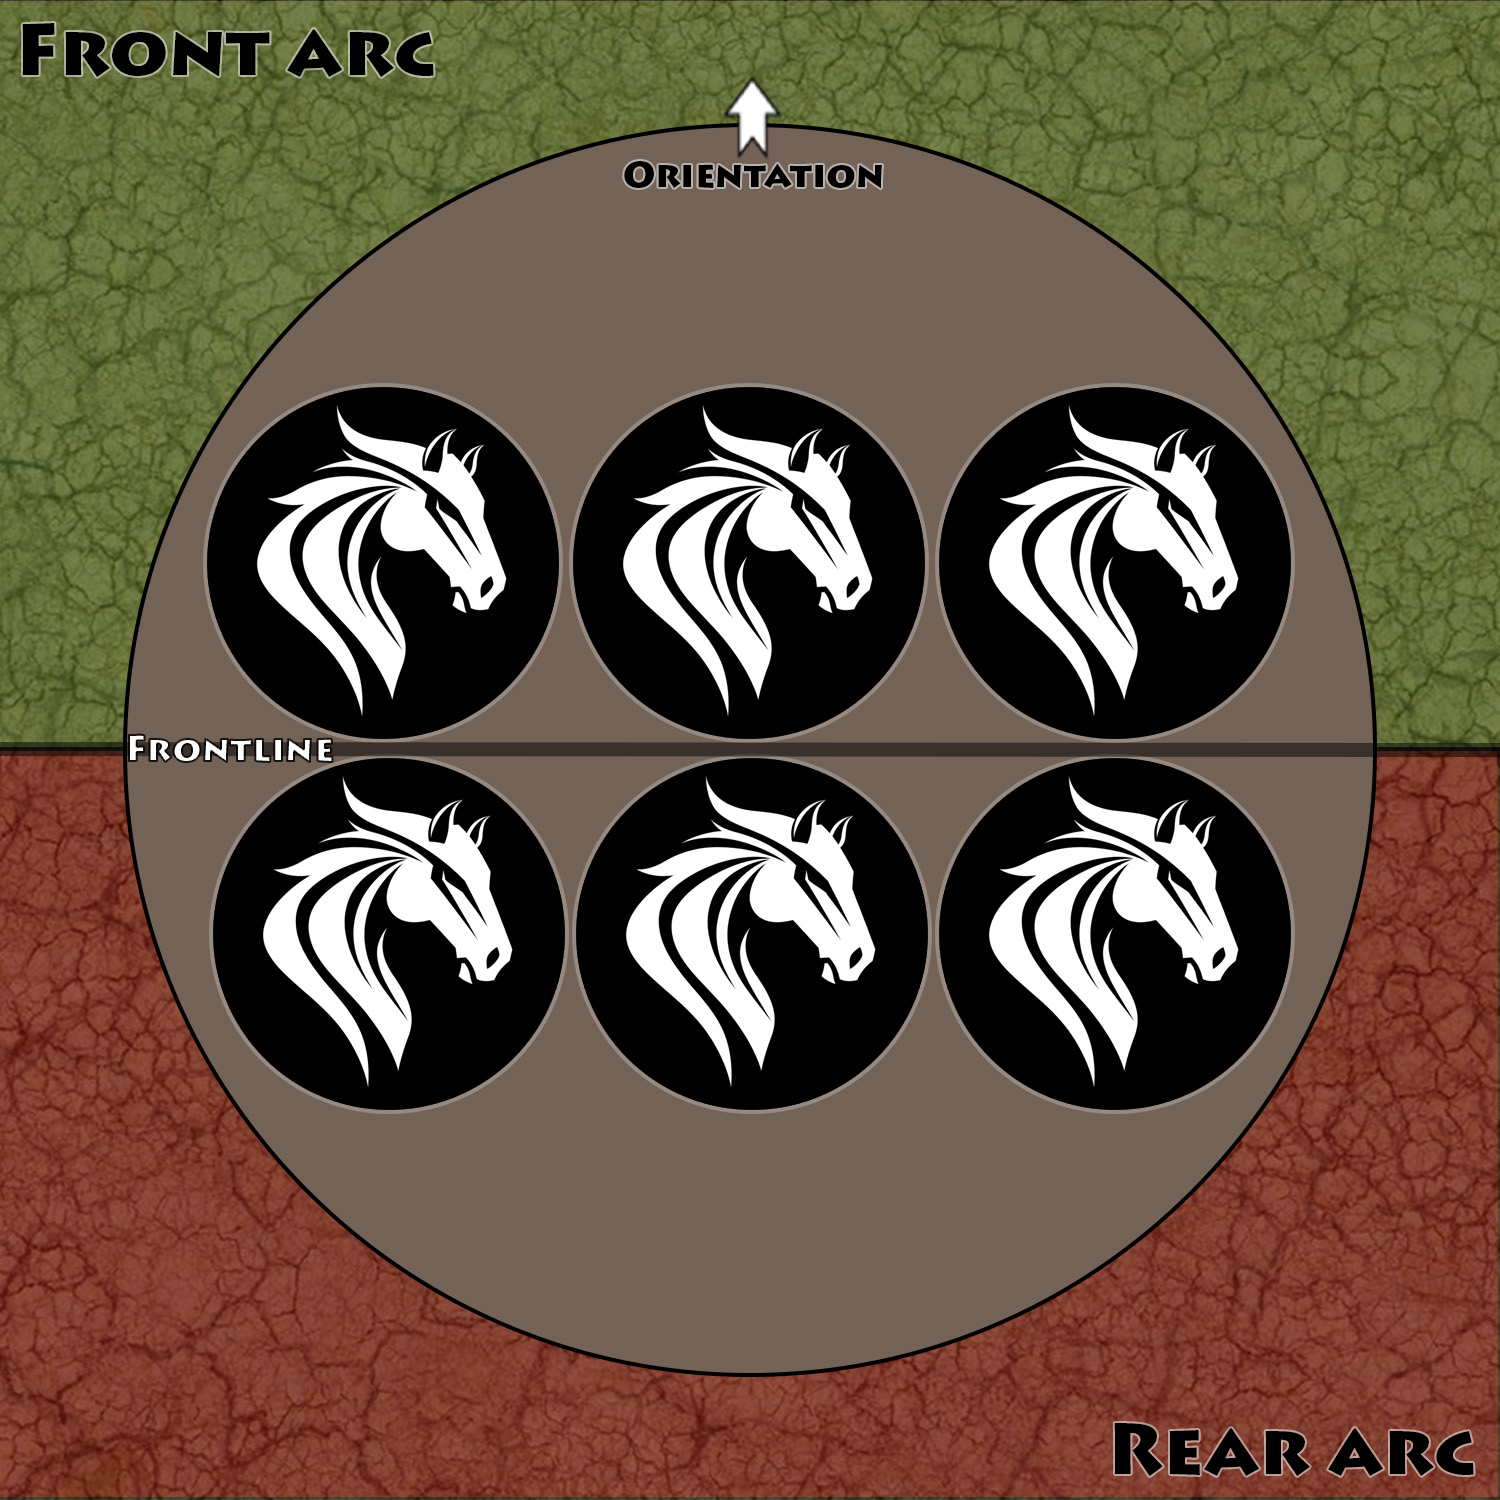
Orientation
Orientation
Even the most disciplined soldier does not watch all directions at once. Each unit has a front it faces, and a vulnerable rear that enemies may exploit.Units have a round or oval base, but this does not mean they lack orientation. Use a base marker to define the facing of the unit (especially when it is on a round base). The orientation of a unit is set at the moment of deployment and may be freely adjusted each time the unit performs a Move action.
Oval Bases
Oval bases must be oriented according to their longest dimension. For example, a 60x35mm base is considered to face along its length (60mm).
Front Line
The line perpendicular to the orientation that divides the unit’s base into two halves is called the front line. The front half is the front arc, and the rear half is the rear arc. Details will be provided in later rules, but as a general principle, units may interact with the battlefield area within their front, and not necessarily with what lies in their rear.
Visibility
Units may normally see and target only those enemy units located within their front.
Recruitment
Recruitment
Every army is built from distinct pieces—whether a lone hero, a squad of soldiers, or a monstrous creature. Recruitment isn’t just shopping—it’s mustering. You decide how many bodies you bring, then how they’ll fight once the drums start.Entity
An entity (a group of soldier or an individual model) is the basic instance you recruit into your army. When recruiting, choose how many entities of each you add to your army. The same entity can be taken multiple times.
Squads
An entity usually corresponds to 1 unit on the battlefield. But a squad can be constituted of 2 entities (2 goups) that together form a single unit. The way squads are organized is set during the deployement. You decide whether each squad is made of 1 or 2 groups, and which characters join which squads.
Restrictions
Some roster limits are enforced by the builder, but the rulebook takes precedence. If a coding gap exists, follow the printed restrictions; the army remains valid only if it complies with those rules.
Options
Option are bought per entity (model or group, depending on the unit). Unless stated otherwise if you have 6 entities and you want them all to benefit from a rule, you must purchase the option 6 times. Options are always applied at the entity level.
Equipment
For a given type, each entity may select only one option at a time (for example, a single entity cannot stack 2 melee options, 2 armor options, or 2 ranged options).
Two kinds of equipment options exist. By default: Additive options grant extra weapons/armor in addition to those already carried.
Replacement weapon options, and mount options replace all weapons of the chosen type (either all melee weapons or all ranged weapons), or your mount.
Special rules
A same entity may stack multiple different special rules options at the same time, with no limit unless a restriction is explicitly written.
Army
Army
An army is more than a gathering of warriors—it is an organized force bound by allegiance, led by figures whose command shapes the fate of the battlefield.Factions & Allegiance
An army can be composed of several factions; however, more than half of its power must belong to the same faction, called the main faction.
Characters
If your army is not made up solely of individual miniatures, it cannot have more Characters than squads.
Each faction, minor or main, must have at least 1 Character who is considered its general in chief. By default, the character with the Leader keyword and the highest cost in army points is chosen. The general in chief of the main faction is the general in chief of the army.
Game round
Initiative
Initiative
Every battle begins with the clash of wills—initiative decides who seizes the moment and strikes first. This rule is designed to balance the game flow. In the early turns, it prevents the player with a powerful “death star” unit from simply seizing the first activation and crippling a large portion of their opponent’s army before they can react. Later in the game, initiative shifts toward the player who is behind on victory points, offering a subtle comeback mechanic that keeps both players in contention until the very end.From round 0 to round 6, at the start of each round, the player who does not have the unit with the highest point cost in their army, gains initiative. In case of a tie, roll dice at the beginning of each turn to break the tie.
From round 7, at the start of each round, the player who has the least victory points: VP, gains initiative.
Key Terminology
First Player: The player who got the initiative at the start of the round. Active Player: The player who currently has the initiative. Active Unit: The unit chosen by the active player to be activated.
Round Phases
Round Phases
Every clash of arms is not a single blow but a rhythm of war. Each round unfolds in ordered phases—deployment, maneuver, fire, and steel—until the field itself yields its victor.Each round is divided into 6 phases: Tactical, Movement, Shooting, Melee, Consolidation and the Objective phase.
During each phase, players may activate all their eligible units. When activated, units can perform 1 action. Note that the First Player is also the Active Player at the start of each phase.
Once the round is complete, proceed to the next round.
Tactical Phase
Armies do not always arrive at once—reinforcements, ambushes, and sudden movements reshape the field as the battle unfolds.One by one, in turns, starting with the First Player, Players can activate the units that can use skills (special rules), be deployed from the reserve, declare changes (Formations) during this phase. If a player chooses to pass his turn, he cannot activate any more units during this phase. His opponent can activate all of his remaining units in any order he wish.
It is during this phase that troops are deployed from reserves or redeployed, that characters choose the bonuses they will grant to their soldiers, that units change formation and other such joys.
Launch an arrival roll for each unit that attempts to be deployed during the Tactical phase, even if it fails the player passes his turn.
Movement Phase
Armies surge forward, reposition, or hold the line—every step shapes the flow of battle. This phase ensures mobility is resolved clearly, with tokens marking those who have already moved.Starting from round 1, one by one, in turns, starting with the First Player, players activate the units that can move. To simplify the reading of the battlefield, you may place a “
If a player chooses to hold with one of their units, they cannot activate any more units during this phase. All of their remaining units are considered to have held. They can, however, react normally. Their opponent can activate all of their remaining units in any order they wish.
| Action | Description |
|---|---|
| Charge | Move up to M+2’’ to reach an enemy unit |
| Move | Move up to M’’ |
| Swap | Swap the positions of 2 adjacent squads |
| Hold | Don't move |
Shooting Phase
Arrows, bolts, and bullets darken the sky as warriors unleash their ranged fire. This phase balances offense and clarity, ensuring every shot is tracked without confusion.Round 0 represents the opening of the battle. During this round, units cannot move or charge, but may shoot or resolve pre-battle effects such as bombardments.
Starting from round 0, one by one, in turns, starting with the First Player, players activate the units that can shoot. All units equipped with a ranged weapon, with a possible target, are eligible. To simplify the reading of the battlefield, you may place an “
If a player chooses to hold with one of their units, they cannot activate any more units during this phase. All of their remaining units are considered to have held. They can, however, react normally. Their opponent can activate all of their remaining units in any order they wish.
| Action | Description |
|---|---|
| Shoot | Shooting attack |
| Hold | Hold fire |
Melee Phase
Steel clashes and warriors lock in desperate combat, where skill and timing decide who stands. This sequence resolves close fighting in strict order to keep the chaos of melee fair and fluid.All units within 1’’ and that are not "Exhausted", this mean that have not shot this turn may be eligible for this phase.
Starting with the First Player, in turns, the player with the initiative chooses a melee, meaning a group of units engaged with each other in close combat. All units in this melee attack in ascending order of Rk. Units with the same Rk attack simultaneously. When resolving attacks of the same Rk, players take turns assigning targets for their units, starting with the player who selected the melee.
Once all attacks of a given Rk have been resolved, roll any necessary rout rolls before moving on to the next Rk.
To simplify the reading of the battlefield, you may place an “
| Action | Description | Attack | Melee attack |
|---|
Consolidation Phase
Once all melees have been resolved, units that were once during this round, but are no longer engaged in combat because their opponents have been removed from play or moved away, may perform a consolidation move. Players activate their units alternately, starting with one unit of the First Player.
Objective Phase
When the dust settles, commanders look to the field—victories are measured not only in blood spilled, but in ground gained and resolve unbroken. This phase keeps score and forces the losing side to test their will.Starting from round 6, players calculate their respective Vp. And starting from round 7, the losing player must perform a panic roll if applicable.
Reaction
Reaction
Sometimes instinct prevails over orders—when under sudden attack, units may react instantly to strike back.When a Active Unit performs Shoot, or Charge, the target of the activation may choose to react provided it has not already been activated this round (or has only taken a Hold action).
To react, the target must be capable of performing the same type of action back at the Active Unit, at the begining of its activation, the reacting unit must first succeed at a control roll.
Initiative
The Active Player retains initiative after a reaction is resolved.
Opportunity Attack
Opportunity Attack
Foes don’t simply let their enemies slip past—when a gap opens, warriors lash out with a sudden strike.When an Active Unit moves or swap, one enemy unit within 1’’ of it may perform an opportunity attack. The unit may then make a normal melee attack against the Active Unit with a defense improved by +1.
The unit will still be able to shoot during the Shooting phase, or attack normally during the Melee phase.
The opportunity Attack is executed before the Active Unit starts its activation.
Initiative
The Active Player does not retains initiative after an opportunity Attack.
Movement
Hold
Hold
Sometimes the wisest move is none at all—holding ground, watching, waiting for the right moment to strike.The unit does nothing. You can hand over to your opponent.
Move
Move
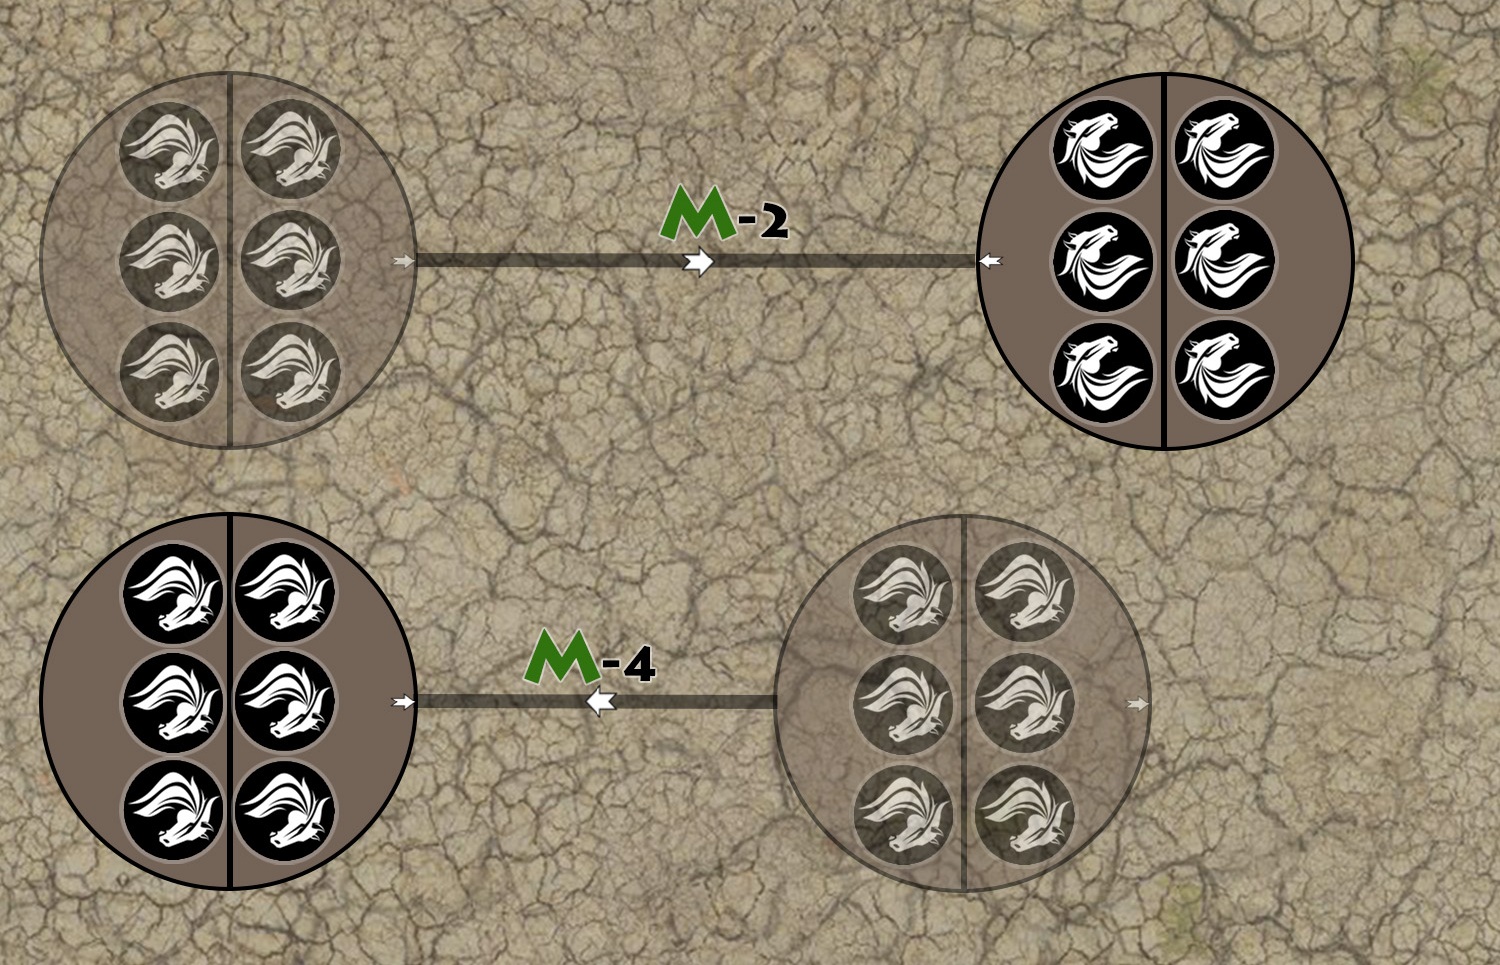
Every battle is won by those who dare to advance—step by step, each move reshapes the battlefield.This is the basic movement. The unit may advance up to M’’ in the direction of your choice. During this action, you may freely reorient the unit to face any direction.
However, if the unit moves into an area that was located within its rear at the start of the phase, it suffers a penalty of -1M (-2M for squads of 2 groups) for this move.
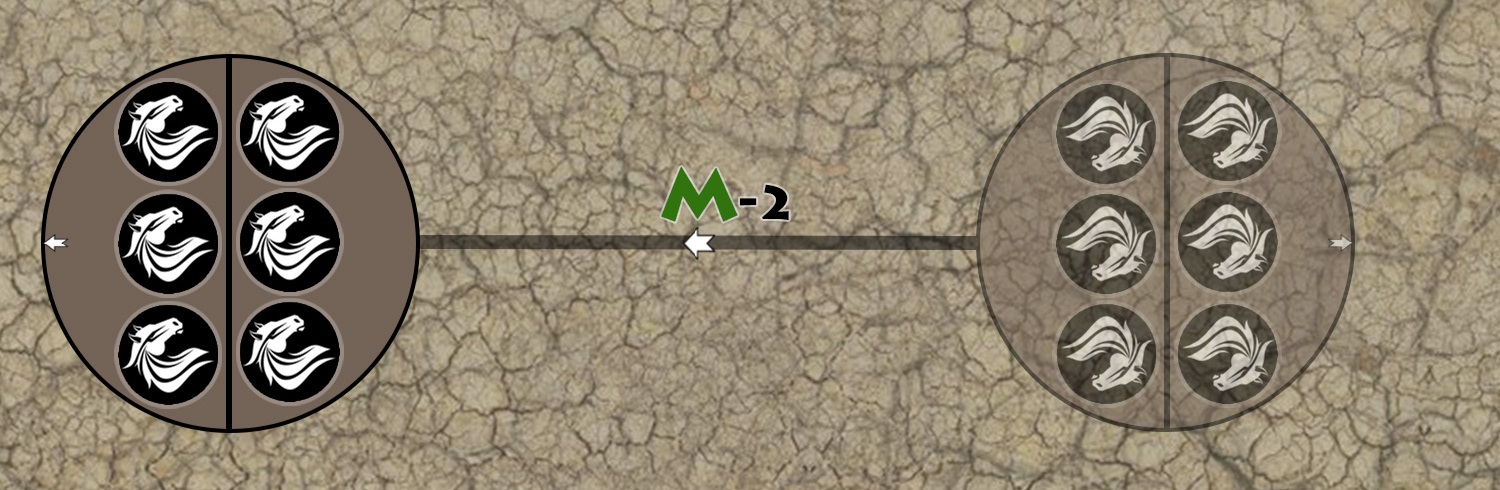
And if at the end of the move its initial position is located within its front, it suffers a cumulative penalty of -1M (-2M for squads of 2 groups) for this move.
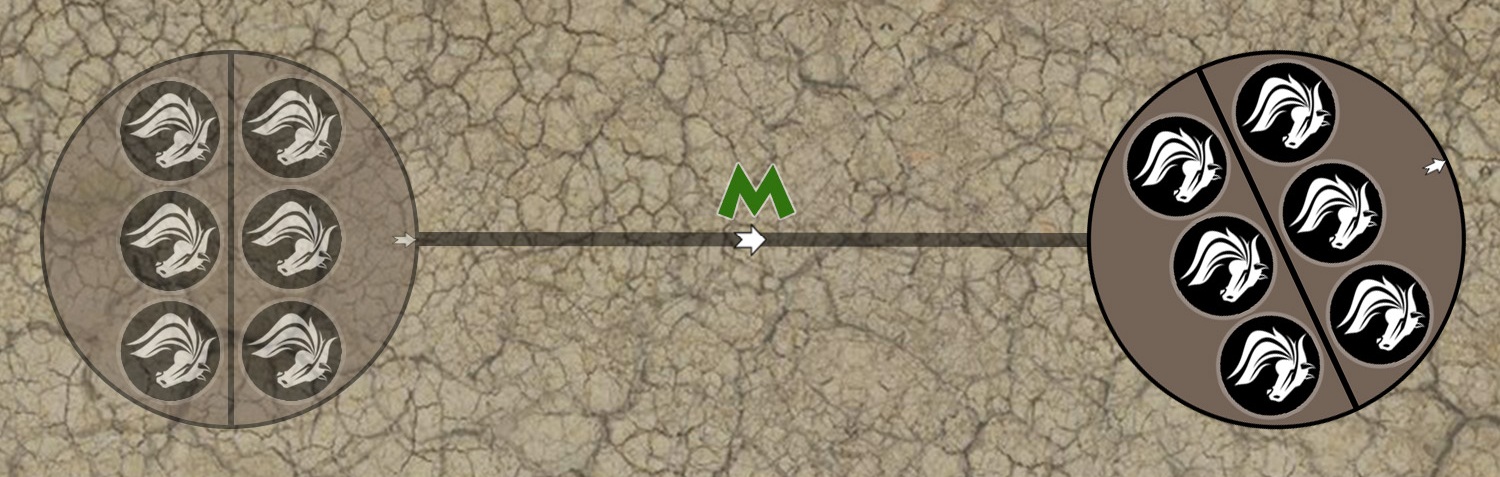
Charge
Charge
There comes a moment when steel and courage collide—the charge, a desperate rush where warriors hurl themselves at the enemy with all the fury they can muster.Conditions
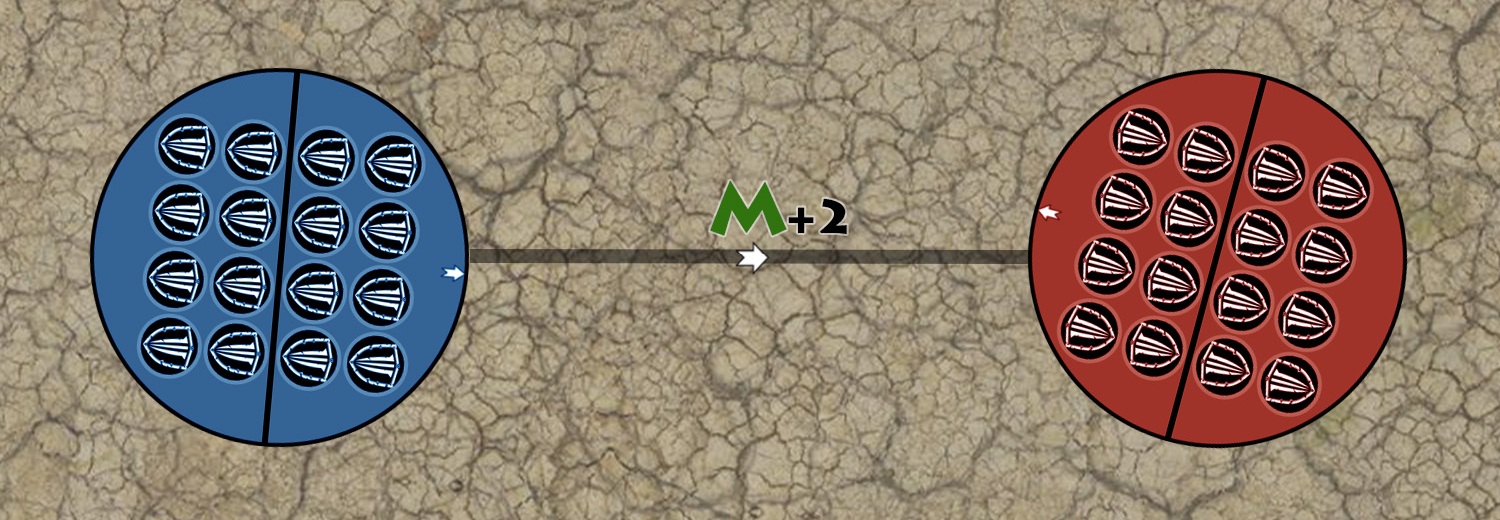
To charge, a unit must be more than 1’’ away from any enemy unit and within M+2’’ of its visible target.
Only targets within the unit’s front arc are considered visible. if the target is not visible the charge is impossible.
Line of Sight
The line between the center of 2 units is called the line of sight. If a blocker, a position, a vehicle or a titan blocks this line, charge is impossible.
Distance between 2 units
The distance between two units is defined as the minimum distance between the bases of both units.
Contact
Your unit can move up to M+2’’. This movement must bring your unit in contact with the target unit.
It must reach its target by the shortest route possible (avoiding obstacles).
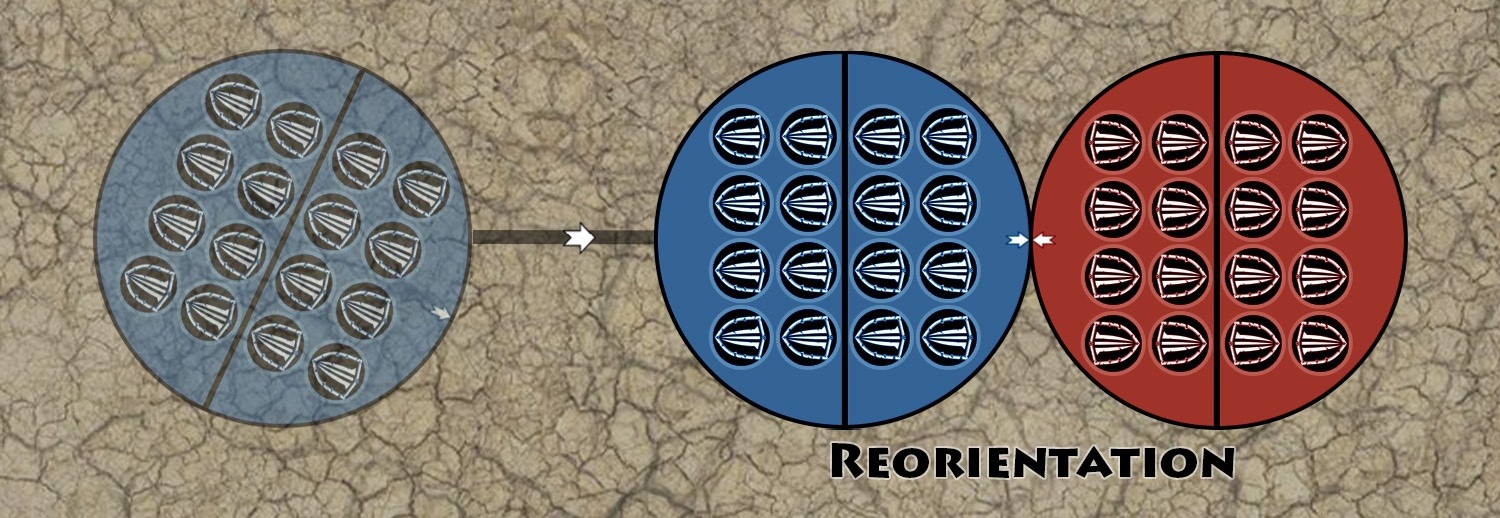
Facing on Charge
When a unit finish a charge, it must immediately reorient to face the center of its chosen target unit. Likewise, the charged unit(s), if it is not already engaged in melee with another enemy, and if it is being engaged on its front arc, must reorient to face the charging unit.
Hard target
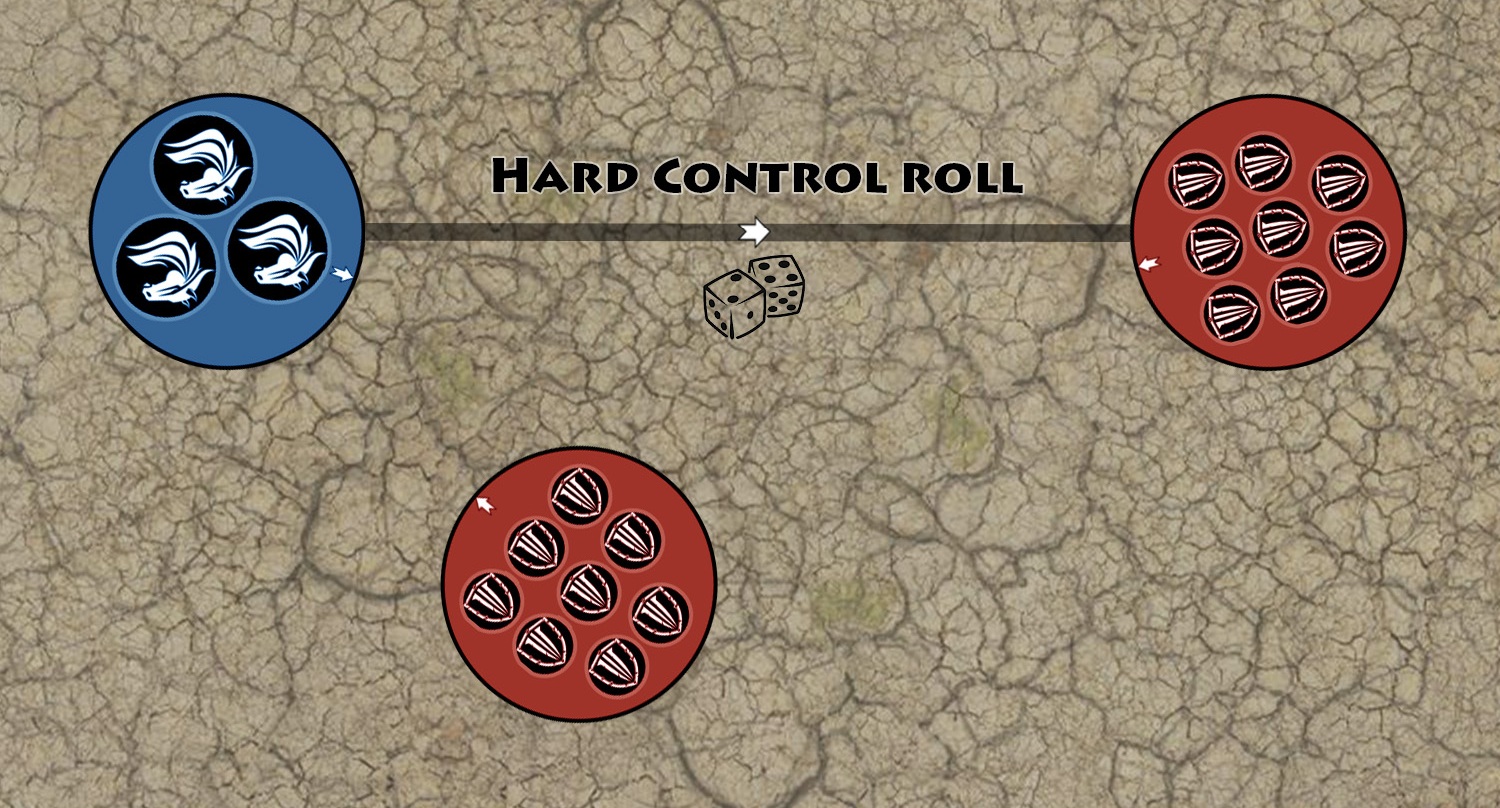
If you choose a target that is not the closest target, you must succeed a Hard control roll. If unsuccessful, your unit will charge the nearest target.
Double charge
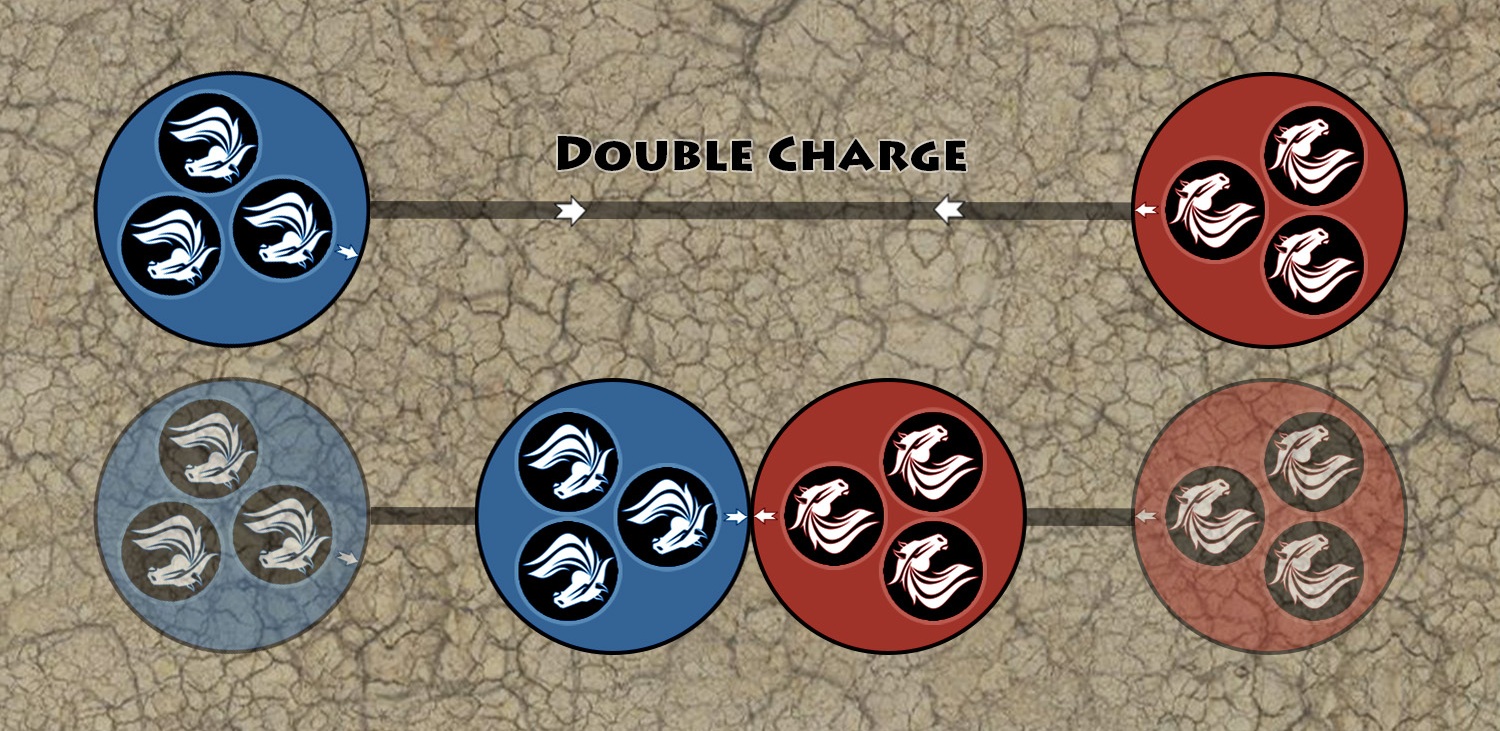
When two units charge each other, each unit moves half the distance between them.
Overpowered Opponent
Your unit has to pass successfully a Hard control roll to target an opponent worth at least three times more than it. In case of failure, your unit must stop its engagement movement at 3’’ from this adversary.
Swap
Swap
Disciplined ranks move like a living engine of war, soldiers stepping forward as their comrades fall back. This swap allows fresh troops to hold the line seamlessly, while keeping the flow of battle fair and clear.This maneuver is not possible if one of the squads has less than 5M or one of the squads has more than 1 group.
During the Movement phase, you may swap the position of your squad with that of a, yet not activated this phase, friendly squad within 1’’ and more than 1'' from any enemy unit. The target squad, along with its characters, will be considered as having been activated and moved during the Movement phase.
The final positions of both squads must cover the area occupied by the two squads before this movement. And neither squad will be able to benefit from a charging bonus during this turn.
After the swap, the Active Unit may be freely reoriented in any direction. The unit that replaced it may also be freely reoriented, unless it is now engaged in melee, in which case it must face at least one of the enemy units it is engaged with.
Because this move can trigger an opportunity attack, it's possible the active unit could be removed from play before the process is complete. But even then, it's swapped out before being removed.
interactions
interactions
On the battlefield, movement is more than marching forward—it’s weaving through allies, slipping past foes, and seizing the perfect position without breaking formation.Passing Through
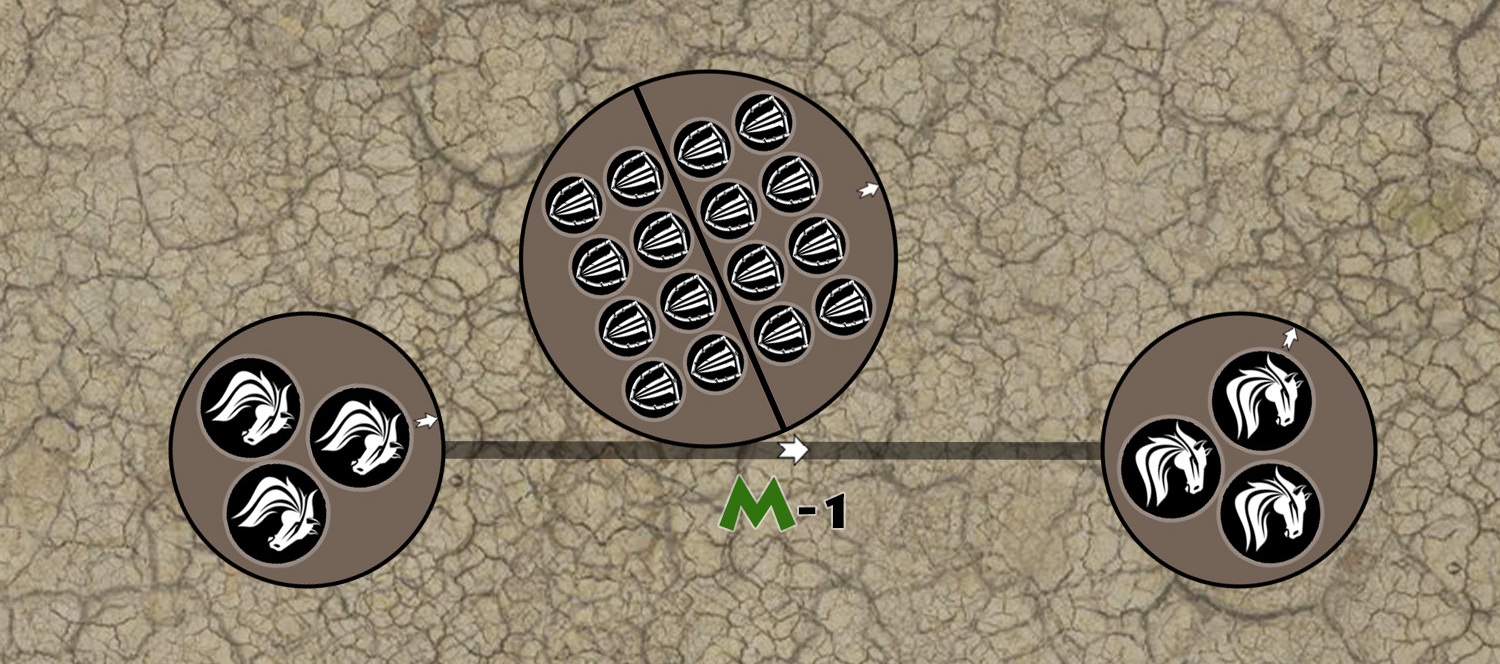
Crossing the bases of friendly units slows down by 1’’ (non-cumulative).
Enemy units and those that do not have the keywords infantry, rider cannot be passed through.
Engagement Range
When moving, your units must stay more than 1’’ away from opposing units. Unless you finish your charge movement within 1’’ of all enemy units that you approached within 1’’.
Shooting
Shoot
Shoot
The silence of the battlefield shatters with the roar of gunfire—arrows, bolts, and bullets cutting through the air as warriors seek to strike down their enemies before blades can cross.Shooting
Select a shooting weapon and visible targets in range.
Only targets within the unit’s front arc are considered visible. if the target is not visible shooting is impossible.
Roll 1 attack roll per total A, applying modifiers.
| Attack roll | |
|---|---|
| Hit roll | Wound roll |
| 1D6 ≥ G + P | 1D6 ≥ T + S |
| -1W | |
Multiple targets
Each attack roll may target a different unit, but the targets for each attack roll must be designated before launching the first one.
Distance between 2 units
The distance between two units is defined as the minimum distance between the bases of both units.
Line of Sight
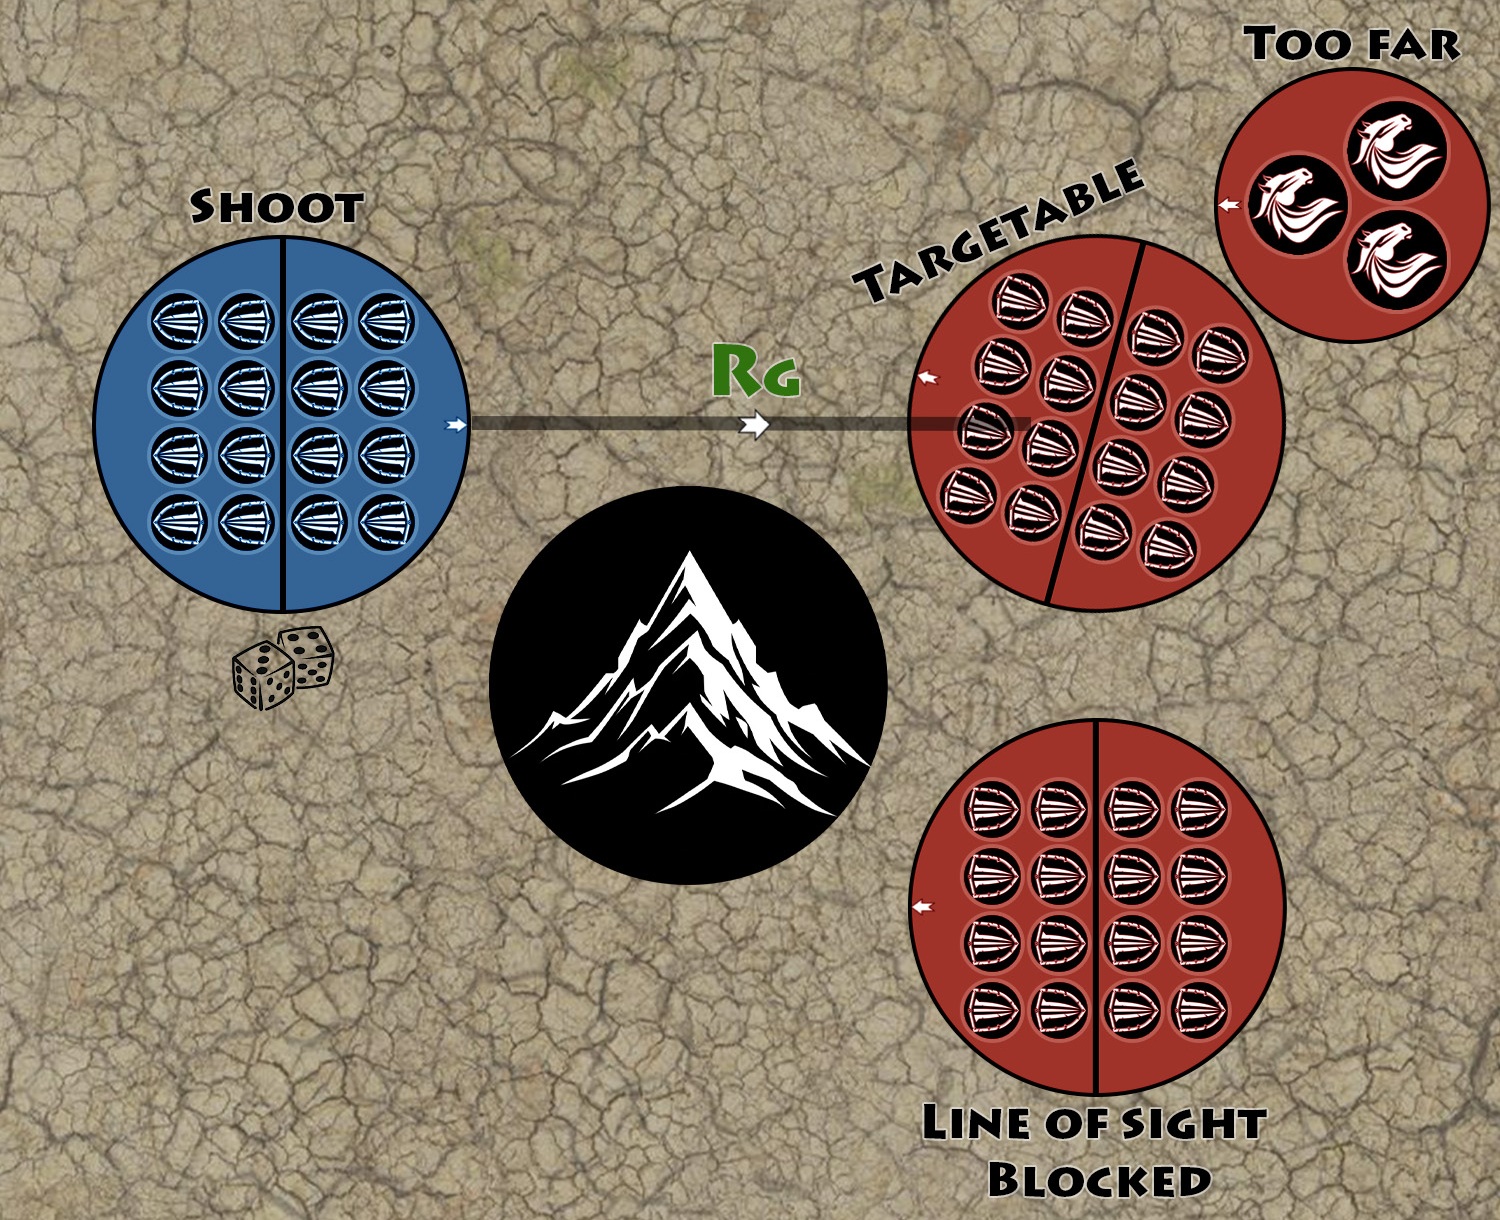
The line between the center of 2 units is called the line of sight. If a blocker, a position, a vehicle or a titan blocks this line, shooting is impossible.
If the target is less than 12", line of sight is blocked if it passes through a unit on the battlefield.
Facing
When a unit shoots, it automatically reorients to face the chosen target.
Priority Threat
Priority Threat
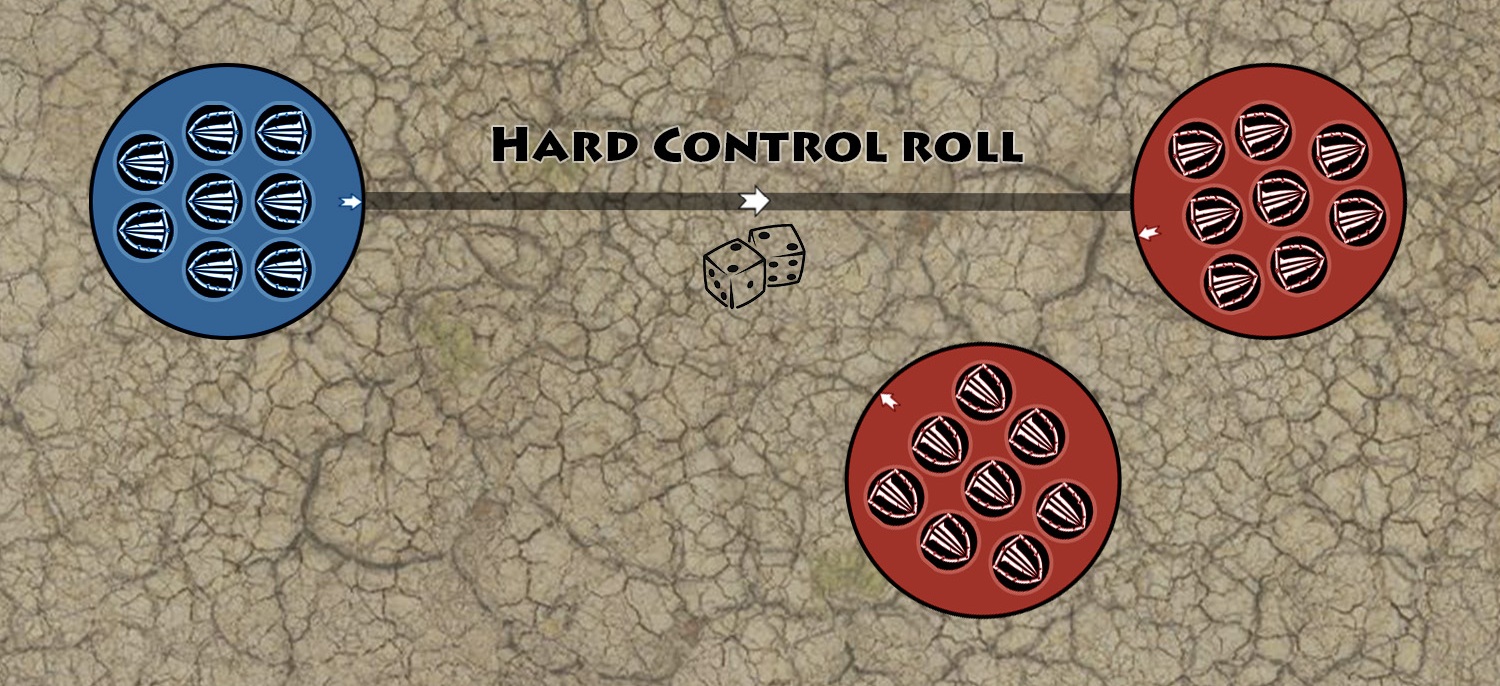
On the battlefield, instinct takes over—when danger looms too close, soldiers often fire at the most immediate threat, whether ordered to or not.Units must make a Control Roll to target an enemy unit that is not the closest visible one.
If at least one enemy unit is within 24’’, this roll is treated as a Hard Control Roll.
If at least one enemy unit is within 1’’, you can only target that target, unless the total value of enemies within 1’’ is less than half the value of your unit..
| Priority Threat | ||
|---|---|---|
| Enemy over 24" | Enemy within 24" | Enemy within 1" (50%+pts value) |
| Control roll | Hard Control roll | Automatic failure |
| Failure → Target the nearest visible enemy unit in range | ||
Modifiers
Modifiers
Battlefields are chaotic places—dust, smoke, allies, and enemies tangled together. Shots are rarely clean, and every circumstance shifts the odds. These modifiers represent the unpredictable conditions of ranged combat, where distance, movement, and positioning decide whether bullets find their mark or vanish into the haze.| Rule | Situation | Modifier |
|---|---|---|
| Hidden | The target is a Infantry unit inside a Cover that only used the Hold action during the previous round and this one | Defense improved by +2 |
| Long Range Shooting | Target beyond X x 6’’ (6’’, 12’’, 18’’...) | Defense improved by +X(+1, +2, +3...) |
| Advance & Fire | Moved more than M/2 during this round | Defense improved by +1 |
| Indirect Shot | Obstructed line of sight on a target less than 24’’ away | Defense improved by +1 |
| Friendly Fire | Target within 1’’ of an ally (including this unit) |
Defense improved by +1 |
| Melee shooting | Ennemy unit within 1’’ | Defense improved by +1 |
| Harassment | Shoot at a target located in the rear arc | Defense improved by +1 |
| Rear Attack* | The center of the active unit is located in the rear arc of the target | Defense reduced by -1 |
*If the defender has 2 defense values (two G values in the case of a hit roll, or two T values in the case of a wound roll) choose the lower of the two.
Shooting Attack Roll Calculator
| Defense Modifiers | |
|---|---|
| +1 Def | |
| +1 Def | |
| +1 Def | |
| +1 Def | |
| +1 Def | |
| -1 Def | |
| +1 Def | |
| -1 Def | |
| Long Range x2 | |
| +2 Def | |
| +2 Def | |
| Range & Cover | ||
|---|---|---|
| Range | 27" | |
| Cover | 0 | |
| Target | G | T |
| Weapon | P | S |
| Attack Roll | Hit Roll | Wound Roll |
Exchange of Fire
Exchange of Fire
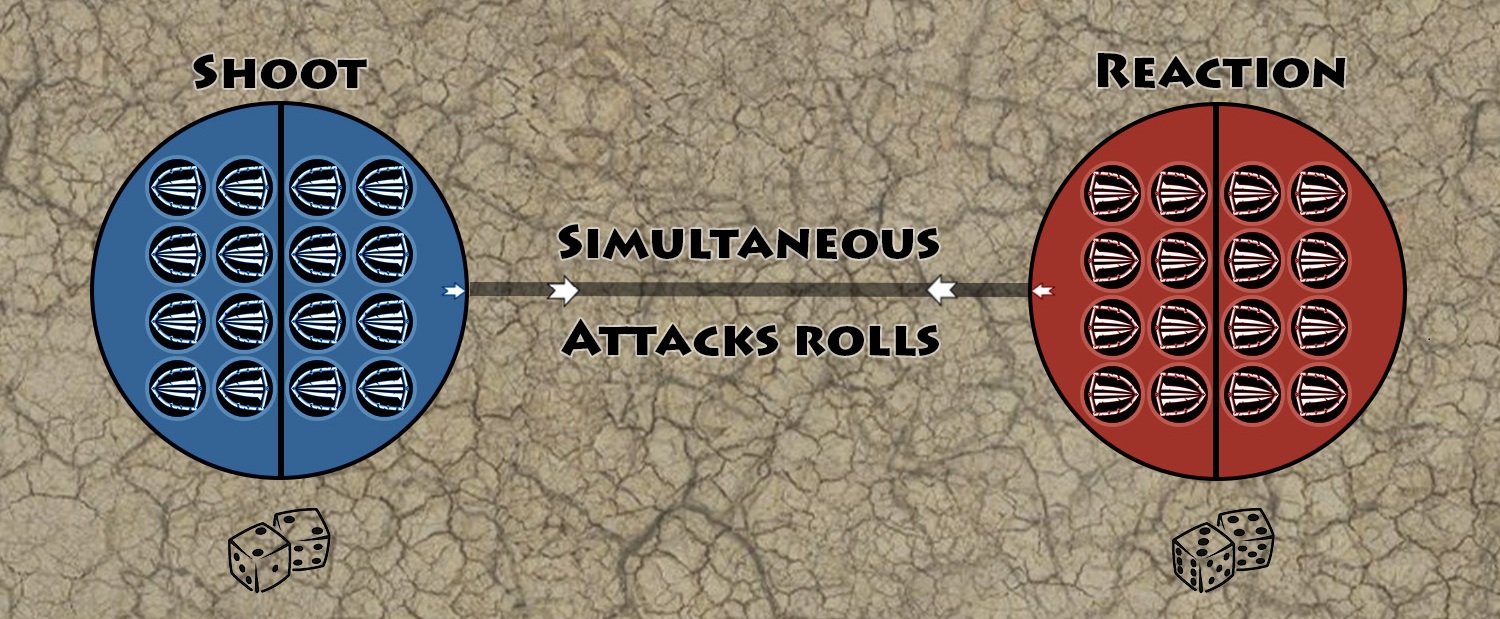
In the chaos of battle, no volley goes unanswered—when arrows or bullets fly, instinct drives warriors to return fire in the same breath.If an unit is targeted by a shoot, it can react by shooting back at its attackers, even if either unit is destroyed in the exchange. All attacks are resolved based on the status of both units at the beginning of the exchange.
| Exchange of Fire - Process |
|---|
| An unit is targeted by a shoot |
| It react by shooting back |
| All attacks rolls resolve simultaneously |
Max range
A ranged weapon with a Rg of at least 18'' can, when reacting, shoot at its attacker with a +6Rg bonus. However, its weapon's A are halved for this shot.
Bombardment Phase
Bombardment Phase
Heavy guns and long-ranged weapons do more than fire across the battlefield—they shape it before the first step is taken, softening enemy lines and forcing commanders to act under the shadow of relentless bombardment.The Bombardment phase is an intermediate phase that occurs immediately after the Tactical phase, and only during Round 0.
Units with a Rg greater than 30" may be activated during this phase. They can be activated one or more times, depending on their Rg and Shoot.
Multiple pre-activations
Shots made during the Bombardment phase do not cause a unit to become "Exhausted". As a result, unit may be activated multiple times during this phase, ignoring the usual activation limits. And it may still be able to Shoot normally during the Round 0 Shooting Phase that follows
| Bombardment - additional activations | |||||||
|---|---|---|---|---|---|---|---|
| Rg | 36’’ | 48’’ | 60’’ | 72’’ | 84’’ | 96’’ | 108’’+ |
| Shots | x1 | x2 | x3 | x4 | x5 | x6 | x7 |
Tracking
Place a d6 next to each eligible unit to show how many bombardment activations it still has to resolve. Reduce the die by 1 each time the unit completes a bombardment shooting activation.
Reaction
Targets cannot react to Bombardment shots.
Velocity save
Fast-moving units are harder to catch under long-range bombardment. Their speed and constant repositioning make incoming fire less accurate before the battle is fully joined.A target with a M greater than 6 receives a Velocity save to avoid Bombardment shots on Round 0. Roll this save with 1d6 as soon as your unit is targeted. If the roll is successful, the shot is lost and the target takes no damage.
| M | Velocity Save |
|---|---|
| 7’’ | 6+ |
| 8 - 9’’ | 5+ |
| 10 - 13’’ | 4+ |
| 14’’+ | 3+ |
Multiple Weapons
If a unit is equipped with multiple main weapons, determine the total number of Bombardment activations using the weapon with the greatest Rg.
Bombardment activations must be resolved starting with the longest-range weapon available. And a weapon may not be used for more activations than its Range allows.
Example: A unit has one weapon with Rg 60" and another with Rg 36". The unit gains 3 Bombardment activations. The first 2 Bombardment activations must be resolved using the 60" weapon. The final Bombardment activation can be resolved using the Rg 36" weapon or the Rg 60" weapon.
Munitions
Munitions
Even the finest marksmen are bound by the limits of powder, arrows, or shells—every shot is a choice, and sooner or later, the barrel runs dry.Each ranged weapon can only be used a number of times equal to half its Rg
You can ignore this rule if both players agree.
Melee
Attack
Attack
In the clash of steel and flesh, strength and numbers rule the outcome—every strike counts, and the tide of battle favors the fresher, the fiercer, or simply the more numerous.Attack
Select a melee weapon and target an eligible opponent’s units within 1’’ of your unit. Roll 1 attack roll per A of your weapon, applying modifiers.
| Attack roll | |
|---|---|
| Hit roll | Wound roll |
| 1D6 ≥ G + P | 1D6 ≥ T + S |
| -1W | |
Multiple targets
Each attack roll may target a different unit, but the targets for each attack roll must be designated before launching the first one.
Large squads
When a squad attacks, all groups within the squad can engage in the attack.
Squad weapons
All soldiers in the same squad must attack with the same weapon.
Target
Target one of the enemy units located in the front arc as a priority.
Melee Attack Bonuses
| Rule | Situation | Bonus |
|---|---|---|
| Law of the Strongest | The target’s condition is worse than that of the attacker | Defense reduced by -1 |
| Fresh Attackers | The attacker was not engaged in melee at the start of the turn, while the target already was | |
| Rear Attack* | The center of the attacking unit is located in the rear arc of the target. |
*If the defender has 2 defense values (two G values in the case of a hit roll, or two T values in the case of a wound roll) choose the lower of the two.
Charging
Charging
A sudden rush can turn the tide—charging units strike with momentum and fury, but only the fresh and unbroken can truly hurl themselves into the fray.| Condition | Charging? |
|---|---|
| The unit charged or moved closer to the target | ✅ Yes |
| The unit is Disorganized, Destabilized or Destroyed | ❌ No |
| The unit started the round within 1’’ of an enemy unit | ❌ No |
| The unit was or has swaped | ❌ No |
Charging Units
Is considered charging an unit performing the Charge or Move action during this round, if its movement has brought it closer to its target.
Not Charging
Disorganized, Destabilized or Destroyed units are never considered as charging.
Similarly, units that were within 1’’ of an enemy unit at the start of the round cannot be considered as charging during this round.
Encirclement
Encirclement
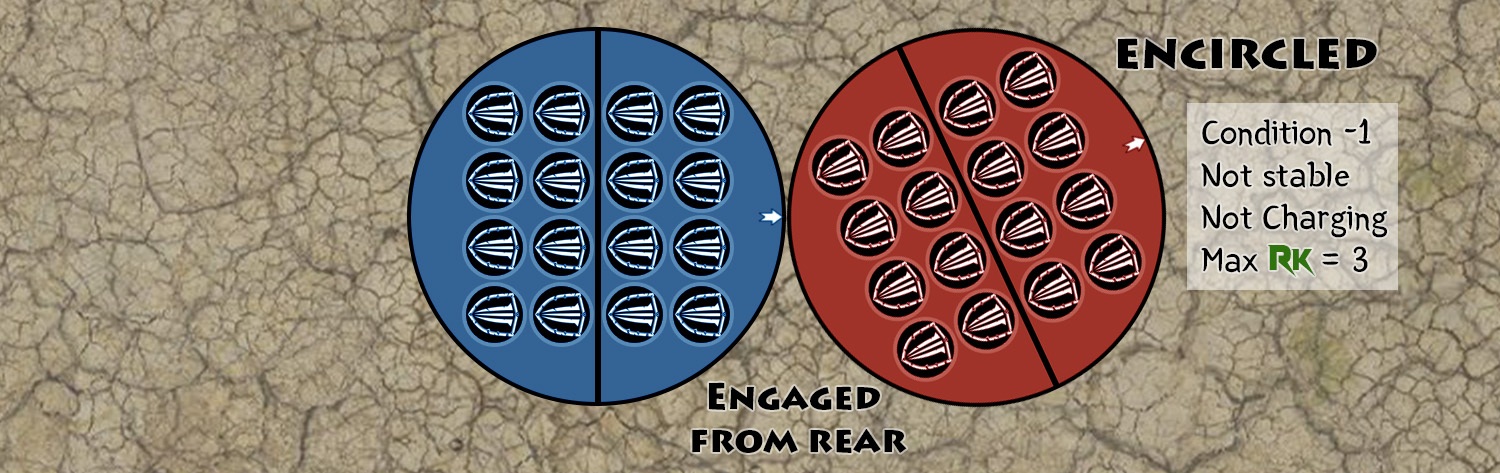
Surrounded on all sides, warriors lose their cohesion, their formation collapsing under pressure from every direction. With no path to break free, a unit caught in encirclement fights as if crushed under the weight of the enemy, its resolve faltering with every passing moment.If a unit is engaged in melee within its rear arc, it is considered encircled.
Condition
The condition of an encircled unit is temporarily considered degraded by one level. For example, shaken units are considered as destabilized.
Disorganization
Encircled units are also Disorganized, they have a maximum Rk of 3, and they lose all charge and stable bonuses.
No Escape
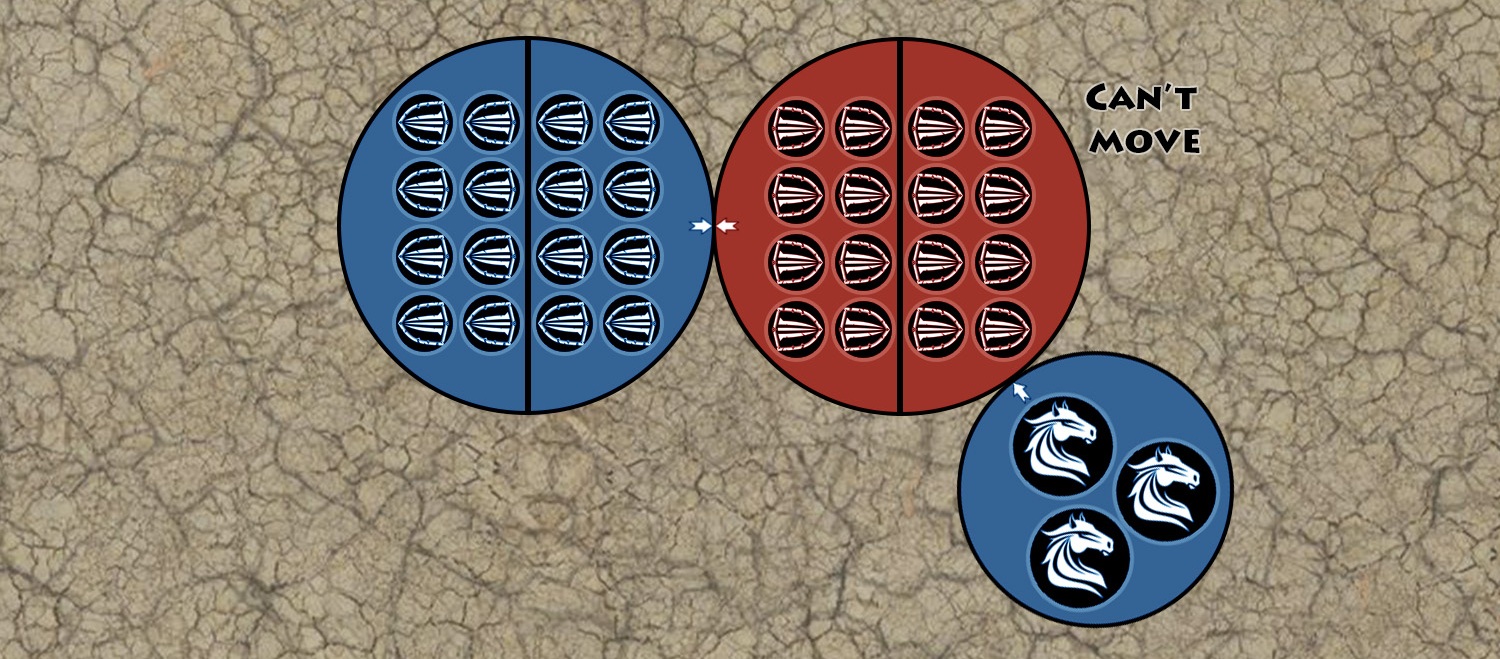
As long as they are encircled, and if multiple ennemy units are within 1'', encircled units cannot move.
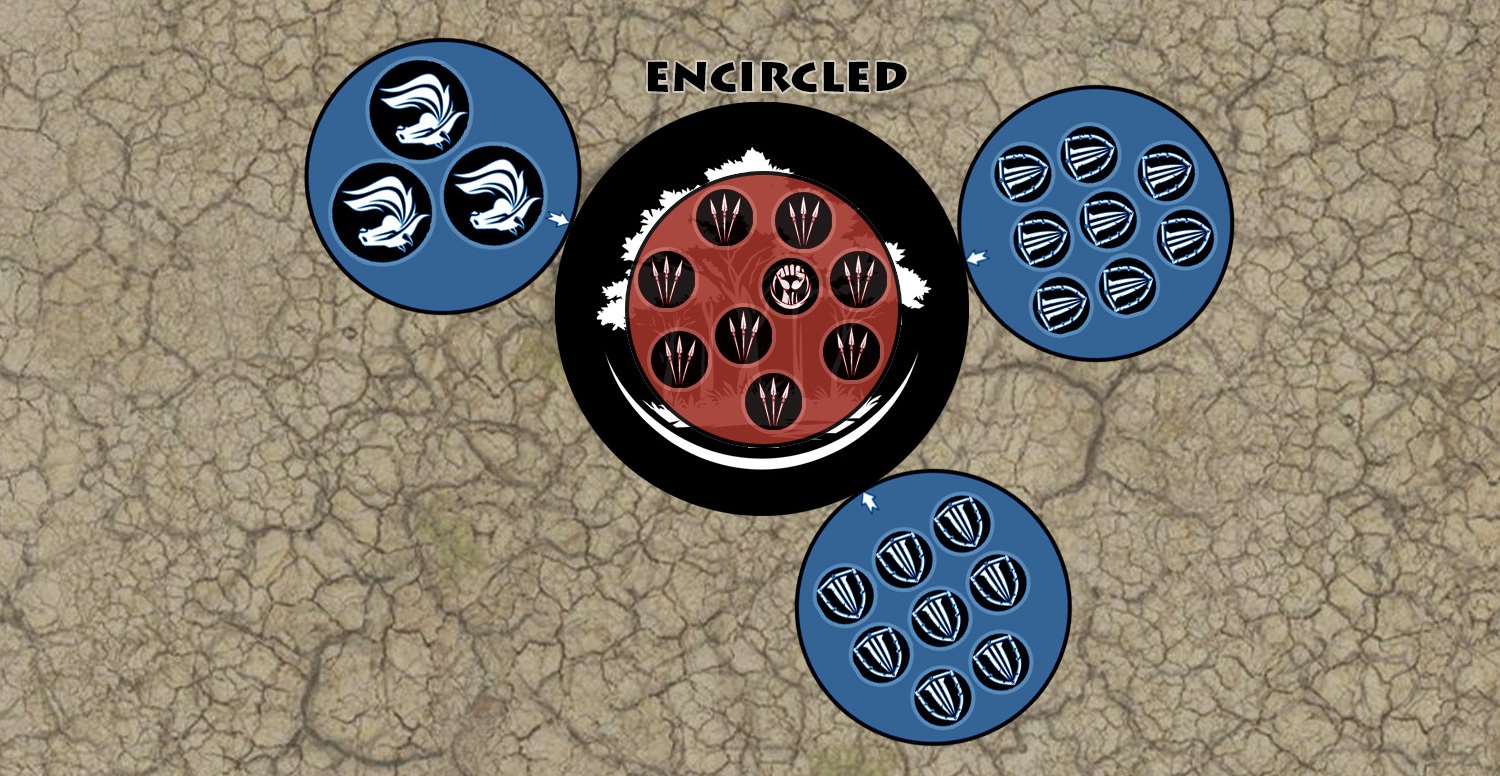
Under Siege
Units that do not have a defined front arc or rear arc — such as those occupying a position, or fighting in square formation — are considered encircled if no line can be drawn through the center of the unit without having enemy units center within 1’’ on both sides of that line.
The energy of despair
If an encircled unit succeeds a rout roll, it no longer needs to make additional rout rolls and gains the Exalted rule for as long as it remains encircled.
Rout order
Rout order
When the clash ends and silence briefly falls, it is always the weakest who break first. In the chaos of rout, fear spreads unevenly — some falter at the sight of slaughter, others only when pressed by sheer numbers.When units from the same melee that attacked each other simultaneously, multiple units may need to make rout rolls after the attacks.
1 - Face the slaughter
If one of the units must roll more rout rolls than the other, start with that unit.
2 - The weakest first
If multiple units must roll the same number of rout rolls, the unit with fewer remaining W rolls first.
3 - Cowardice first
When ennemy units have the same remaining W and must roll the same number of rout rolls, make a superiority roll B to determine which unit must roll its rout rolls first. Note that any B and rout rolls modifiers affecting the rout rolls also apply to the superiority roll.
Victorious
If a unit is no longer engaged in melee because all enemy units within 1’’ have been destroyed or have fled, do not make a rout roll for it.
Exalted
Exalted
We're not done yet
In the frenzy of battle, triumph can turn to ecstasy. Warriors who crush their foes or hold their blades in patient restraint find themselves lifted above the din, exalted by bloodlust or discipline alike. For a fleeting moment, their strength swells beyond mortal limits.When a unit is destroyed in melee and suffers excess wounds or flees before making all the required rout rolls, one of the units that attacked it in melee gains the Exalted rule for the next round.
Likewise, if at the end of the turn a unit that was engaged in melee did not use all or part of its melee weapons, it also gains the Exalted rule until for the next round.
Exalted bonus
Exalted units gain a +50% bonus to A with their melee and ranged weapons, and a +50% bonus to M if they did not move during the previous turn. To simplify the reading of the game, place 1 or 2 “
Consolidation
Consolidation
As the dust settles, victorious warriors push forward, while the slower and weaker remain behind, unable to seize the moment.Once all melees have been resolved, units that were at one point in the round but are no longer engaged in combat may perform a consolidation move. They may then move up to 3’’ toward the center of one of the enemy units destroyed this turn that was previously engaged in melee with them.
In addition to this movement, the unit may freely reorient in any direction.
Units with a M value lower than 3’’ cannot perform a consolidation move.
Reorientation
Units that, at the end of the Melee phase, are no longer facing any enemy unit within 1’’ are also eligible at the Consolidation phase. If such a unit is on a round base, it may freely face one of the enemy units within 1''.
losses
Condition
Condition
As the toll of battle mounts, a unit’s strength falters with its numbers. What begins as steady ranks soon wavers into chaos — shaken, destabilized, and finally broken. The fewer the warriors left standing, the sharper the edge of fear, and the harsher the hand of fate upon them.Losses & efficiency
Depending on the remaining W, your unit will be more or less likely to lose efficiency.
| W | Condition | Rk | A | M | Rout Roll | Control Roll |
|---|---|---|---|---|---|---|
| 76 - 100% | Stable | - | - | - | 1D6 ≥ B | 1D6 < B |
| 51 - 75% | Shaken | - | - | - | 1D6 ≥ B | 2D6 < B |
| 26 - 50% | destabilized | 6 | /2 | - | 2D6 ≥ B | 3D6 < B |
| 0 - 25% | Destroyed | 6 | /2 | /2 | 3D6 ≥ B | 4D6 < B |
Decimated
If the unit’s condition is destabilized or Destroyed, divide the A of all its weapons by two. If you end up with X.5A, , roll X normal Attack Rolls and 1 Attack Roll with the target’s defense improved by +2. To make the game flow more smoothly, you may roll all the dice at the same time and identify the half-attack roll with a different color.
No mercy for the weak
When a unit has only one W left, its condition is always Destroyed.
Critical Strike
Critical Strike
Large Individual Model
Massive creatures and war machines do not fall with a single blow. As their structure weakens and their systems fail, each critical threshold brings new risks. The closer they are to collapse, the more unstable and dangerous they become—until a single failure is enough to bring them down entirely.Each time a individual model with more than 11W sees its remaining W drop to or below 3/4, 2/4 or 1/4 of its max W, roll respectively 1, 2 or 3 Critical Damage Roll.
| Remaining W Ratio | Critical Damage Rolls |
|---|---|
| 3 / 4W | x1 Roll |
| 2 / 4W | x2 Rolls |
| 1 / 4W | x3 Rolls |
Down with the beast!
When a giant falls, it rarely does so quietly. Devastating blows can trigger cascading failures, pushing the creature beyond its limits in an instant. What seemed like a single decisive strike can unravel into total destruction.Critical damage rolls are cumulative, so if an attack removes 3/4 of an individual model's W, the model will have to roll 6 Critical damage rolls at once.
Critical Damage Roll
| 1D6 = 1 | Effect |
|---|---|
| Individual model | Remove it from the game |
| Squad | Remove the remaining W to kill one model |
Timing
Catastrophic damage strikes before fear can take hold. The body breaks before the mind falters, as destruction is resolved before any thought of retreat or survival.Critical Damage Rolls occur before Rout Rolls. In fact, wounds on targets with more than 11W are dealt iteratively. Therefore, if the unit is destroyed by a Critical Damage Rolls, any remaining wounds are considered excess wounds and are distributed to any surviving members of the unit.
Collect the trophies
Some victories leave more than ruins behind. When destruction goes beyond what was needed, it becomes a display of dominance—proof of overwhelming force that can inspire allies or strike fear into enemies.When a unit killed by a Critical damage rolls suffers excess wounds, it counts as having been destroyed with excess damage and can therefore trigger the Exalted rule.
What doesn't kill you
Sometimes a special rule allows the unit to recover a certain number of W. In this case, the unit’s W can decrease multiple times at the same stage. Only roll the Critical Damage Rolls the first time the unit’s lost 1/4, 2/4 and 3/4 of its W.
Large Monster Units
When several colossal beings fight side by side, each fights as an individual creature. Their wounds are not shared, and every monster may endure, falter, or collapse on its own.When a squad is composed of models with more than 11W, track the remaining W of each model separately.
Whenever this squad is targeted by attacks, the attacking player may divide their attacks freely between the models of the unit before rolling any dice. Once assigned, resolve each group of attacks against its chosen target separately.
Any W lost are applied only to the targeted model. Excess wounds are lost and do not transfer to another model of the squad.
Whenever a model with more than 11W sees its remaining W drop to or below 3/4, 2/4, or 1/4 of its maximum W, it must immediately roll respectively 1, 2, or 3 Critical Damage Rolls.
If a model is destroyed by a Critical Damage Roll, its remaining W become 0W. Remove it from the battlefield. Other models in the squad are unaffected.
If the squad must resolve Critical Damage Rolls for another reason, such as terrain or a special rule, roll separately for each model affected.
When this squad recovers W, restore them to one model at a time, chosen by its controller, up to that model’s maximum W.
Dead for good
Some losses cannot be undone. When a creature is destroyed at its core, nothing remains to recover—only absence, unless powerful forces can restore what was completely lost.The W lost by a model destroyed by a Critical Damage Roll can never be recovered, except if the rule allows the entire unit to be redeployed or all its lost W to be restored.
Non-circular effect
W potentially lost from Critical Damage Rolls do not generate additional Critical Damage Rolls. The Critical Damage Rolls is tied to a model; if it dies, it loses all its remaining W. Its death has no effect on the other models W in its unit.
It’s a Trap!
The battlefield itself can become a weapon. Collapsing structures, unstable ground, or deadly environments can inflict sudden and unpredictable damage, catching even disciplined units off guard.Sometimes, a unit composed of models with less than 12W can be forced to perform Critical Damage Rolls due to its situation on the battlefield, for example when in cover being destroyed or when crossing a dangerous area.
In this case, perform one Critical Damage Roll per model in the unit and subtract from the unit's remaining W the remaining W to kill one model for each 1 obtained.
| Unit | Situation | Effect |
|---|---|---|
| Individual Model | A monster with 16W max, loses 9W due to an attack. | It must make x3 Critical Damage Rolls. If it rolls a 1 on either roll, it is removed from the game. |
| Squad of Monsters | A squad of 2 monsters, each with 12W max, has 22W remaining (11W on each model). Following an attack it suffers 4 additional wounds. | Each model of the squad must make 1 Critical Damage Roll. If it rolls a 1, it (and its squad) loses its 9 remaining W. |
| A squad of 2 monsters, each with 12W max, has 13W remaining (6W and 7W). Following an attack it suffers 1 additional wound. | 1 model of the squad must make 2 Critical Damage Rolls. If it rolls 1 or 2 1, it (and its squad) loses its 6 remaining W. | |
| Squad | A squad of 8 infantrymen, each with 3W (total 24W max) with 22W remaining, crosses crosses a Dangerous Area. | Each model of the squad must make 1 Critical Damage Roll. For the first 1 the squad lost 1W, then for each other 1, the squad loses 3W. |
Moral
Rout
Rout
Suffering very heavy losses is a traumatic experience that shakes the courage of the bravest.Each time, following a melee or shooting attack, an unit loses enough W to see its condition deteriorate, the opposing player rolls a Rout Roll for it. The same attack can trigger 2 or 3 rolls. In this case, consider the target’s final condition to determine the number of dice to roll for each Rout Roll.
Rout Roll
| W | Condition | Rout Roll |
|---|---|---|
| 76 - 100% | Stable | 1D6 ≥ B |
| 51 - 75% | Shaken | 1D6 ≥ B |
| 26 - 50% | Destabilized | 2D6 ≥ B |
| 0 - 25% | Destroyed | 3D6 ≥ B |
Resigned
Sometimes a special rule allows the unit to recover a certain number of W. In this case, the unit’s condition can deteriorate multiple times at the same stage.
In this case, only roll the Rout Roll the first time the unit’s condition deteriorates at each stage.
General
General
The presence of a general can steel the hearts of even the most wavering soldiers, turning dread into defiance. Yet, when that same figure falls, despair spreads like wildfire. The fate of an army can hinge on a single breath — a roar of triumph, or the silence of a headless king.Warrior King
Your army is not subject to Panic Rolls when your general or his unit is within 2’’ of an enemy unit.
Headless
This is the coolest way to end a battle, that seemed lost.When your general is removed from play, immediately roll a Panic Roll.
When the general of a minority faction in your army is removed from play, roll a panic roll with a +1 bonus. In case of failure, only the units of the faction in question are removed from the game.
Panic Roll
| Condition | Result |
|---|---|
| 1D6 = 1 | Defeat |
| 1D6 + VP < opponent’s VP | Defeat |
Glorious
Glorious
To strike down the mightiest foe is to etch your name in legend. When your warriors topple the enemy’s most prized champion, glory burns within them like a second soul, hardening their will and driving them to fight with unyielding fury.The first time one of your units knocks out the most expensive opposing unit, it gains the one of the following effects you choose until the end of the battle:
| Cause | Effect | Duration |
|---|---|---|
| Knocking out the most expensive opposing unit | No longer subject to Rout Rolls | Until the end of the battle |
| Attacks cause twice more Rout Rolls | Until the end of the battle |
Objectives
Victory
Victory
Victory is not measured only in blood spilled, but in the shattering of enemy lines, the fall of their champions, and the ground your warriors claim as their own.Victory Points
Use the table to calculate your victory points VP. The VP are not added from turn to turn.
Panic
As the battle drags on and losses mount, even the bravest warriors begin to falter. When the enemy's advantage becomes undeniable, doubt spreads, and entire formations may break under the weight of despair.At the end of round 7 and subsequent rounds, if your opponent has at least 3 more VP than you and had already more VP the previous round, roll a panic roll.
Heroic Resistance
Some armies refuse to yield, even in the face of overwhelming odds. Having endured the worst, they harden their resolve, standing firm unless the situation grows truly hopeless.If you have already made a panic roll during this battle, you automatically succeed all panic rolls with a required result that is lower or equal.
This means you will not need to make any more panic rolls unless your opponent increases the gap further.
Primary Objectives
| VP | Objectives |
|---|---|
| +1 | Disorganization Your opponent has more characters out of combat. |
| +1 | Cut the Head Take out of combat the most expensive character of the opposing army. |
| +1 | Destruction Take out of combat 10% of the opponent’s army points. Take the theoretical maximum into account. |
| +1 | They Have Fallen Take out of combat the most expensive unit of the opposing army. |
| +1 | Home Field Advantage Occupy more valuable positions (with units totaling at least 8W) than your opponent, based on their total scp value. |
| +1 | Land Domination No enemy units, with a total of at least 8W remaining, are closer to your deployment zone than to theirs. |
| +1 | Cut Retreat Place units with a total of at least 8W remaining in the opponent’s deployment zone. If it occupies a position, gain an additional +1. |
Additional objectives
Additional objectives
Beyond the clash of arms and the struggle for survival, commanders may pursue hidden goals and personal ambitions. These additional objectives bring new layers of strategy to the battlefield.Scenario
Depending on the scenario, secondary objectives can be added to or replace the basic ones.
Personalization
If you want a more tactical dimension to your games, add an even number of generic secondary objectives, each player taking turns choosing one. The secondary objectives chosen by the players only bring points to their army.
Obsession
The same secondary objectives can be chosen several times but not on the same target.
Secondary Objectives
| VP | Objectives |
|---|---|
| +1 | Bringer of Hope
The opposing character you designated before the start of the battle is out of action. |
| +1 | Strategic Position
Place units with at least a total of 8W remaining in the position outside your deployment zone that you designated before the battle began. |
| +1 | Priority Threat
The opposing unit you designated before the start of the battle is out of action. |
| +1 | Symbolic Victory
Win more duel and take out more units with special rules that play on rout rolls, panic rolls, or modify the B of their enemies than your opponent. |
| +1 | Instill Fear
You have successfully routed more units than your opponent. |
Retreat in good order
Not every withdrawal is a rout. Under firm command, disciplined troops can disengage and leave the battlefield in good order, preserving their strength for battles yet to come—though such a decision may cost them the initiative and the glory of holding the field.At the end of the round you can choose to remove units from the battlefield, they will then count as a loss at the start of the next round.
Stable units cannot be removed from the battlefield.
Retreat in good order prevents the Bringer of Hope and Priority threat objectives from being fulfilled.
Retreat in good order
Retreat in good order
Sometimes, retreat is not a sign of weakness but a calculated move—pulling back to preserve strength and deny the enemy their triumph.At the end of the round you can choose to remove units from the battlefield, if they are within 1" of a table edge, these units are placed in reserve and can be redeployed within 1" of that table edge(s) and more than 9" of any enemy unit within 3 rounds.
For example, if a unit is removed from play on turn 3, it can be redeployed on turn 6.
Retreat in good order can prevents the Bringer of Hope and Priority threat objectives from being fulfilled. If these objectives were absolute objectives, you win the battle immediately.
Terrain
Terrain Bible
Terrain Bible
| D10 | Blockers | Scp | Effect | Base | Element |
|---|---|---|---|---|---|
| 1 | Obstructing Terrain | 2 | Cannot be crossed | 6'' Round Height 7" |
Wood Stone |
| 2 | Unbreachable Zone | Cannot be crossed | 6'' Round Height 0" |
Water Wood Stone |
|
| Each player may place a maximum X set of Blockers.If you have already placed all the possible Blockers add +2 on the Terrain Roll. | |||||
| D10 | Areas | Scp | Effect | Base | Element |
| 3 | Flat Area | 2 | +1M | max 200''² Free shape max ratio 48:1 Height 0" |
Urban |
| 4 | Rough Area | 2 | -1M | max 100''² Free shape max ratio 24:1 Height 0" |
Water Wood Stone Sand Urban |
| 5 | Difficult Area | 3 | -2M Disorganized |
max 50''² Free shape max ratio 3:1 Height 0" |
|
| 6 | Dangerous Area | 4 | -3M
Disorganized for attackers Roll a Critical damage roll for each model when moving on it during its activation |
8'' Round Height 0" |
Water Wood Stone Sand |
| D10 | Positions | Scp | Effect | Base | Element |
| Hills | |||||
| 7 | Smooth Hill | 2 | 3 | High ground 1" +1M when leaving the position Disorganized for attackers |
6|8'' Round 1 | 2 Rooms |
|
| 8 | Steep Hill | 4 | 6 | Charging attackers have 0A High ground 2" Disorganized for attackers |
Stone Sand |
|
| Covers | |||||
| 9 | Light Cover | 3 | 4 | Defense improved by +1
Disorganized for both attackers and defenders |
6|8'' Round 1 | 2 Rooms Height 3" |
Wood Stone Urban |
| 10 | Basic Cover | 4 | 6 | Defense improved by +1 | 2
Disorganized for both attackers and defenders |
||
| Buildings | |||||
| 11 | Heavy Cover | 6 | +3 | Defense improved by +1 | 3
Disorganized for both attackers and defenders |
6-12'' Free shape 1-4 Rooms Height 3" |
Urban |
| 12 | Fortified Cover | 8 | +4 | Charging attackers have 0A
Defense improved by +1 | 4 Disorganized for both attackers and defenders |
||
Large & Small Terrain Options
When Terrain elements can be selected in two sizes, apply the corresponding cost in scp.
Geometric Base Shape
Free shape actually means free geometric shape. The base of the design must be round, oval, rectangular, square or hexagonal.
Random Generation of Terrain
If the scenario requires Terrain elements to be chosen randomly, roll 1d10 and use the table below to see which element you can select. Until you are familiar with the rules, it is recommended to replace the 1D10 with a 1D5 to avoid dealing with overly complex terrain too quickly.
End of Terrain Selection
When you no longer have enough Scenery point to place the randomly designated element, you cannot place it and you lose all your remaining Scenery point for random terrain.
Better Attack Angle
When you obtain a randomly selected Terrain element from a Terrain Roll, you may replace the generated Terrain element with the first element of its category (Blocker, Area, Position).
Unbreachable Zone may be replaced by Obstructing Terrain for exemple.
In that case, the final cost in Scp is the cost of the terrain element actually placed on the battlefield.
Blockers
Blockers
Blockers are the battlefield’s hardest boundaries—cliffs, chasms, and massive obstacles that troops cannot cross and that reshape movement and lines of sight from the very start of the battle.Blockers cannot be crossed; they can be crevasses, steep peaks, or other imposing features that block the line of sight.
Each player may place a maximum X set of Blockers.If you have already placed a set of Blockers and roll a 1 or 2 on the Terrain Roll, re-roll your d10.
| Blocker | Scp | Effect | Base | Element |
|---|---|---|---|---|
| Obstructing Terrain | 2 | Cannot be crossed
Height 7" (Blocks line of sight under 7") |
6'' Round | Wood Stone |
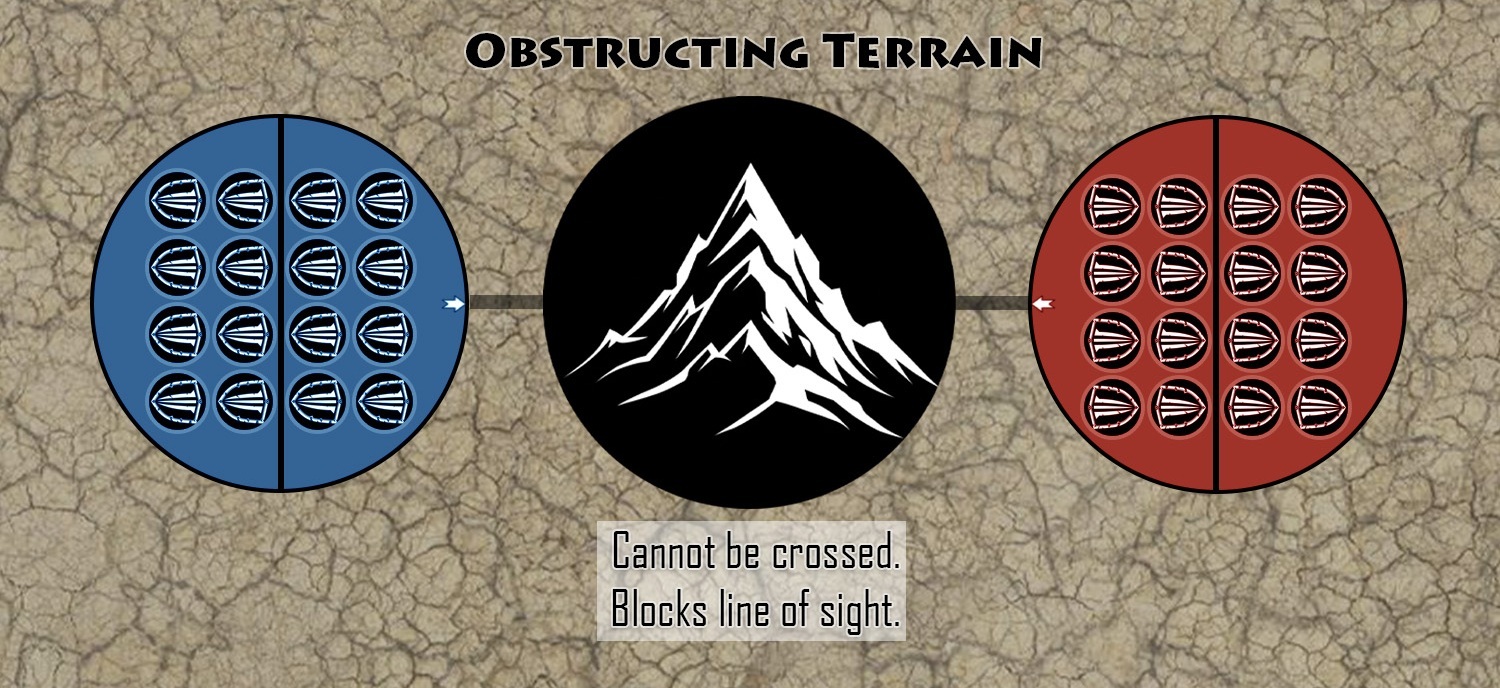
| Blocker | Scp | Effect | Base | Element |
|---|---|---|---|---|
| Unbreachable Zone | 2 | Cannot be crossed | 6'' Round | Water Wood Stone |
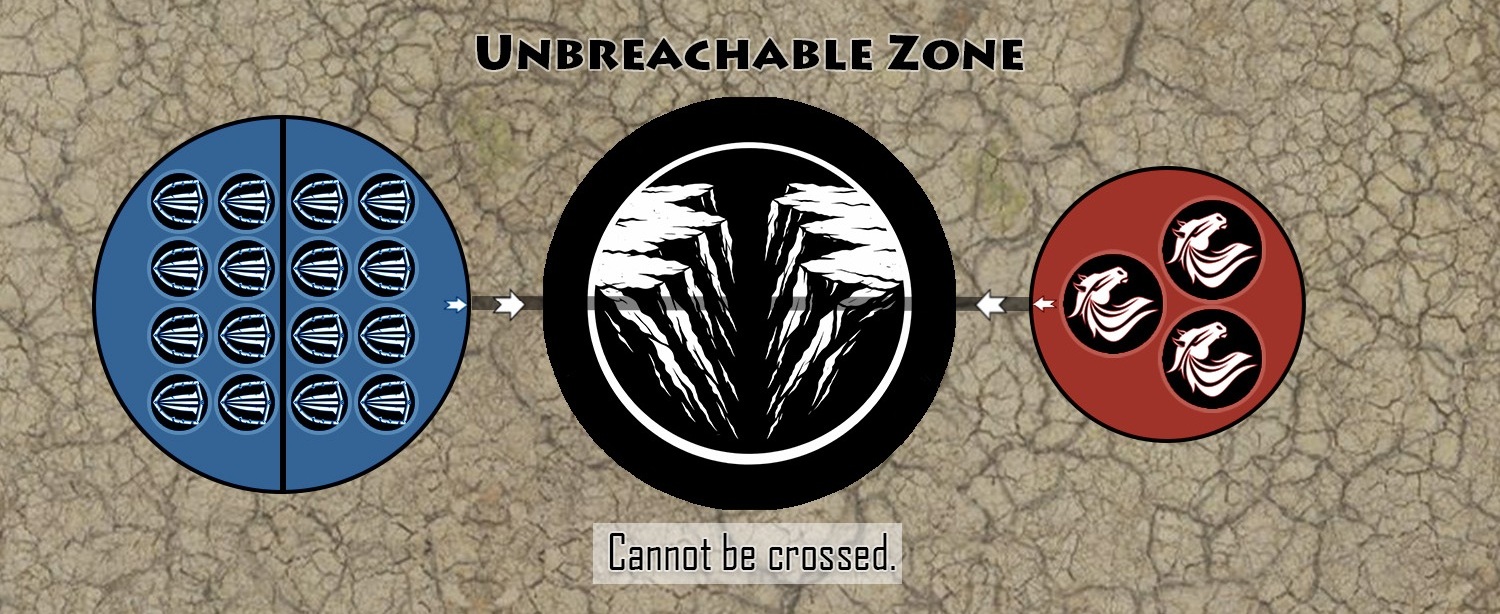
Areas
Areas
Areas represent zones of the battlefield that hinder or empower troops, ensuring that movement and positioning carry both risks and opportunities.Areas can be crossed normally; the bases of the units that cross them are simply placed above them.
If, at any point during activation, the center of the unit is above the area, all groups and miniatures inside get the bonus or suffer the area’s penalty during this round.
If, at any point during activation, only part of the unit's base is above an area that slows down, the unit suffers -1M during that round.
| Area | Scp | Effect | Base | Element |
|---|---|---|---|---|
| Flat Area | 1 | +1M | max 64''² Free shape max ratio 4:1 |
Urban |
| Flat Area bases can be 8x8" square, 4x16" rectangular, or 9" round | ||||
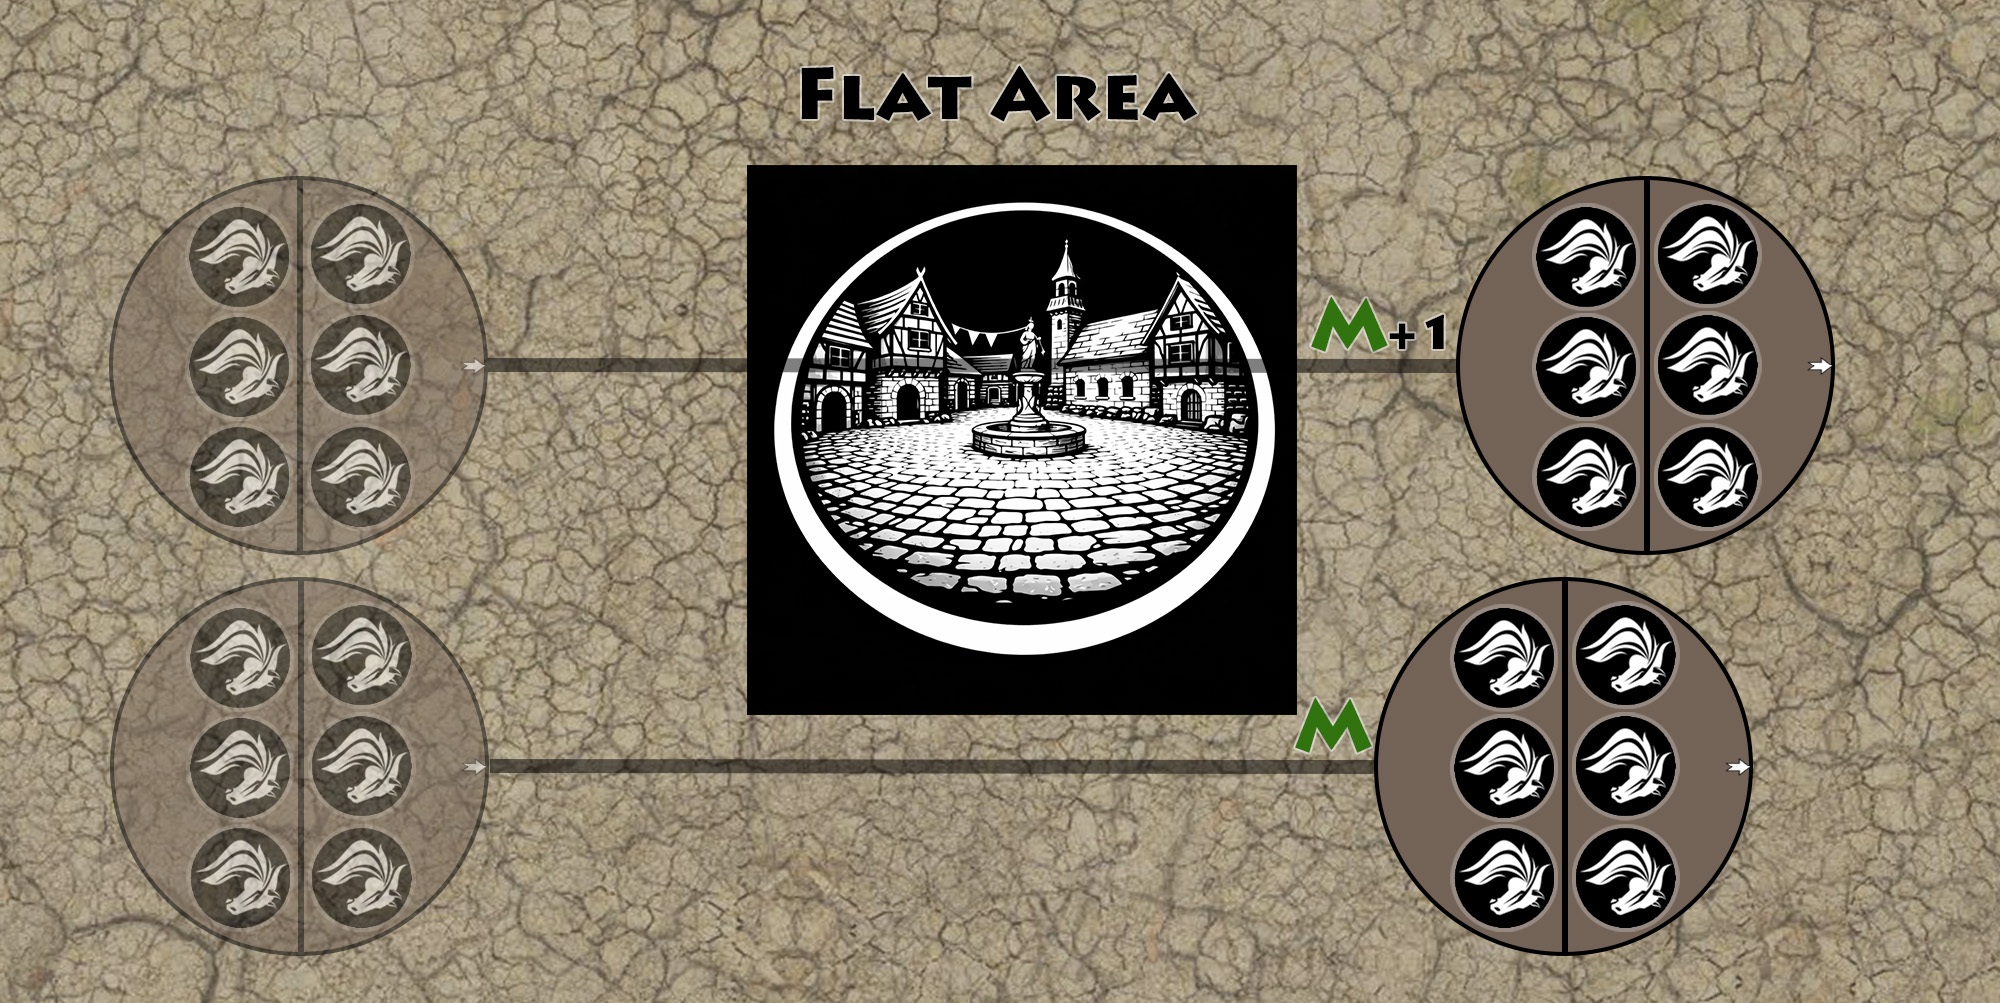
| Area | Scp | Effect | Base | Element |
|---|---|---|---|---|
| Rough Area | 2 | -1M | max 100''² Free shape max ratio 24:1 Height 0" |
Water Wood Stone Sand Urban |
| Difficult Area | 2 | -2M Disorganized |
max 50''² Free shape max ratio 3:1 |
|
| Difficult Area bases can be 7x7" square, 4x12" rectangular, or 8" round | ||||
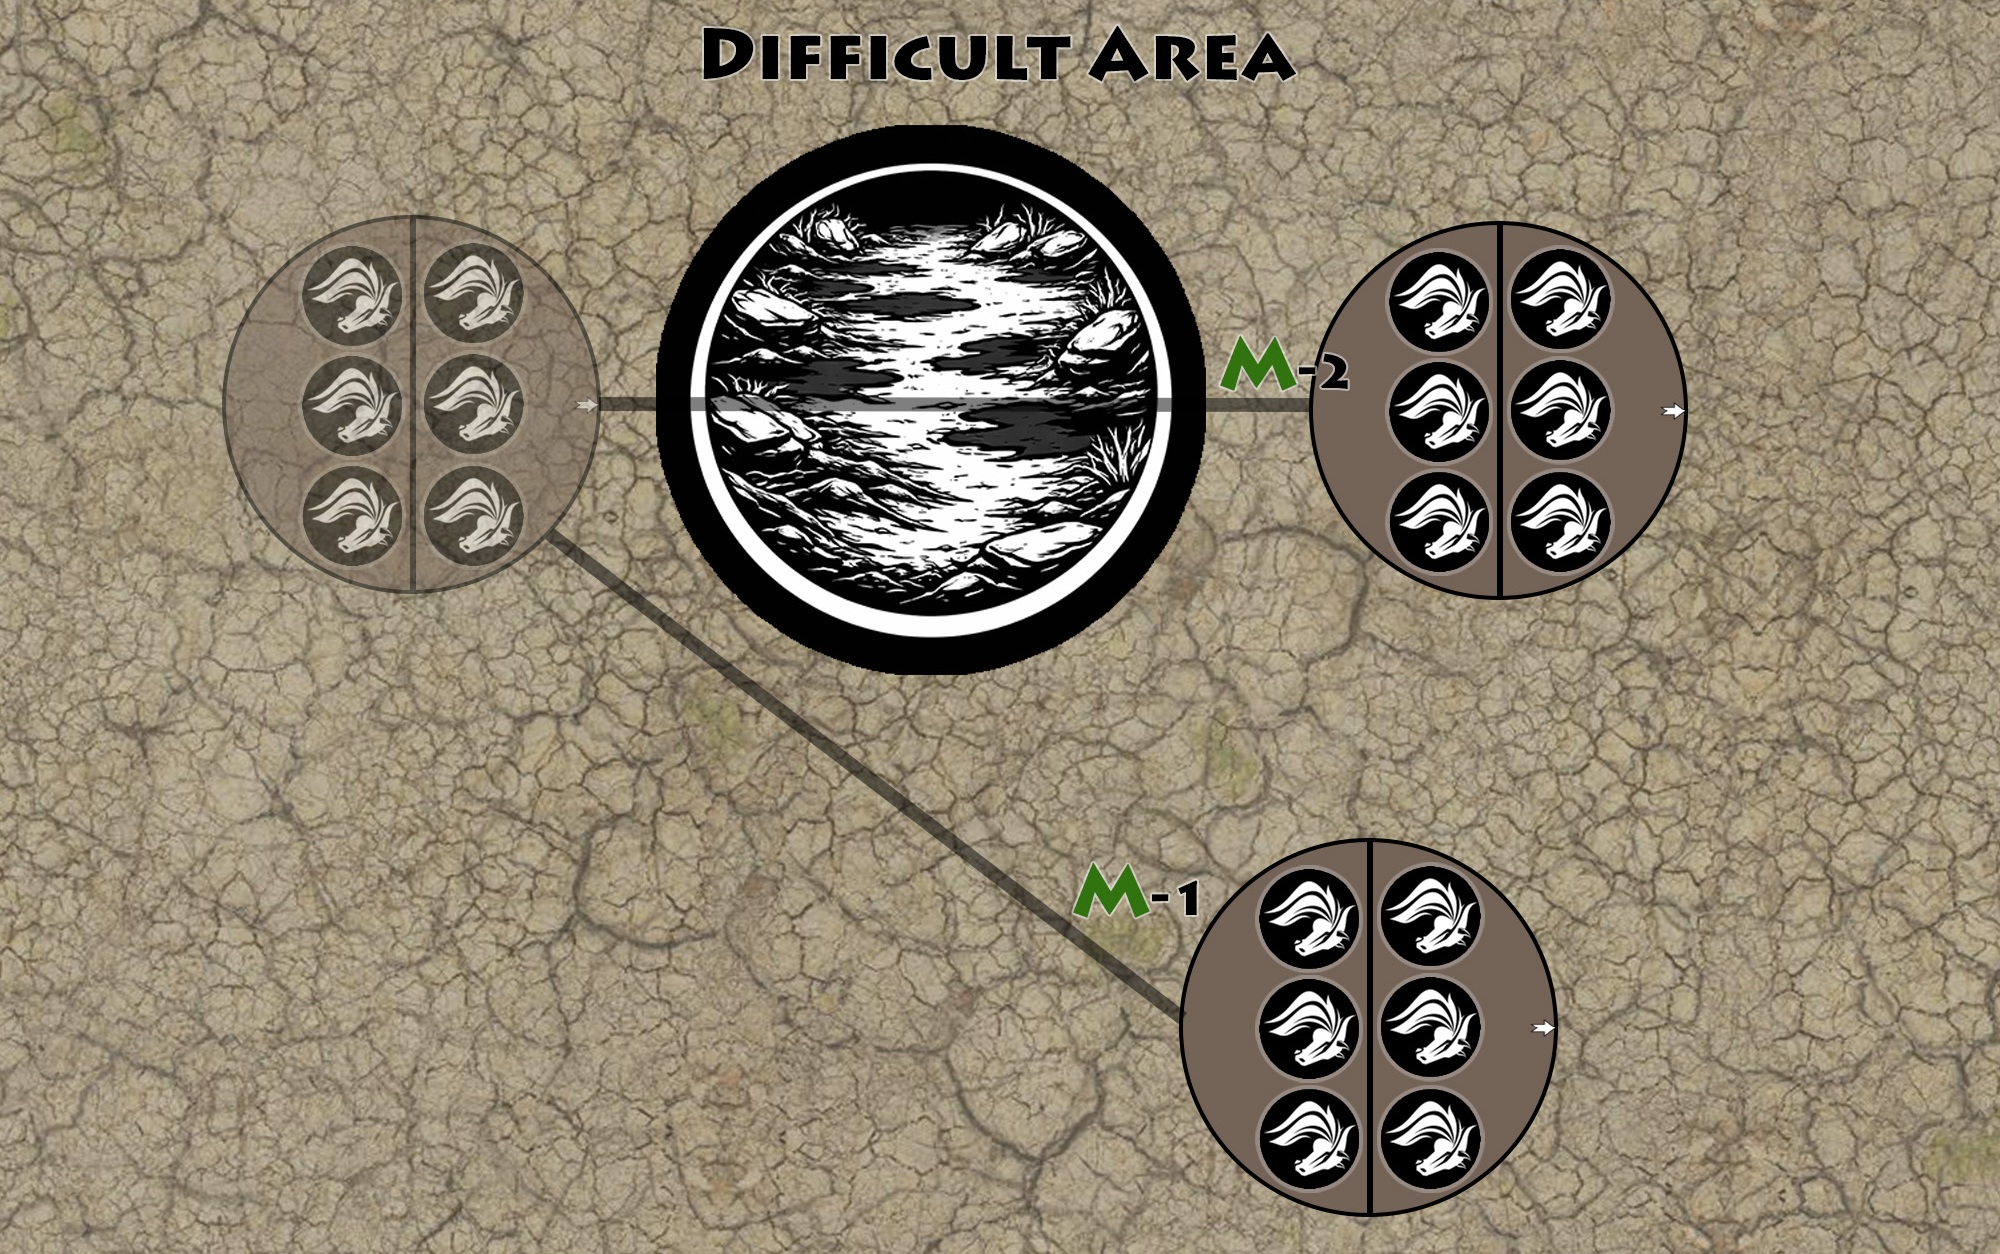
| Area | Scp | Effect | Base | Element |
|---|---|---|---|---|
| Dangerous Area | 4 | -3M
Disorganized for attackers Roll a Critical damage roll for each model when moving on it during its activation |
8'' Round | Water Wood Sand Stone |
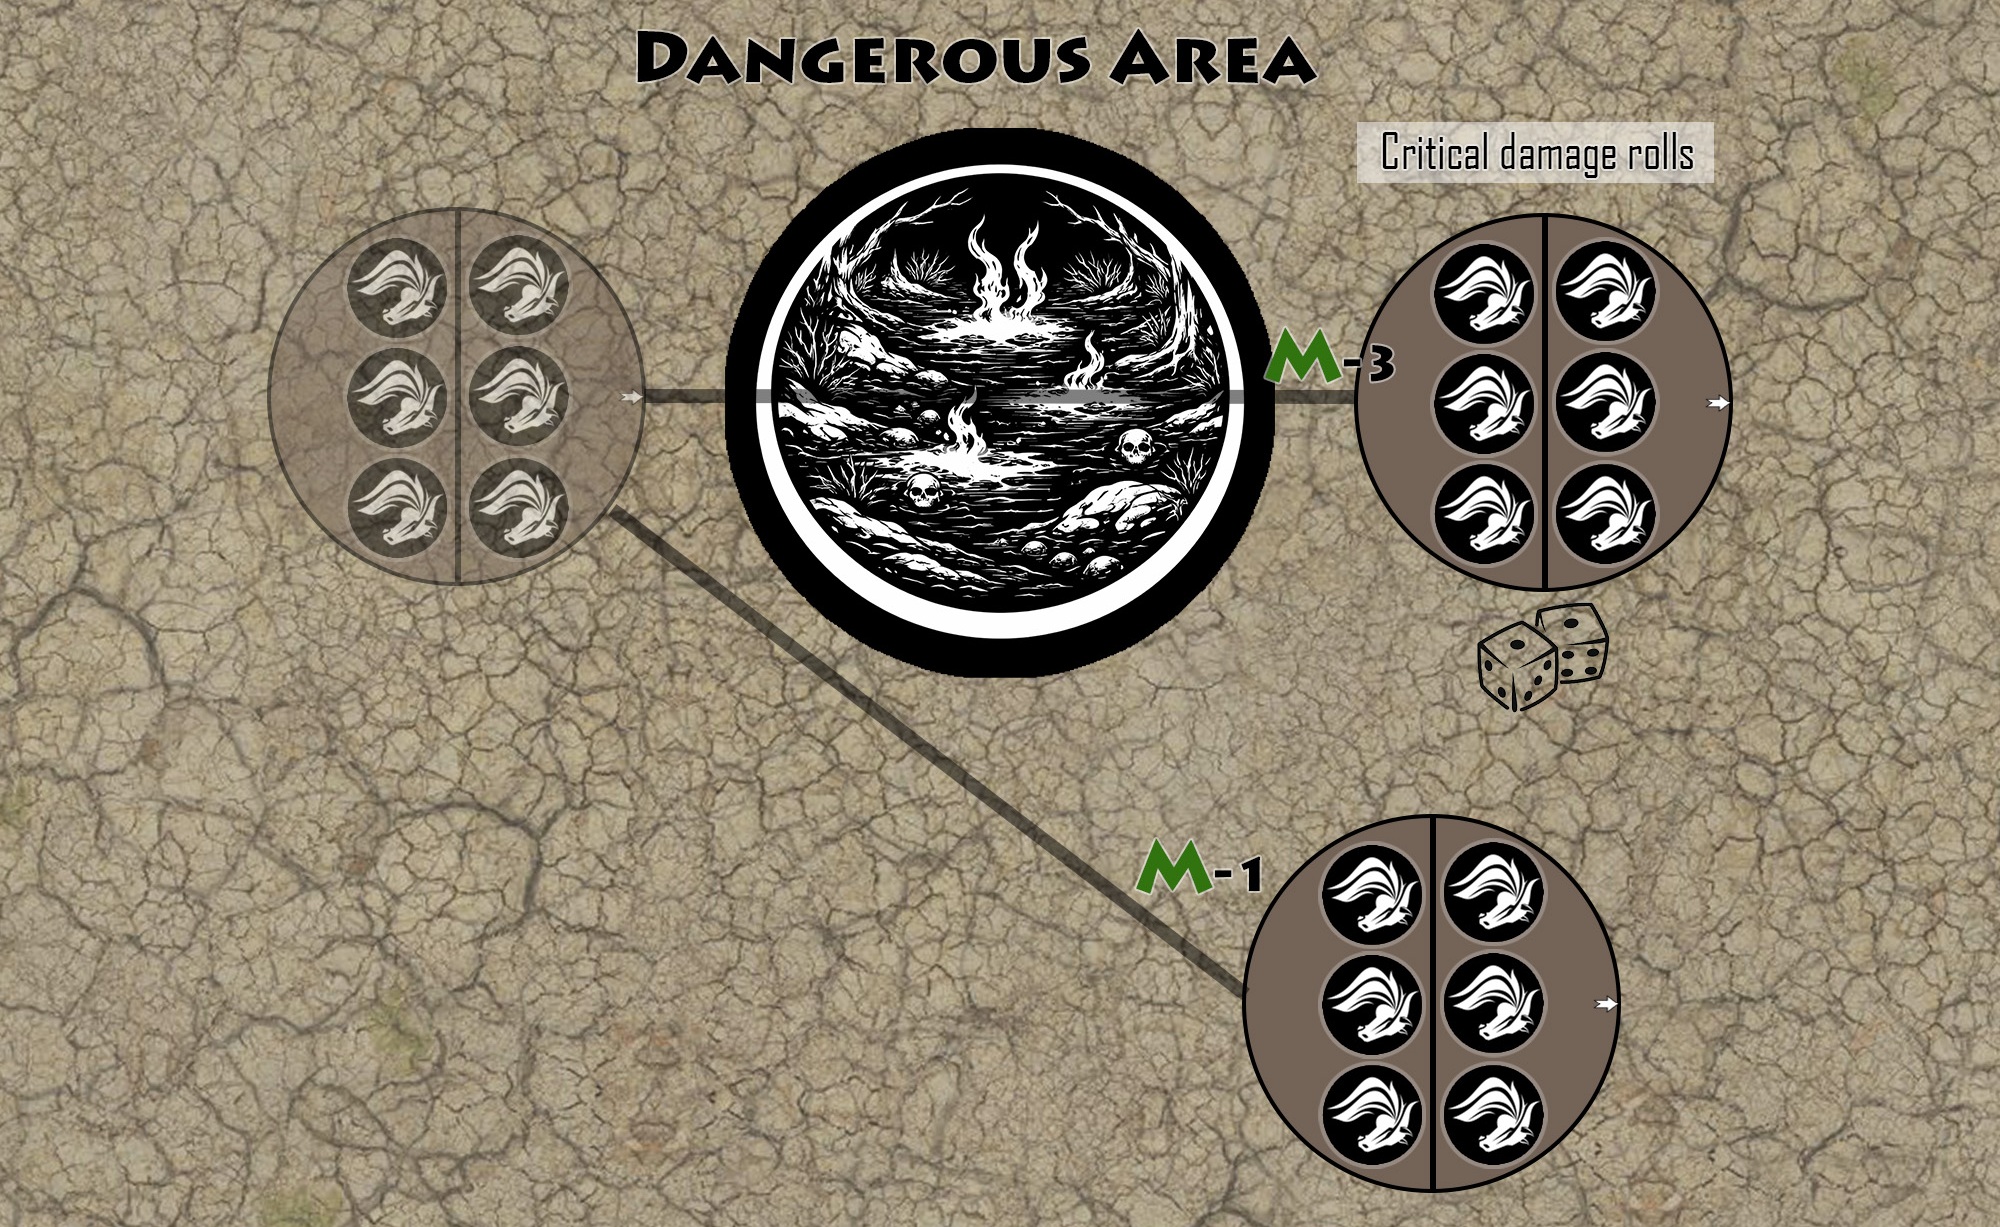
Units whose base is at least partly on an area that slows them down are Disorganized.
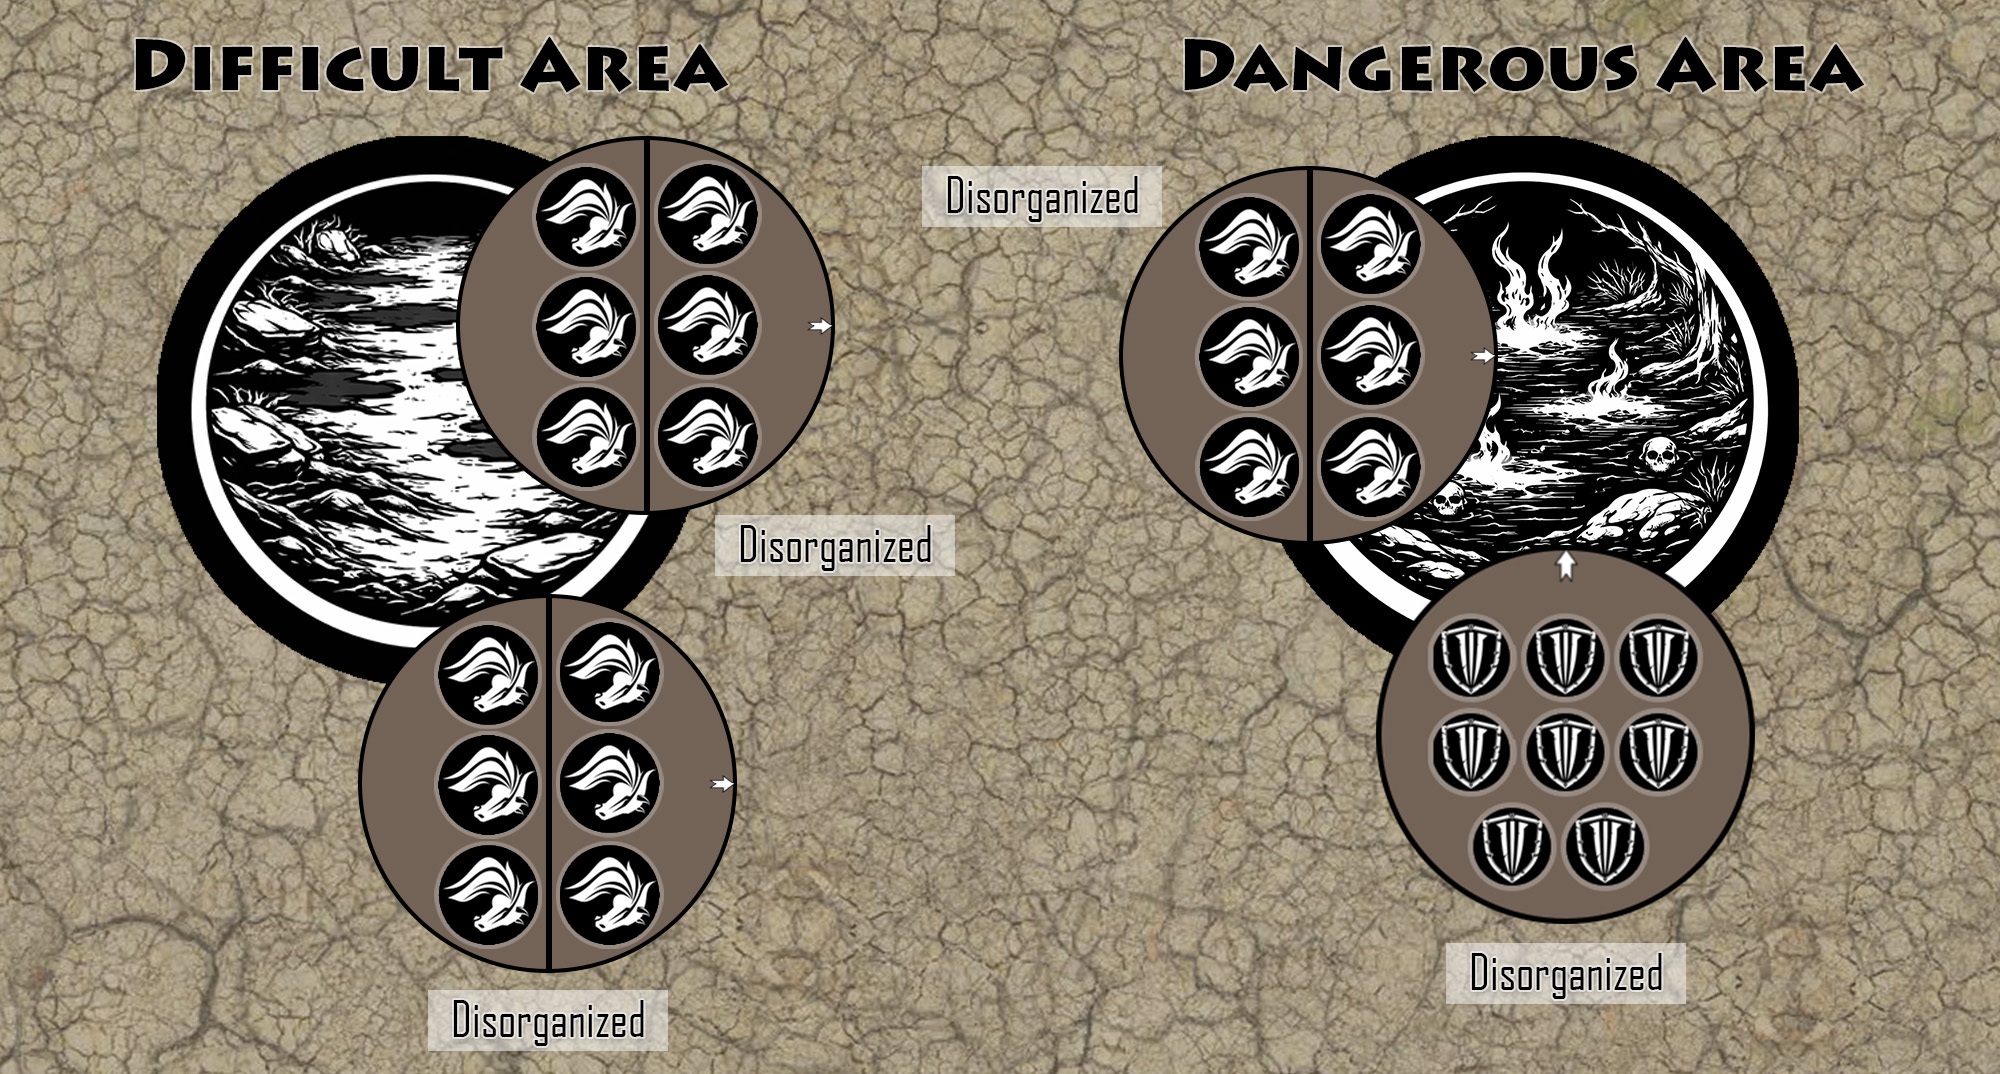
Disorganization
Disorganized Units: - Have a maximum Rk of 3, - They lose all charge and stable bonuses.
Positions
Positions
From the shattered ruins to the fortified hills, positions embody the heart of the struggle, where warriors clash to seize every inch of ground that could turn the tide of battle. These rules ensure that holding such key points feels both rewarding and tactically decisive.Enter
To enter a Position, the unit or group must meet the following conditions:
| The Position is not occupied by an enemy unit |
| The Position has sufficient remaining capacity to accommodate the unit |
| The unit can reach and be placed entirely within the Position |
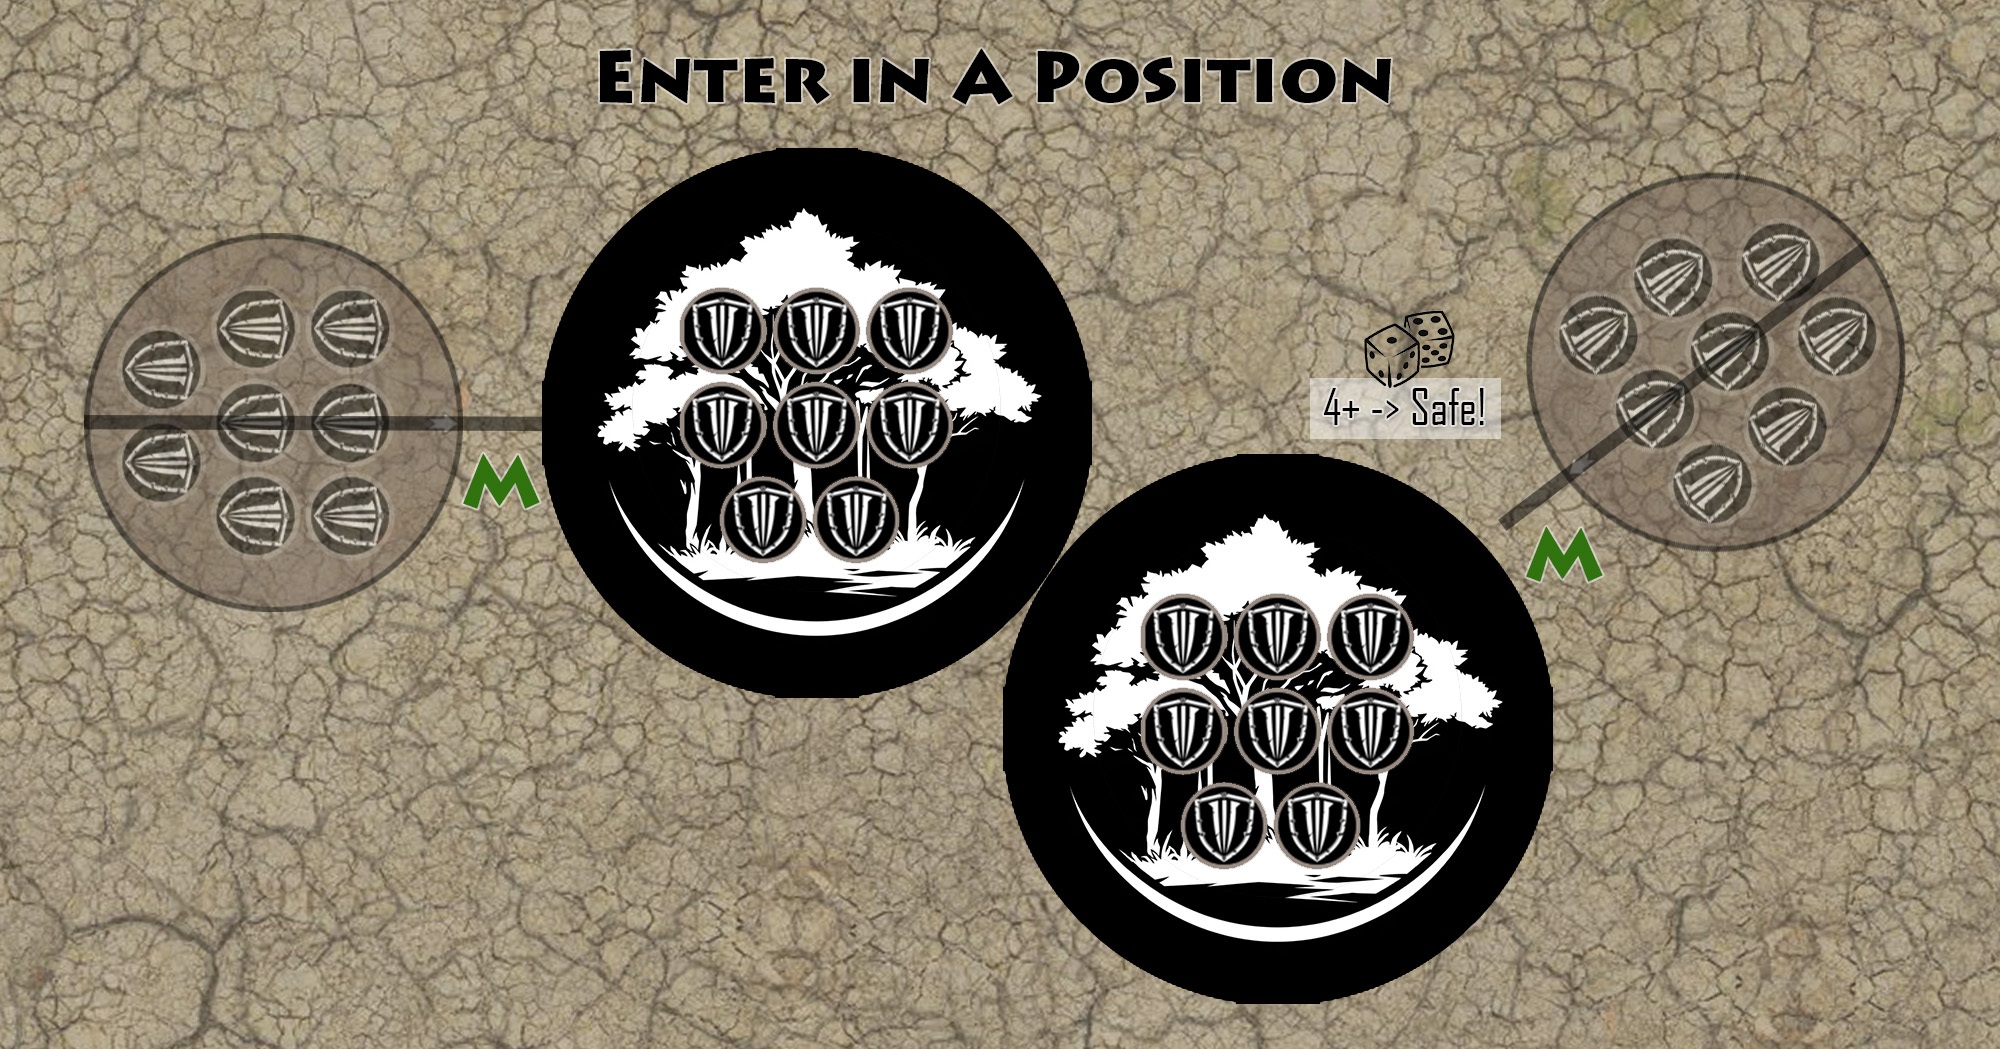
Safe!
If the unit’s M is not sufficient to allow it to be fully placed inside the Position, it must succeed on a 4+ roll on 1d6 to enter. On a failure, it is considered to have moved its full M instead. If this test fails once, it will automatically succeed on the following round, provided the unit attempts to enter the same Position.
Base
Units that occupy a Position can be placed inside or on it anywhere. As long as it occupies the Position, its base is considered to be that of the Position for Safety distance, melee, and shooting purposes.
Bursting In
On the battlefield, the shortest path is not always the safest nor the smartest. Warriors will vault walls, rush through openings, and force their way into contested ground if that is what it takes to reach the enemy.During a Charge, a unit may move into a Position adjacent to its target’s Position if your M and unit category allow it — even if it’s not the shortest path to the target.
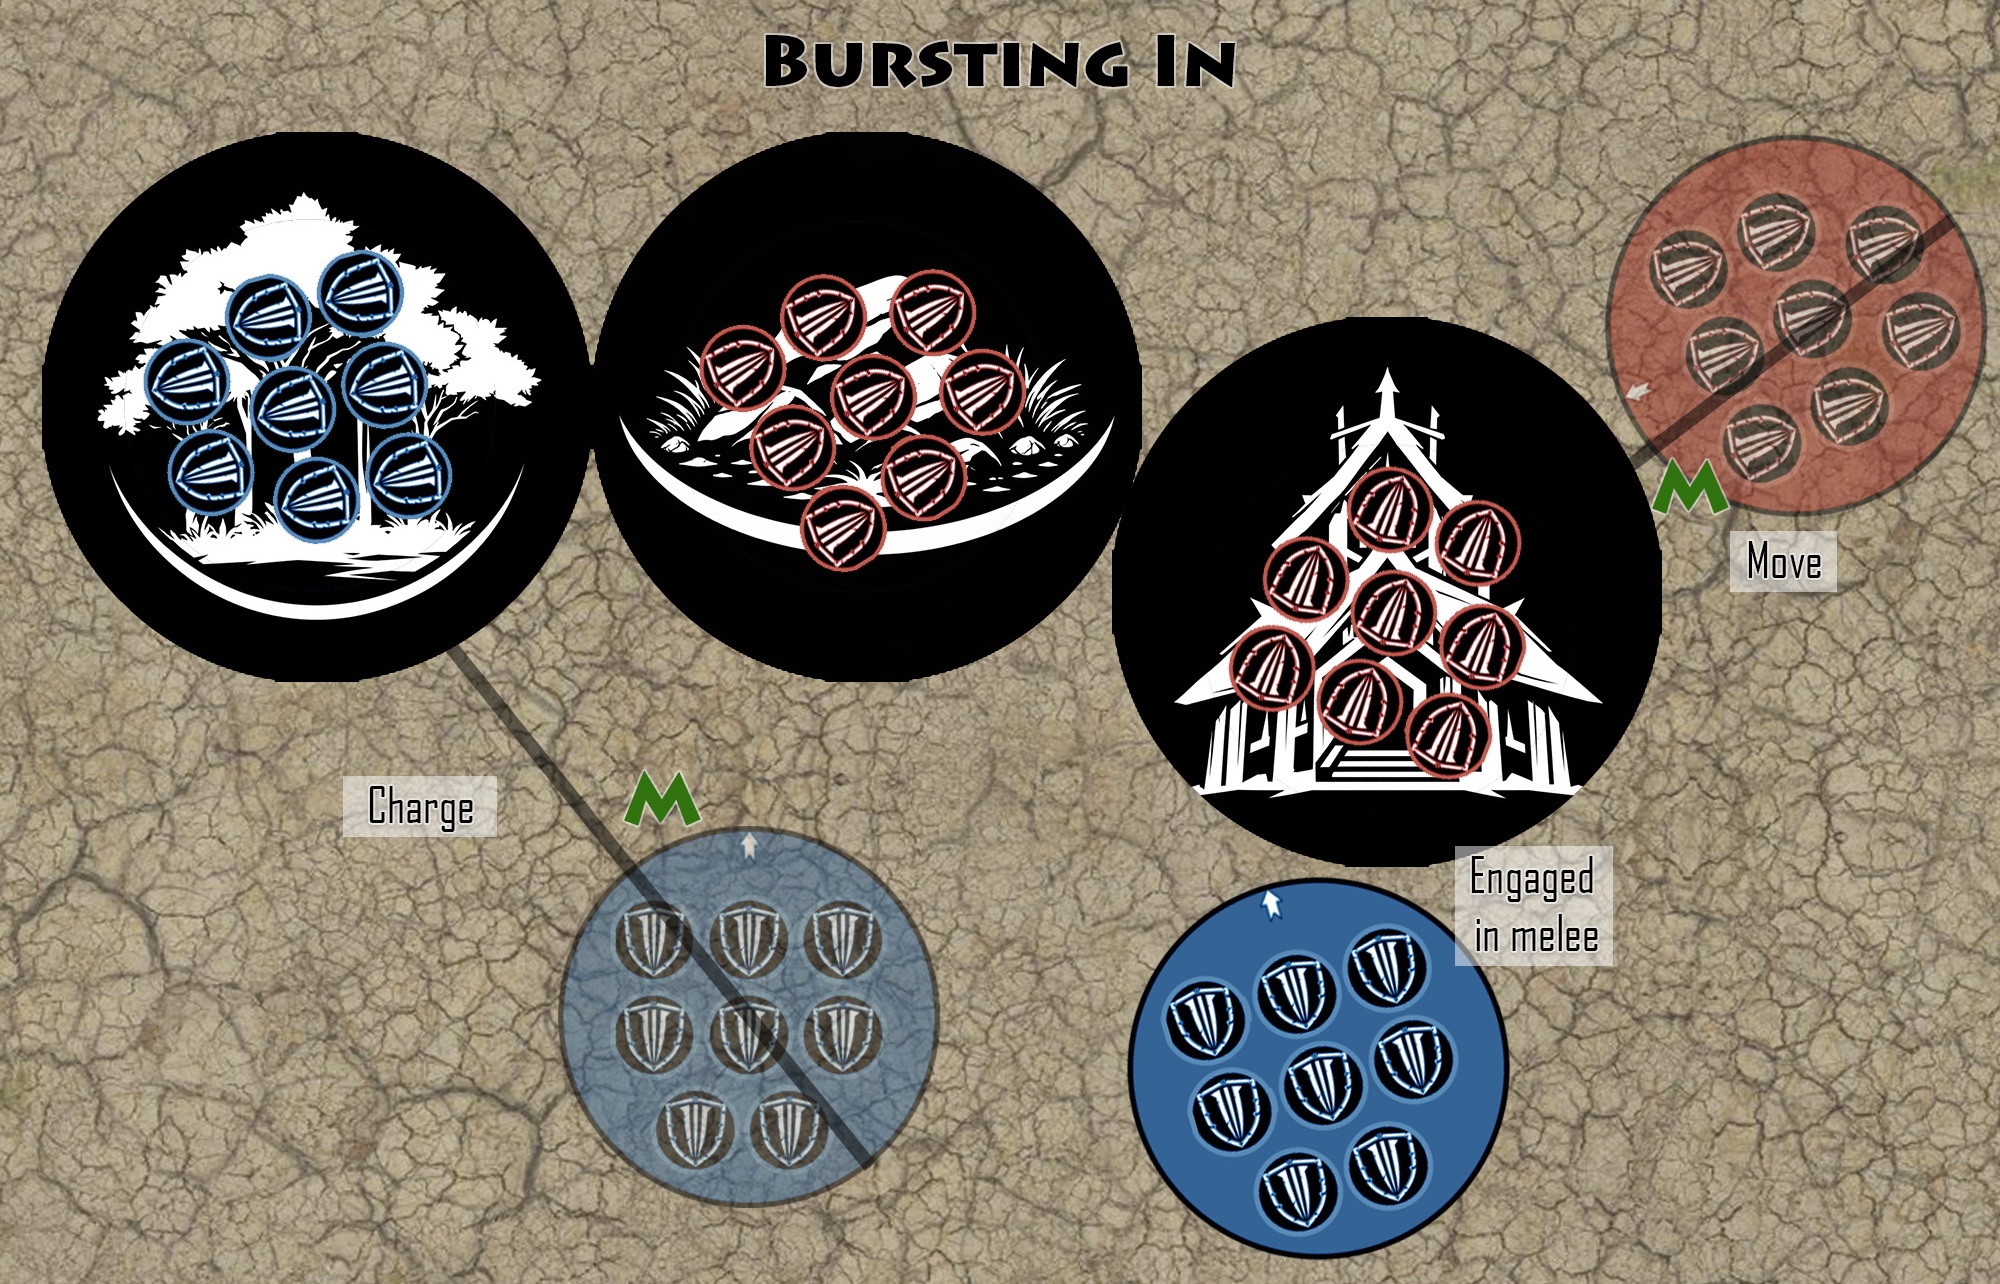
Conversely, a unit may enter a Position using a Move action even if enemy units are within 1'' of that Position. Once inside, it is considered engaged in melee with all enemy units within 1'', and vice versa.
Leave
Holding ground is one thing, but leaving it under pressure is another. A disciplined withdrawal from a position can open new opportunities—or expose troops to danger as they step back into the open.During the Movement phase, a unit can leave a Position by moving or charging, provided it was inside the Position during the previous round’s Tactical phase. It can then either be placed entirely outside the Position, or inside an adjacent vacant Position.
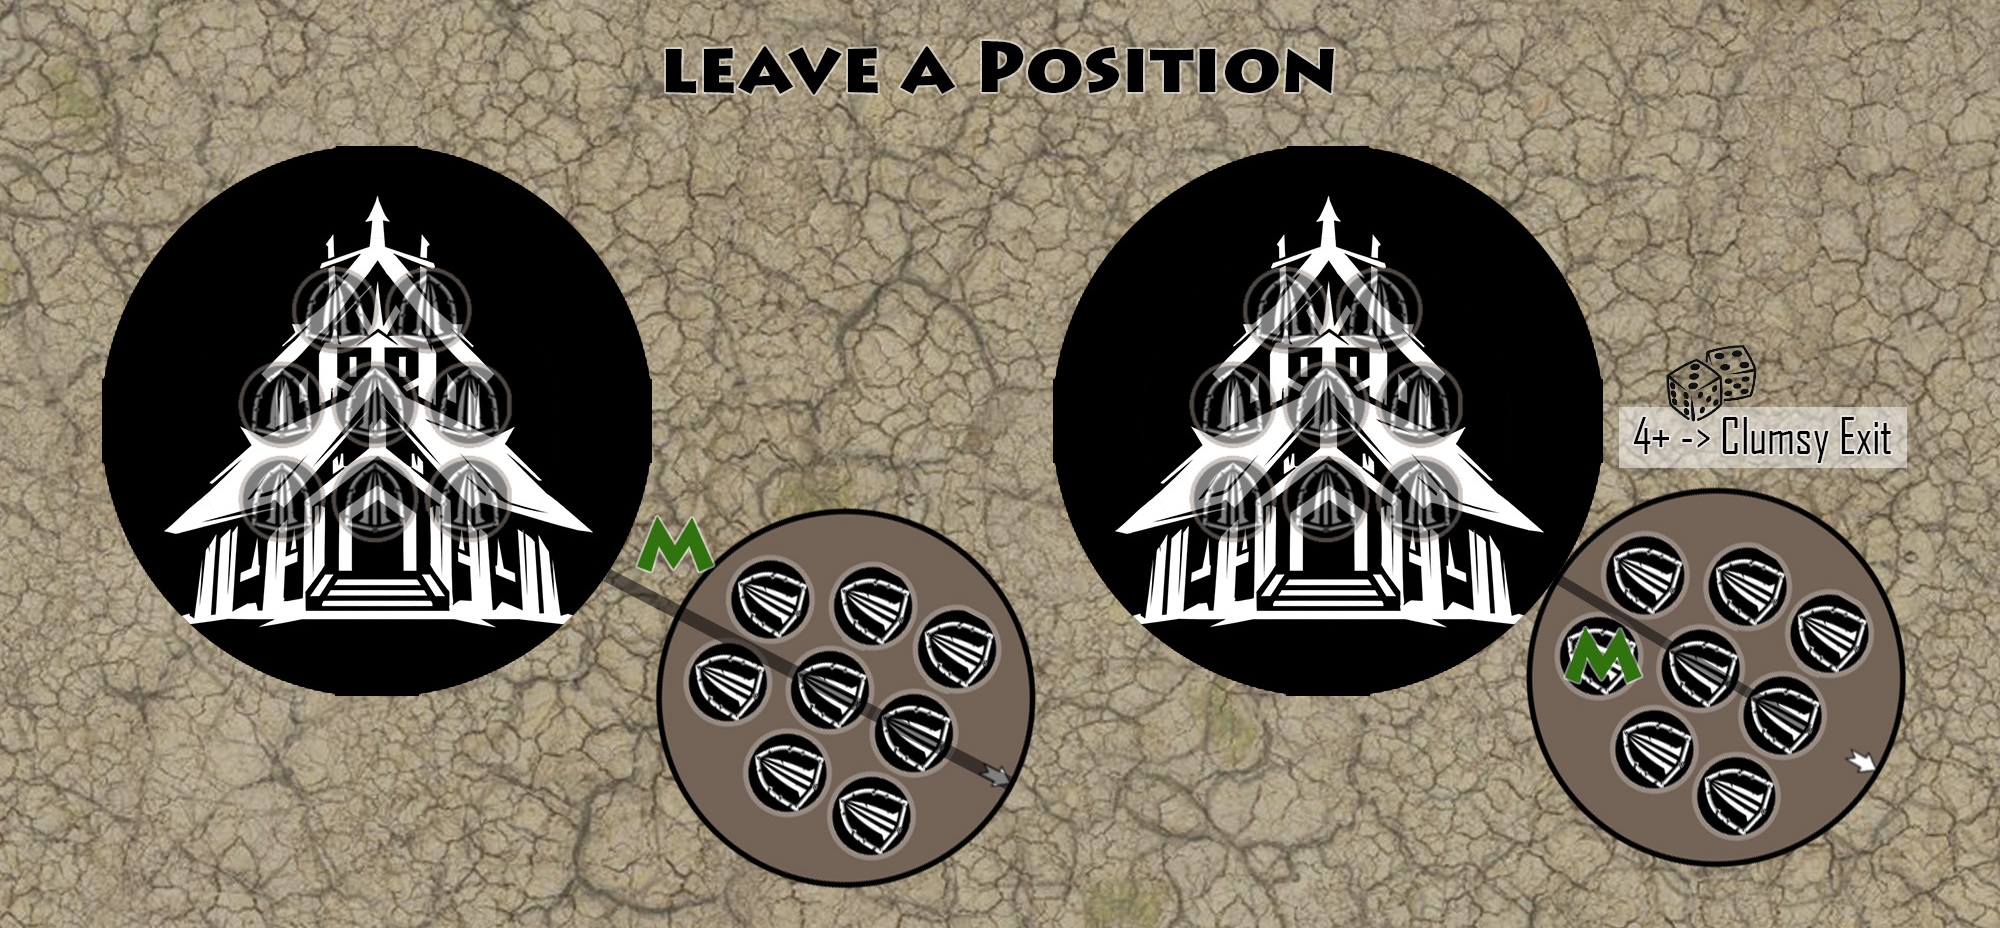
Clumsy Exit
Not every stronghold is easy to abandon. Tight spaces, heavy formations, and awkward terrain can turn even a simple withdrawal into a dangerous and uncertain maneuver.If the unit’s M is less than the width of its base and it cannot be fully placed outside the Position, it must succeed on a 4+ roll on 1d6 to exit. On a failure, it is considered to have moved its full M instead. If this test fails once, it will automatically succeed on the following round.
Cross
Some positions may be crossed without being occupied, allowing troops to press forward without becoming entangled in every defensible feature along the way.You can cross a Smooth Hill or Light Cover unoccupied by ennemy unit for -1M. However, your unit cannot end its movement on the base of that Position.
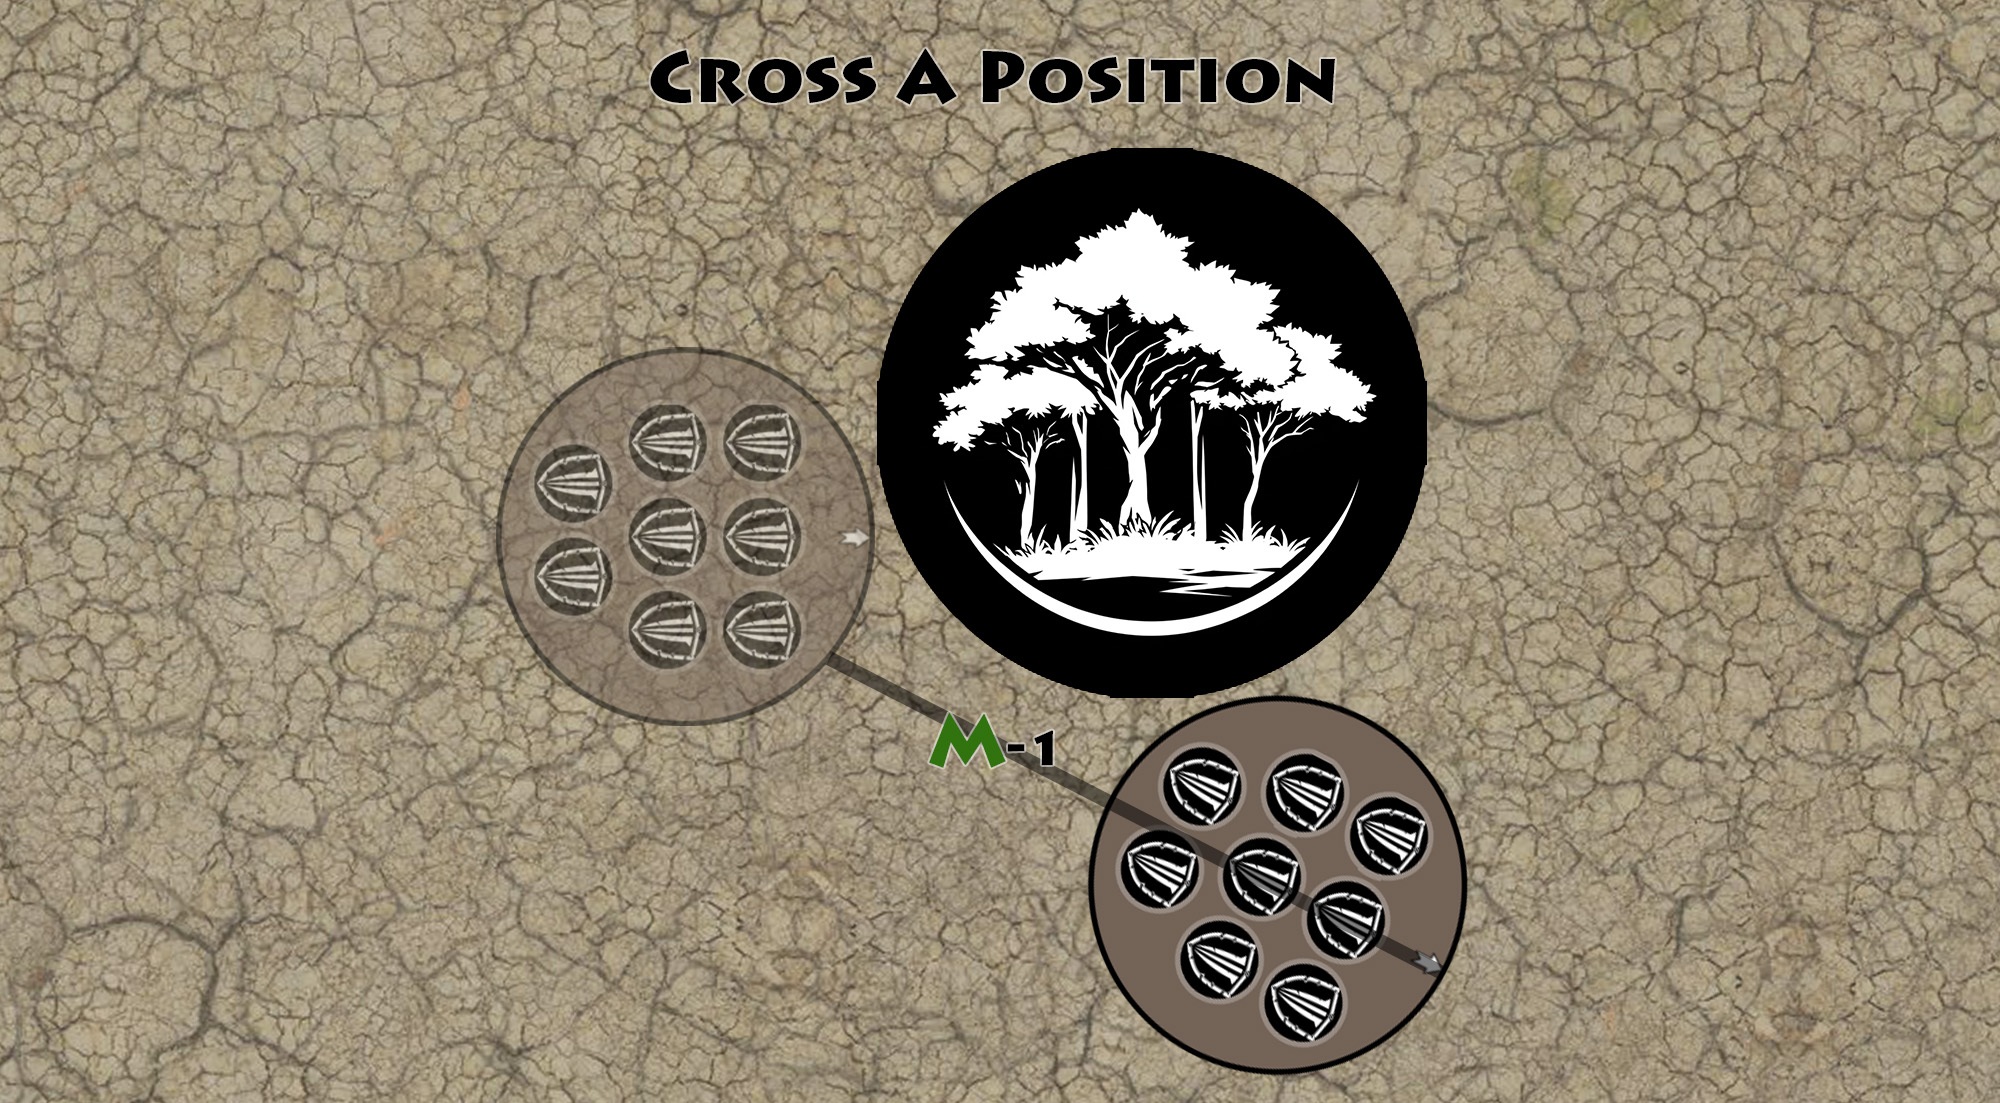
Capacity
Not every position can shelter an entire force. Space inside terrain is limited, and commanders must decide carefully how many warriors can truly fight from within.Positions can accommodate a mix of individual models or 1 group squad (character included) by Room.
If a Position is occupied by a mix of individual models, each model uses a percentage of the capacity based on its base size:
| Base size | Occupation |
|---|---|
| 20mm | 9% |
| 25mm | 11% |
| 28mm | 12% |
| 30mm | 14% |
| 32mm | 16% |
| 40mm | 25% |
| 50mm | 33% |
| 60mm | 80% |
| 64mm | 88% |
| 65-100mm | 100% |
| 101mm+ | impossible |
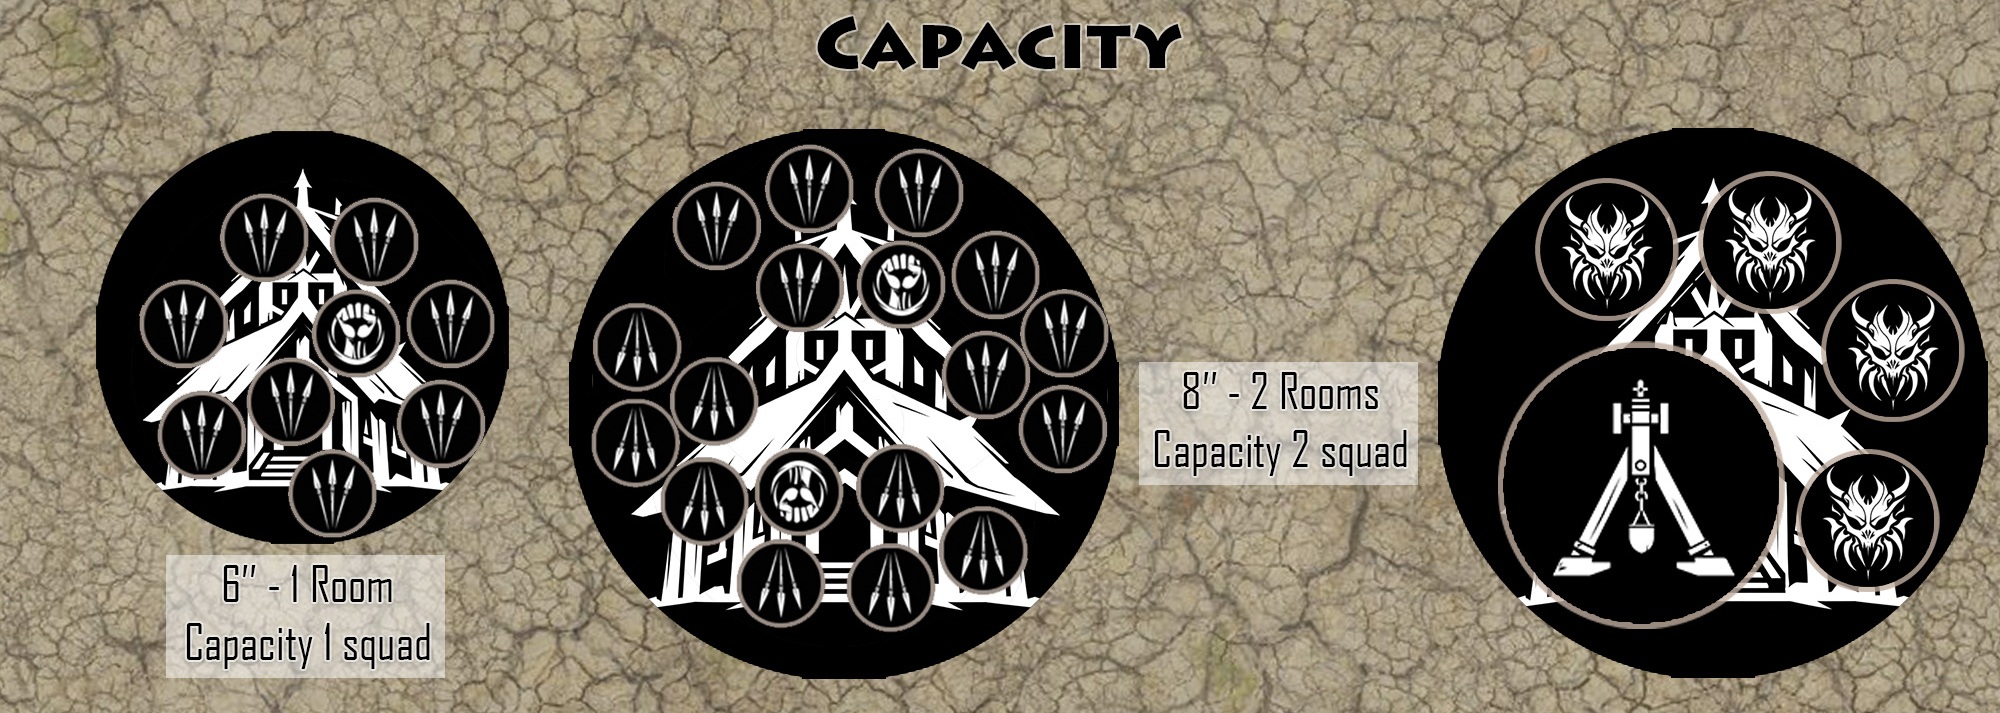
Rooms
The larger and more complex a position becomes, the more troops it can shelter. Extra rooms increase both its tactical value and the number of warriors who may fight within it.If you choose to add Rooms to your position, you increase its capacity accordingly. For example, a position with 2 Rooms can accommodate 2 groups and their Characters, or any combination of them, up to a maximum capacity of 200%.
Infiltration & Conquest
Once the fiercest fighting has passed, weakened positions may be seized by bold enemies slipping through shattered defenses and claiming the ground for themselves.Once all melees have been resolved, during the Consolidation phase, if a position is occupied at half of its capacity or less, enemy units within 1’’, providing they are only engaged in melee with Positions, may enter it, up to its capacity and subject to their own restrictions.
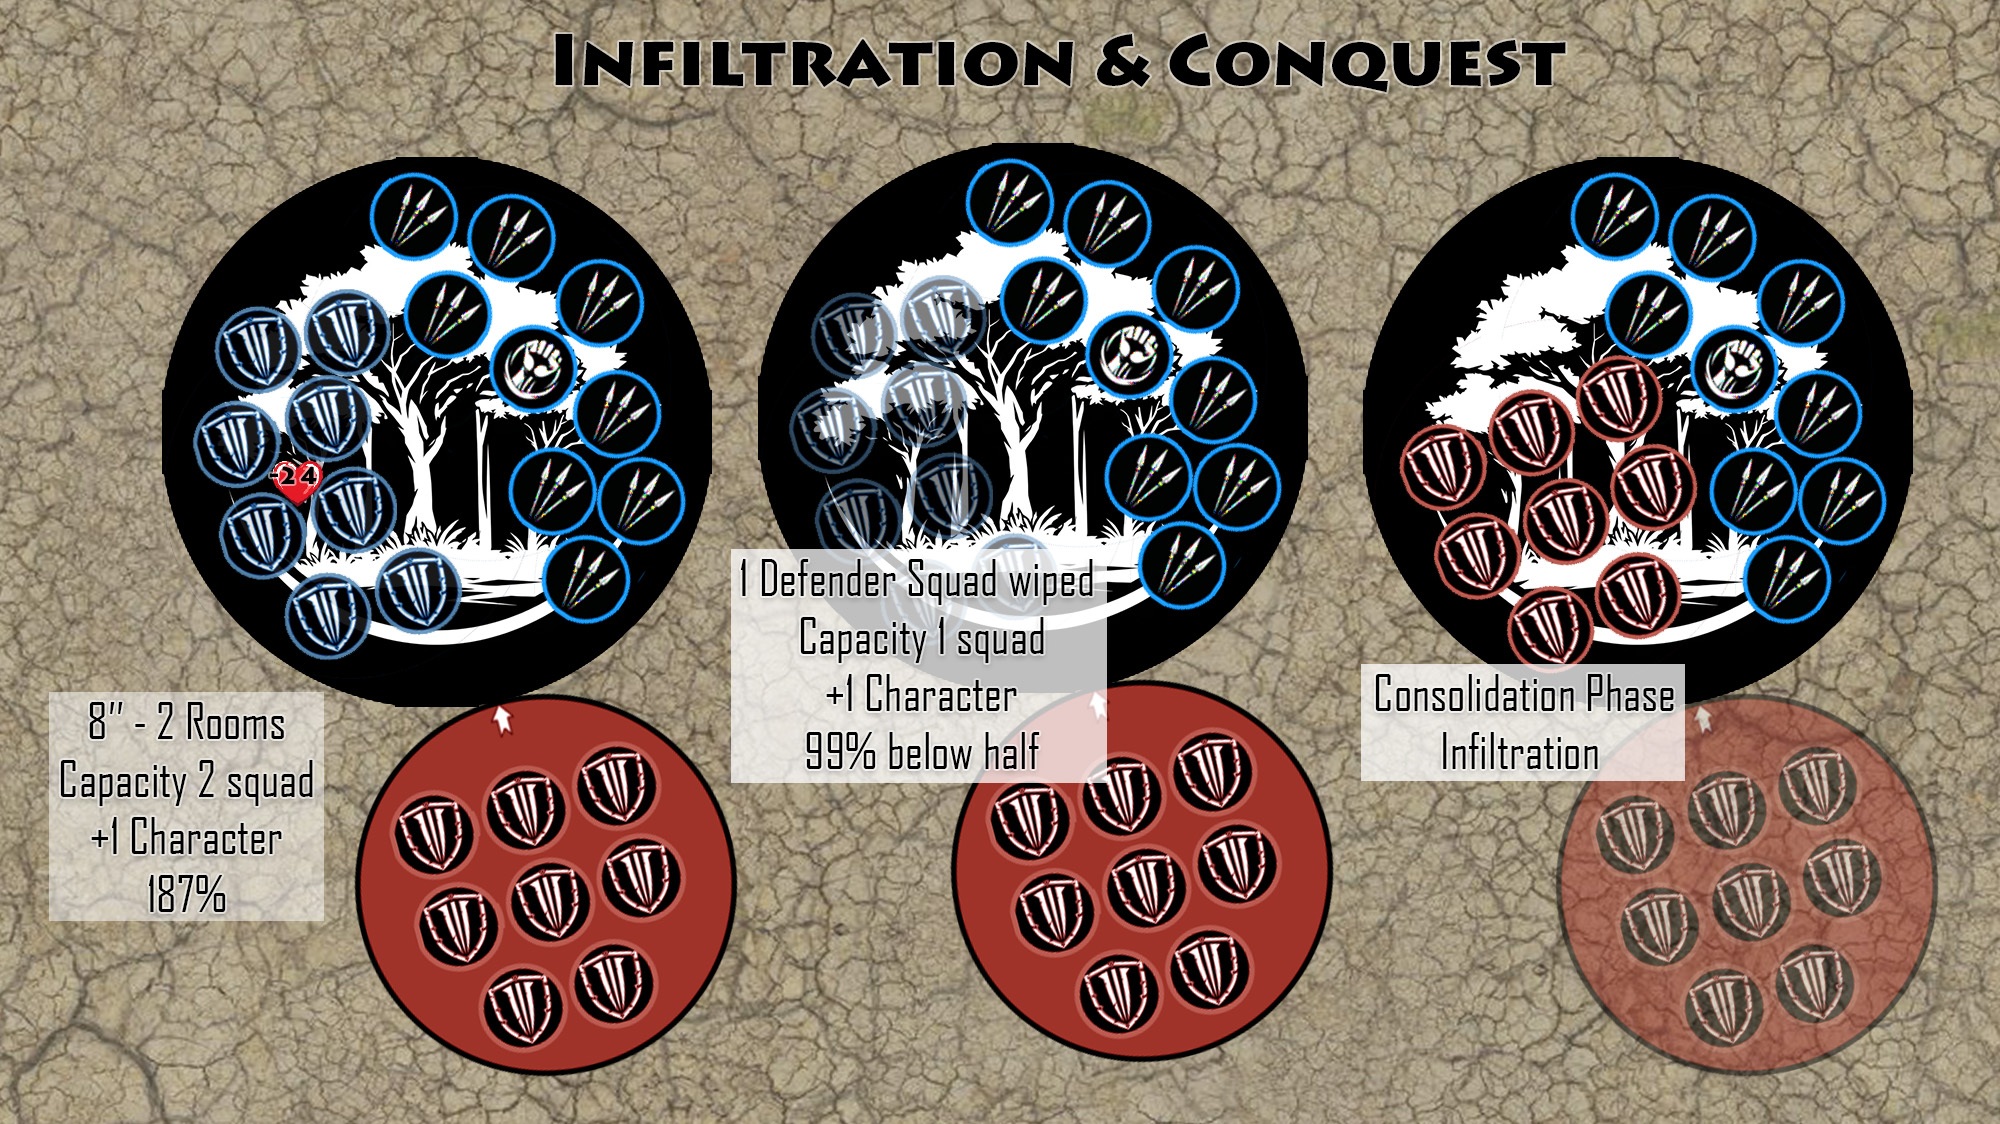
Enemy in the Compound
When enemies fight within the same cover, walls and rubble no longer offer the same protection. At such close quarters, survival depends less on fortification and more on nerve and steel.When units from opposing sides attacks and shoot each other while within the same cover, use the melee cover bonus: Defense improved by +1 for both.

Pragmatic split
In the chaos of battle, a large squad may break apart not in panic, but by necessity—one part forcing its way inside while the rest holds outside as the fight continues.During the Consolidation phase (providing the unit is eligible) or the Tactical phase, if a squad of two groups is adjacent to a position that is half occupied or less, providing the squad is not engaged in melee with units outside Positions, the unit may be split by its player. One group of his choice, may enter the position and form a new unit, while the rest of the squad forms a new unit outside.
Place the movement board of the newly formed second squad adjacent to the position and orient it freely.
The controlling player may freely distribute existing W and characters between the two new squads (maximum 1 | 2 character per squad). The maximum W and the condition of each squad are reset, but each squad must make Rout Rolls again if it suffers further degradation.
If, after the squad splits, one of the two new squads has a lower condition than the original large squad, immediately resolve the corresponding Rout Rolls.
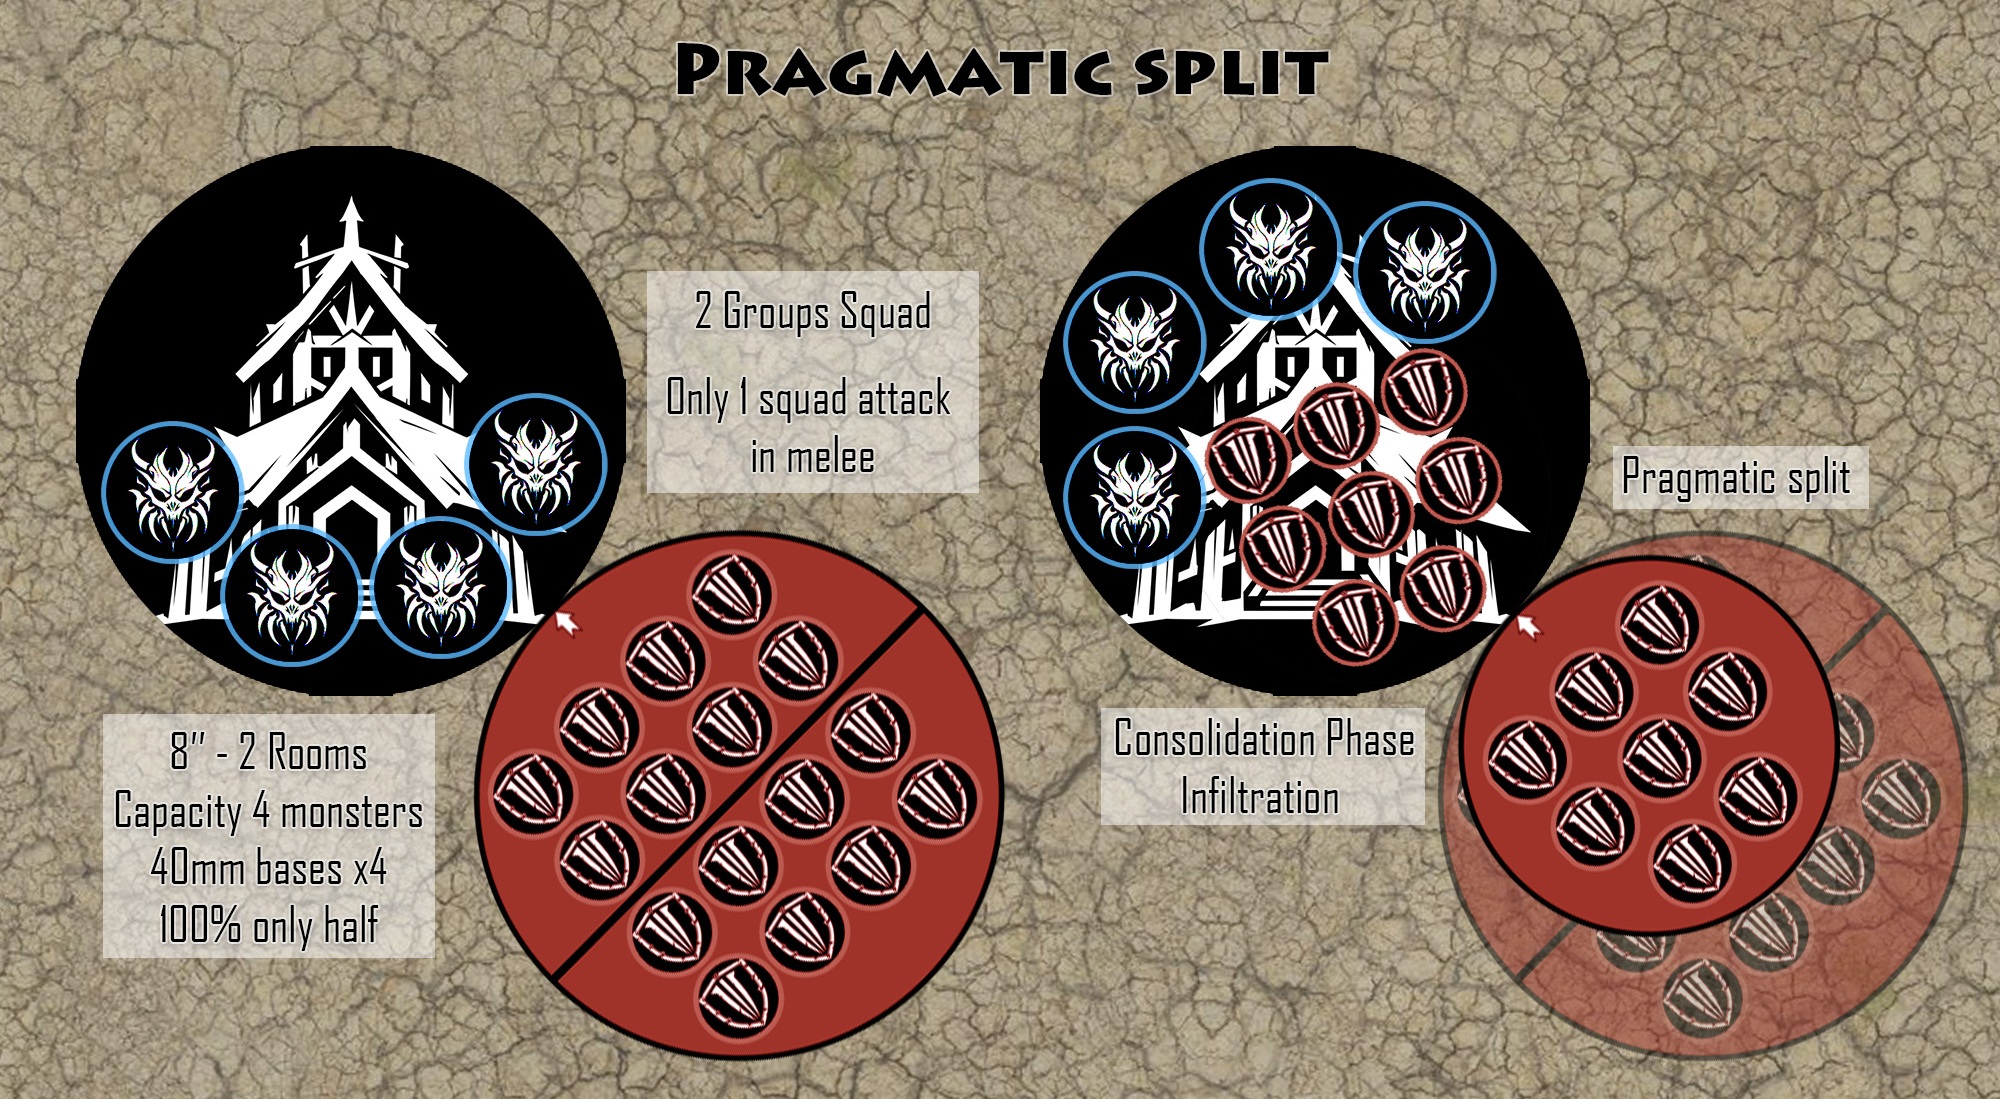
Narrow Pass
There is only so much room to fight at the mouth of a breach or doorway. Numbers alone do not always decide the outcome when space itself becomes the greatest obstacle.When a squad of 2 groups attacks a Position in melee, only one group of the squad may target it. The other group may target another unit.
A single unit can only be attacked from a position by one entity at a time. For example, if a squad of 1 group with one Character is within 1’’ of your position, which is defended by 2 groups with two Characters, you may attack the squad with one of your groups or one of your Characters, and attack the Character with one of yours. Your other two entities must choose another target or refrain from attacking.
The strongest at the gates
A defended position allows its occupants to choose who meets the enemy first, placing their strongest fighters where the assault is fiercest.If multiple units are defending a position and it is attacked in melee, the defender chooses which unit is targeted.
Shooter at the window
From within cover, marksmen can pick their targets with greater freedom, using angles, elevation, and protection to strike where the enemy is weakest.When a unit shoots at a position, it may choose its target among the eligible defending units.
Make an Exit
Sometimes the enemy stands too close to allow a proper charge. In such moments, the defenders must strike directly from their shelter, forcing the fight at the threshold itself.If a unit occupying a Position cannot charge an enemy unit within 5.6’’ because the target is too close to allow full deployment outside the Position, it may attack the target normally during the Movement phase without leaving the Position. However, it will not be eligible to act again in the Melee or Shooting phases.
If the target is destroyed, the attacking unit is placed entirely outside the Position in contact with it and as close as possible to the center of the destroyed target.
If the target survives, it may perform an Opportunity Attack against the defenders of the Position, and in this case the defenders do not benefit from the bonuses of the Position.
High ground X"
Height is power on the battlefield. From above, warriors see farther, strike more easily, and turn the shape of the land itself into a deadly advantage.Targets suffer a Defense reduced by -1 on attack rolls of units at least 1’’ higher. This applies to both shooting and melee attacks.
If the defender has two defense values (two G values in the case of a hit roll, or two T values in the case of a wound roll), choose the lower of the two.
Ignore the Indirect Shot rule on attack rolls when the target is located lower or higher.
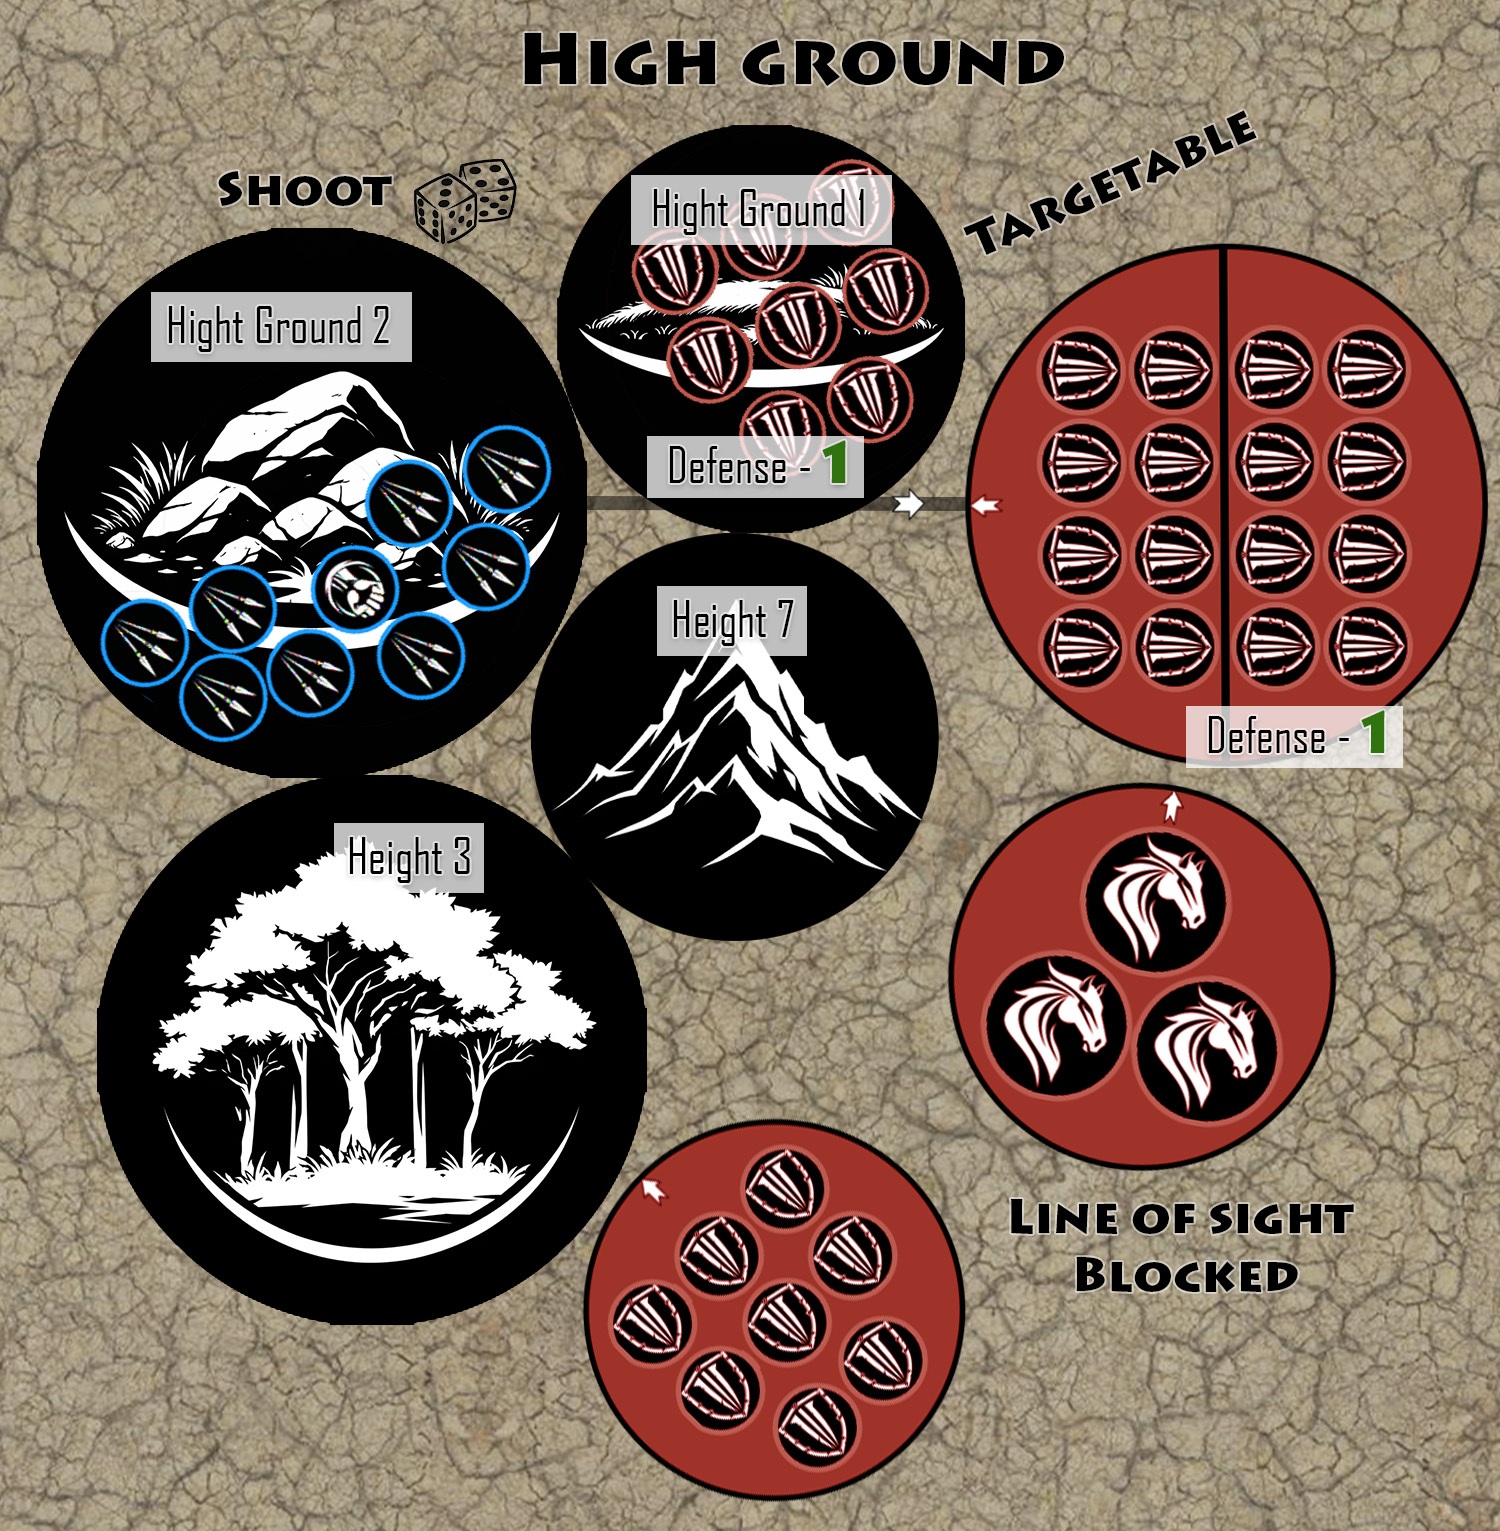
When determining line of sight, add a terrain element’s High Ground and Height values together if both apply. If a terrain element with a High Ground+Height value equal to or higher than that of the shooter or the target lies in the line of sight, it blocks it and the shot is not possible.
By default, the table and all Terrain Element have a high ground value of 0.
You may increase the High Ground value of a position by 1 when selecting it, by paying an additional +1Scp per room.
Positions - Covers - Buildings
Not all terrain follows the same rules, yet many features build upon one another. Positions form the foundation, covers add protection, and buildings expand these rules into multi-level strongholds.The rules for Positions apply by default to all Positions. Additional rules also apply to Positions that are also Covers. In the same way, additional rules apply to Covers that are also Buildings.The corresponding rules will be detailed in the following chapters.
| Positions | Smooth Hill |
Steep Hill |
Light Cover |
Basic Cover |
Heavy Cover |
Fortified Cover |
|---|---|---|---|---|---|---|
| Covers | X | X | Light Cover | Basic Cover | Heavy Cover | Fortified Cover |
| Buildings | X | X | X | X | Heavy Cover | Fortified Cover |
Covers
Covers
Covers give soldiers a chance to survive the storm of battle, whether by crouching behind rubble, holding a barricade, or sheltering inside stronger defenses. But even the best protection can be broken apart under enough firepower.Covers grant variable defense bonus against shooting and melee attacks. They may also be targeted and destroyed.
| Name | G | T | W | Replacement |
|---|---|---|---|---|
| Light Cover* | 0 | 3+ | 10 | 13+ | 12 per room | Difficult Area |
| Basic Cover | 0 | 1+ | 15 | 18+ | 12 per room | Difficult Area |
| Heavy Cover | 0+ | 14 | 17+ | 12 per room | Basic Cover then Steep Hill |
| Fortified Cover | 0+ | 16 | 20+ | 12 per room | Heavy Cover then Steep Hill |
*Shield Save 4+ This cover may attempt to negate each wound it suffers from a shot by making a save roll of 4+ on 1d6.
Attack Rolls against Covers cannot be improved.
Heavy Covers and Fortified Covers must perform a Critical Damage Roll whenever their condition deteriorates.
When replaced, all Covers regain their W.
When you destroy a Cover, roll 1d6 on the destruction table:
| Roll | Effect |
|---|---|
| 1–4 | The Cover is replaced by its next replacement (using the same base). Models from all units inside must each suffer a Critical Damage Roll. |
| 5 | The Cover is replaced by its final replacement (using the same base). All units inside are removed from play. |
| 6 | The Cover is vaporized. It is replaced by a Difficult Area (using the same base). All units inside are removed from play, and all models within 3’’ must each suffer a Critical Damage Roll. |
Hiding
Troops that remain still and keep low within cover become far harder to spot. Patience and discipline can be as valuable as armor when the battlefield falls quiet for a moment.If a unit occupying a Cover only used the Hold action during the previous round and this one, or has not yet been activated once during this battle, they got a defense improved by +2 (hidden modifier) until they do another action.
Entrenched
During the Tactical phase, if a cover is occupied solely by a single player's units, when that player activates one of those units, they can choose to place it in a Entrenched defensive stance.While being Entrenched, the attack values of all its ranged and melee weapons are halved. However, it gains a +1 defensive bonus (this bonus does not stack with the hidden modifier).
If an enemy unit enters the Cover, the Entrenched defensive stance ends.
Buildings
Buildings
Ground Structure
Buildings rise above the battlefield as strongholds, shelters, and deathtraps alike. They offer control, protection, and elevation, but once the fighting reaches their walls and floors, every room can become a battleground.A building can have up to 4 Rooms. You must pay an additional scp for each extra Room. Add a round, oval, square, or rectangular base to your building to facilitate distance calculations and improve gameplay.
Floors
You may then add one or more floors to your building. Rooms on upper floors cost half as much as Rooms on the ground floor (rounded down). For example, a building with 2 Rooms and 3 floors in total costs 10 Scp.
Only the top floor of a building may have fewer Rooms than the floors below it.
Upper Rooms do not add W to the building .
The Height value of a building is 3" per floor.
Upper Rooms have a High Ground value equal to 3 times the number of floors below them. Add +1 if your ground floor has High Ground 1".
Shooting & Targeting
Distances for shooting from and toward upper floors are measured from the base of the building , on the 2D ground. Take the High Ground of each floor into account when determining lines of sight.
Two units on the same floor cannot shoot at the same enemy unit within 1’’ of the building .
Units inside the building may shoot at enemy units on the floor above and on the floor below. Shooting is not possible if there is an entire floor between the two units.
Melee & Targeting
Closed Doors
Units on upper floors cannot be targeted by melee attacks from enemy units outside the building and within 1’’ of it.
Secure Floor
A floor occupied only by allied units is considered secure. Enemy units located on floors above a secure floor are considered encircled.
Combat on Floors
As long as a floor X is not secured, enemy units on floor X+1 above and on floor X−1 below are not considered to be engaged in melee with the units on floor X.
When a floor X is secure, enemy units on floor X+1 above and on floor X−1 below are considered engaged in melee with the units on floor X.
During the Consolidation phase, units on a secure floor may use the Infiltration & Conquest rule to move to the floor above or below.
Troublesome Neighbors
Enemy units located on the same floor but in another building within 1’’ are considered to be engaged in melee.
During the Consolidation phase, units on a secure floor may use the Infiltration & Conquest rule to move to the same floor of a neighboring building.
Stealth Infiltration
Certain units have rules that allow them to deploy into an unoccupied Position. If a building has a completely unoccupied floor, these troops may be deployed there during a Tactical phase.
Pyramidal Destruction
When a building is replaced after destruction, its upper floors lose Rooms in proportion to their height. The second floor loses one Room, the third loses two Rooms, the fourth loses three Rooms, and so on.
If, after Critical Damage Rolls, a floor contains more squads than its remaining Rooms allow, the excess squads, randomly designated, are removed from the game along with their Characters.
In the case of a mix of models, randomly remove entities until the number of occupants no longer exceeds the building’s capacity.
Placement
Placement
The battlefield is shaped not only by armies, but by the land itself. Clear placement rules ensure that terrain remains a tactical feature of the game, creating meaningful choices without blocking the battle under awkward layouts or unfair positions.Terrain Placement Rules
Scenario rules may add specific instructions for placing Terrain Elements. Unless stated otherwise, apply the following general rules:
| Each Terrain element must be placed entirely within a single zone of the battlefield (such as a deployment zone or no man’s land) and cannot overlap two different zones. |
| Each Terrain element must either be placed in contact with a table edge, or more than 6’’ away from it. |
| No Terrain element element can be on top of another. |
| Blockers and Positions must be placed either in contact with another Blocker or Position, or more than 6’’ away from all other Blockers and Positions. |
| Areas must be placed either in contact with another Area or more than 6’’ away from all other Areas. |
Decorative Elements
Players may add very small decorative terrain pieces to improve the look of the battlefield, but these are ignored for gameplay purposes unless both players agree otherwise.
Adaptation
You do not need to be perfectly exact. Use the terrain you have and adapt it sensibly. In most cases, placing terrain elements on bases of roughly appropriate size will work perfectly well.
These rules are intentionally precise so that, once learned, they make terrain easier to use in play without slowing the game down, Generating subjective conflict, or destroying the immersion. Feel free to adapt them to suit your collection, as long as both players clearly agree before the battle begins.
Elements & Affinity
Elements & Affinity
The world itself answers the call of battle—water, stone, wood, and steel shaping the fate of those who fight upon them. Affinity rules breathe life into the terrain, turning the battlefield into an ally for some, and an obstacle for others.The player who sets up a Element of Tterrain decides which Element it is linked to: Water, Wood, Stone, Urban. Some special rules grant affinities with these Elements.
Having an affinity with the Element of a Element of Terrain grants the following benefits to soldiers who have it:
| Piece of terrain | Affinity bonuses |
|---|---|
| Obstructing Terrain | If the unit has only held within 1'' during the last two rounds place it anywhere within 1'' of the Obstructing Terrain during the Tactical phase |
| Unbreachable Zones | Are considered Dangerous Areas |
| Difficult Areas Rough Area |
Are ignored |
| Dangerous Areas | Are considered Difficult Areas |
| Positions | Defense improved by +1 when occupying |
| The enemies occupying this position suffer a Defense reduced by -1 against them |
Category
Infantryman
Infantryman
Formation
Infantrymen squads of 2 groups fight in Formation.
By default,Infantrymen in formation adopt the line formation.
If your squad is not engaged in Melee, you may declare (taking turn) a formation change during the Tactical phase at a cost of -2M for that round. Your unit remains in this Formation until you declare another change.
Line: A cog in the machine
A formation within 1’’ of at least two other allied squads in line formation gains a +1B bonus.
Column: Forward march
Except for charges, columns gain a +3M bonus.
Columns are Encircled.
Square: The ultimate defense
The squad rolls -1d6 on Rout rolls.
Has no Rear arc.
The squad cannot Move or Charge while in this formation.
Terrain
Infantrymen benefit from all Positions.
Rider
Rider
Formation
Riders squads of 2 groups fight in Formation.
By default,Riders in formation adopt the line formation.
If your squad is not engaged in Melee, you may declare (taking turn) a formation change during the Tactical phase at a cost of -2M for that round. Your unit remains in this Formation until you declare another change.
Line: A cog in the machine
A formation within 1’’ of at least two other allied squads in line formation gains a +1B bonus.
Column: Forward march
Except for charges, columns gain a +3M bonus.
Columns are Encircled.
Triangle: Victory or death
Squads in Triangle formation gain +1 on their Attack rolls when Charging.
However, when not Charging, enemy units targeting them in melee gain +1 on their Attack rolls.
Terrain
Riders benefit from smooth hills.
Their M is halved when they move into, get out, or charge a Light cover or a Basic cover.
They cannot penetrate or charge Heavy covers, Fortified covers, or Steep hills.
Fierce Charge
When Riders are charging, they double their A, and they add their M to their charge movement instead of the M+2 bonus.
Dismount & Mount
At the end of the deployement phase, and if no ennemy unit is within 1’’, Riders may choose to dismount (or remount). Upon dismounting/remounting, switch their profile to their infantry/rider version.
When dismounting, compare the unit’s remaining W to the maximum W of its Infantry profile: - If the maximum W of the Infantry profile is equal or greater than the unit’s current remaining W, the unit cannot remount later. - If the maximum W of the Infantry profile is lower, the unit remaining W is now the maximum W of its Infantry profile.
For example, a unit with 18W remaining dismounts and switches to an infantry profile with a maximum of 9W. It therefore begins with 9W. Later, while dismounted, it suffers 4W and is reduced to 5W. If it remounts, it returns to its mounted profile with a total of 14W.
If the unit had 9W or fewer at the time of dismounting, it would not have been able to remount.
Remount
If the unit later remounts at the end of a Tactical phase, set its W to the remaining value it had before dismounting, reduced by any W lost while dismounted.
To prevent exploit, a same unit can only dismount and mount once per battle.
Riders cannot remount while inside a position into which they cannot enter, or if they entered it during a previous round.
Monstrous Mounts
Some Riders ride mounts that appear as Monster units in their army list. When these riders decide to dismount, instead of applying the normal rules, the unit splits into two units: one unit of riders with their dismounted profile (and any Characters) and one unit consisting of the mounts. Each new unit must be placed in contact with the center of the original unit.
Each part of the split unit, now a new unit, must succeed on a Hard Control Roll to be able to Move or Charge during this round, and suffers a −3 M penalty.
The wounds previously suffered by the unit must be distributed proportionally to the maximum W of the two units, and as evenly as possible between them.
Remount
The two units may later be reunited. During a Tactical phase, the riders may mount a corresponding Monstrous mount unit within 1’’. To do so, both squads must contain the same number of models, and the rider squad must have been recruited under its mounted profile. At that moment, the wounds suffered by the two units are added together to determine the wounds suffered by the new mounted unit. If the condition of the unit is then lower than that of either of the two units before the remount, immediately resolve the corresponding Rout Rolls.
Terrain
Regarding terrain rules, apply the Monster terrain restrictions to Rider units that are also in the Monster category.
Skirmisher
Skirmisher
Formation
This category includes soldiers on foot or mounted who fight in dispersed order. Squads of Skirmishers are either Infantrymen or Riders; however, they do not fight in Formation.
Harassment
Unlike other units, Skirmishers may shoot in any direction, including units within their Rear arc, but when they do so rule they suffer a -1 penalty on their Attack Rolls.
Charge and Retreat
Unlike other units, Skirmishers may react to a charge by moving up to M in the opposite direction if they have not moved during this round and if this movement places them out of charge range. They must succeed a Hard Control roll to do so. On a failure, they cannot react to the charge.
If successful, the charging unit may advance with its full charge move (with bonus) toward the retreating unit. If, at the end of this movement, the charging unit ends within 1’’ of enemy units, move it into contact with them; it is considered to have successfully charged those units.
The charging unit may attempt a Hard Control roll to cancel the charge and instead choose another action or target for its current activation. The Skirmishers unit still being moved.
Attack Maneuver
When charging, Rider Skirmishers may, if they succeed a Hard Control roll, move up to M in any direction before completing their charge movement.
Vehicle
Vehicle
Terrain
Vehicles benefit from smooth hills.
Movement Restrictions
Their M is halved when they move into or charge a light cover.
They cannot penetrate or charge cover, heavy cover, Fortified covers, and steep hills.
Dangerous Terrain
When moving on a Dangerous Area roll 1d6, on 1 they are no more eligible during the Movement Phase until the end of the battle and lose 1G.
Monster
Monster
Terrain
Monsters benefit from all Positions.
Large Monsters
They cannot penetrate heavy covers and small sized Fortified covers if the width of their individual bases is greater than 45mm.
Unaware
The defense of Monsters with the Drone keyword is reduced by -1 when they occupy a Cover.
Artillery
Artillery
Terrain
Artillery units benefit from all Positions.
Limitation:
You must include 2 Infantryman groups for each Artillery unit in your army.
Shooting
Close Target
Artillery units cannot shoot if an enemy is within 1’’.
Advance & Fire
Artillery units cannot use the rule Advance & Fire.
Titan
Titan
Melee
Titans can only suffer Opportunity Attacks from other Titans.
Titans more than 1'' away from an enemy Titans may perform a Charge.
Duel
If two Titans attack each other in simultaneous melee attacks, apply the Duel rules to those attacks.
Terrain
Titans do not suffer any malus and do not benefit from any bonus due to the terrain. The targets of their attacks do not benefit from the bonuses provided by their position.
Titans cannot penetrate heavy covers and Fortified covers.
Titanic Strike
The Titans benefit from the High Ground 3" rule.
Monstrous Mounts
Titan Characters follow the Riders' Monstrous Mounts rule.
Characters
Keywords
Keywords
Heroes and commanders are more than warriors—they embody the will of their people, carrying discipline, courage, or fear across the battlefield wherever they stand. The rules below define how these Characters inspire their troops, enforce cohesion, and embody the identity of their faction.Characters guide the soldiers on the battlefield. Their rules will be detailed in this chapter.
Leader
A leader gives a bonus of +1B to its squad.
Regroup
A squad that fails a rout roll, is not encircled, and is accompanied by a Leader may attempt to rally by rolling a new rout roll with the same penalties and bonuses.
If successful, the squad is not removed from the game. Instead, move the squad up to 3'' in the opposite direction of the cause of the rout roll.
During the next round, the squad cannot charge attack or shoot.
Faction leader
| Can only be recruited once. |
| If in the main faction, it is automatically designated as the general in chief. |
| Two faction leaders of the same faction cannot be in the same army. |
Named
| Named characters can only be recruited once. |
| If multiple profiles are available, only one can be selected at a time. |
Rookie
| Rookies cannot benefit from bonuses provided by characters. With the exception of their own Squad Leader and staff. |
Elite
| Elite units cannot benefit from bonuses provided by non-elite characters. |
Rare
| Rare units can only be recruited once. |
| If it is a squad, the maximum possible groups can be recruited to compose a squad. |
Characters & squads
Characters & squads
Though they may shine as heroes, Characters fight shoulder to shoulder with their comrades. Their presence shapes the squad, but within its ranks, their individuality is often masked by the rhythm of the whole.Decorative base
As long as a Character is inside a squad, its base is considered purely decorative. It does not obstruct movement, line of sight, or interactions with terrain or other units. At any moment, the player may reposition the Character anywhere within 1'' of the squad, its purpose is to indicate its presence.
For all game interactions, the Character uses the squad's base as its own.
Character & Squad
| Base | Uses the squad’s base for measuring distances and line of sight |
|---|---|
| Protection | Cannot be individually targeted by non-Character units. Gains a bonus to G depending on the condition of the squad: +3G when it is stable, +2G when it is shaken, +1G when it is destabilized |
| Movement phase | Not eligible and is considered to have been activated in the same way as their unit. |
| Shooting phase | Eligible, may choose a different target, and in this case, and counts as an independent activation. Can react when their squad is targeted, even if the squad does not react. |
| Melee phase | Eligible, may choose a different target within 1'' without other restrictions, and in this case, counts as an independent activation. |
| Condition | The character’s condition is independent of the squad’s condition. Include the character’s max W and the character’s remaining W in the calculation of the squad’s condition. |
| Charge | Is considered Charging if the squad is Charging |
| Encirclement | Is considered Encircled if the squad is Encircled |
| Disorganization | Is considered Disorganized if the squad is Disorganized |
| Rout rolls | Rout rolls for a squad not do apply to its characters. But if the squad is routed its characters must pass a rout roll with an extra d6, applying the same modifier on the B value the squad suffered, but considering their own condition. |
Left Alone
When a character’s squad is destroyed, resolve the following:
| Alone | Very Alone |
|---|---|
| If at least one friendly eligible squad is within 1'' | If no friendly eligible squad is within 1'' |
| The character is immediately transferred into one of these squads of his controlling player’s choice. | The character becomes an individual model for the rest of the game, or until he joins another squad.If the squad was destroyed while being within 1'' of at least one enemy unit, the character must be placed within 1'' of at least one of these enemy units. |
| If the squad was wiped out by an attack inflicting excess wounds, the character suffers an attack roll for any excess wounds. If at least one squad’s character survives this way, the opponent does not gain the Exalted bonus for excess wounds. | |
Join In
An individual character who meets the necessary conditions (same category of soldier, max 1|2 characters per squad group, same baze size, and within 1’’ of the squad) may join a friendly squad during the Tactical or the Movement phase, when either the character or the squad is activated.
Note that if the junction takes place during the Movement phase, the bonuses that the character offers to his squad will only be assigned to his new squad from the Tactical phase of the following round.
Hide
During the tactical phase, you may choose to hide your non-Leader or wounded, character within his squad.
When hidden, he cannot be targeted by other characters until his next activation. However, the A of all his weapons is reduced to 0.
Deployment
Deployment
Before a battle begins, heroes rarely march alone—they join the ranks of their comrades, leading them from within and sharing their fate on the battlefield.An Infantryman, Monster or Rider Character of the same category as one or more friendly squads with the same base size must be deployed within one of those squads if possible. A maximum of 2 Characters may be included in a group with model bases of 20mm or 25mm, and 1 Character in a group with model bases larger than 25mm.
Characters inside a squad are deployed at the same time as their squad, both counting as one unit.
Vehicle and Artillery Characters, as well as Characters from other categories that have no unit to be placed in, are deployed as individual models.
Delayed Deployment
Some rules allow for delayed deployment; in this case, the character can only be deployed within this squad if they benefit from the same special rule or if the deployment occurs within your deployment zone.
Redeployment
Certain rules allow the squad to be redeployed during the game. In such cases, characters may, at the player’s choice, either remain in place or be redeployed along with the squad if they benefit from the same special rule or if the redeployment occurs within your deployment zone.
Activation
After a late deployment or redeployment, the character shares the arrival roll result with its squad and may only be activated if the squad itself can be. Note that it can only react in the Shooting phase if it is personally targeted.
Targeting & Skills
Targeting & Skills
Characters are figures of legend, hard to single out amidst the chaos of battle—hidden by the ranks of soldiers, or simply out of reach until the moment is right.Indistinguishable
If other targets of the same category (infantry, rider, vehicle...) are available, a character cannot be targeted, unless he is at least 1" closer.
Unless they are the only possible target, characters cannot be targeted by shooting weapons, in cases where Rg is not specified or considered, or when the shots occur before deployment.
Skill Targeting
Characters must designate their skill's target during the Tactical phase when activated; by default, they target the same unit as in the previous round with the same bonus.
By default, character skills that target friendly units can only target a squad of the same category as the character, and with the same base.
Pts-based skills have no restrictions on the target category and base.
Commander
If the characters is not inside a squad, but the skill is meant to target the characters's squad, or it has to target eligible squads within a radius, he may target a squad of Infantrymen within 1" or the specified radius.
large command platform
If the skill is meant to target the characters's squad, or it has to target eligible squads within a radius, Titan characters may target a squad of Infantrymen Riders or Monsters within 1" or the specified radius.
Temporary Bonus
A temporary bonus means that the bonus is lost if the conditions are no longer met. For example if the Character is no longer in range or if the Character is removed from the game.
Dragon Slayer
Dragon Slayer
Legends tell of heroes whose skill and fortune make them feared by even the greatest of beasts, striking where ordinary warriors would falter.Critical strikes caused by a Character’s attacks or shots cause one additional Critical Damage Roll for models with more than 11W.
Duel
Duel
A duel is an epic fight between two Characters. Here are some rules to make it thrilling.Challenge
When a Character is targeted by attacks of another Character, if the target has neither attacked in melee combat nor shot during this turn, it may, in this specific case, react independently of his eventual squad and attack back alone.
The Character will no longer be able to shoot or attack during this round.
Cinematic Fight
If a targeted Character chooses to attack back on another Character, arrange combat as follows: If both characters would attack simultaneously Roll a die to determine which character is active first. Otherwise, the character who should attacks first is the active character at the start of the duel.
| The active character launch 1 attack roll | |
| The attack roll inflict at least 1 wound | The attack roll fails to inflict any wounds or he has no more A left |
| Resolve the effects of his previous attack like Critical damage roll and rout rolls The character remains the active character and may make another attack roll | The opponent become the active character and may launch 1 attack roll if he still has at least 1 remaining A |
Loyal Combat
The Rear Attack rule does not apply when two characters are engaged in a duel. And neither characters benefits from bonuses granted by their squad (for example, Protection) while in a duel.
Blood Calls to Blood
If both Characters have each inflicted at least one wound on their opponent, they can launch all their attack rolls on each other a second time.
Do not apply charge bonuses during this second round of the Duel.
Duelist’s Condition
Each attack roll is resolved one at a time, taking into account the current condition of the target before each attack.
This could, for example, allow you to gain a +1 bonus on your attack rolls if your opponent’s condition is now worse than yours.
As a result, it may happen that your opponent prematurely loses any remaining A if they become destabilized or destroyed after one of your attack rolls.
Not today
Characters who knock out their opponent during a duel gain the Exalted rule for the next round.
Skirmish
Warband
Warband
In Skirmish Mode, players command small Warbands of individually activated models led by powerful Warlords. This game mode emphasizes individual actions, tactical positioning, and rapid combat. It is ideal for narrative scenarios, fast-paced missions, or campaigns with character development.Recruitment
In Skirmish Mode, soldiers are not recruited as groups or squads. All models are recruited as individual units. Models are organized into Warbands, each with a total W value not exceeding 60W.
You cannot recruit a new Warband unless all your existing Warbands have at least 30W.
Moral
Models in a Warband do roll Rout Rolls individually. But also, whenever the Warband’s overall condition degrades, a single Rout Roll is made for the entire Warband. Determine the current condition of the Warband using total W remaining (including Characters). Roll the corresponding number of D6 based on this condition. Note that this Warband condition is only affected by its remaining W. All Models in the Warband use this same roll, but compare it individually against their own B, modified by any penalties or bonuses they may have.
Mismatched Condition Penalty
If a model's personal condition is lower than the condition of its Warband, it suffers -2B on the Warband's Rout Roll.
Frightening
If an attack or shot that mostly triggers the Rout Roll also applies a penalty to B, that penalty applies to the entire Warband's Rout Roll.
Warlord & Command
Each Warband must include at least one Leader Character, designated as the Warlord of that Warband.
A non-character model located more than 12" from its Warlord suffers a temporary -2B penalty.
When a Warlord is within 1" of an enemy unit, the entire Warband gains a temporary bonus of +2B.
Loss of the Warlord
If the Warlord is out of action, -2B to the Warband Rout Rolls (but not for the individual Rout Rolls).
Characters
Special rules
Characters special rules that would normally apply to a squad now affect all eligible soldiers in the same Warband within 12" of the Characters. These bonuses do not apply to other Characters.
If a bonus grants a fixed number of A or allows soldiers to recover a fixed number of W, it does not apply to every model individually. Instead, the bonus is shared across one or more eligible soldiers in the Warband, as chosen by the controlling player.
The entire Warband counts as two squads for special rules purposes. A rule that allows a squad to gain +1A per group share therefore allows 2 eligible models in the Warband to gain 1A or one model to gain 2A. Similarly, a rule that gives back 2W to the squad can give back 2W to an eligible member of the Warband, or 1W to 2 models.
Offensive skills that are supposed to target a unit also target an entire Warband, taking into account the points cost of all its members, including characters. If the skill roll of an offensive skill is improved based on the troop category targeted, apply the improvement if the total Pts of that troop category constitute the majority of the Warband' Pts.
Sergeants
A Sergeant can only apply his Leader bonus to models whose base point cost is lower than the one of his own squad.
Warband Summary
| Theme | Skirmish Rule |
|---|---|
| Warband Size | Max 60W per WarbandNew Warband only if others have ≥30W |
| Warlord | Leader Character required in every Warband
+2B for the Warband when the is engaged in melee
-2B to models more than> 12" away from Warlord
-2B on the Warband |
| Rout Rolls | When Warband "condition" degrades |
| Weakness | -2B on the Warband |
| Recruitement | Each model is recruited independently |
| Aura | Character's special rules bonus to the squad apply to eligible models in the Warband instead. |
Skirmish Mode
Skirmish Mode
When playing a scenario in Skirmish Mode, the following rules apply:
It’s a Small World
As indicated in the Warband profiles, all distances are halved. This includes not only Rk and M, but all distances referenced in the game rules, including the length of the battlefield (but not its width).
Melee Activation
During the Melee Phase, and more precisely at each Rk step, models with the same Rk do not attack simultaneously.
Instead, players activate their models one by one, starting with Player 1. The effects of each attack are fully resolved before the next model is activated.
Players also do not declare their attack distribution at the start of a Rk step. Instead, targets are chosen individually as each model is activated.
Character Targeting
Characters within a Warband are not considered to be in a squad and are therefore not protected by it. They follow the normal targeting rules for characters used as individual models.
Vacant Positions
During the Consolidation Phase, models may enter a room within a position if the room is less than 50% occupied and all other conditions are met.
If enemy models are present in the same room, they must prioritize targeting each other.
Ammunition
In this game mode, the ammunition carried by the models at the start of the battle is equal to the weapon's Rg.
Scenarii
Size
Size
Army Size
Count 1 for each unit, except for squads of 2 groups which count as double, and Infantry or Cavalry Characters which count as 0. Sum these up to determine the size of the army.
Most scenarios are designed for armies with a maximum size of 72. Feel free to adapt them if you wish to play with larger armies.
Battlefield Size
The size of the battlefield is determined by the sum of the size of both armies.
| Size | Armies | Battlefield |
|---|---|---|
| 1 | 0 - 24 | 4 x 2’ |
| 2 | 25 - 48 | 4 x 4’ |
| 3 | 49 - 72 | 4 x 6’ |
Terrain
Terrain
The ground itself shapes the battle, turning each choice of terrain into a struggle for control and advantage.The different modes of terrain selection allow for placing a total value of Xscp worth of terrain. Multiply this X value by the size of the battlefield to adapt the total amount of terrain to the scenario.
Random and Alternating X
Both players have Xscp of terrain to place on the battlefield. They take turns rolling 1D10 to randomly determine the terrain to be placed, then place it on the battlefield. Continue alternating until neither player has any scp remaining.
No Man’s Land X
Apply the Random and Alternating deployment, but placing a piece of terrain outside your deployment zone costs twice as many scp.
Disputed Land X
Apply the Random and Alternating deployment, but placing a piece of terrain inside your deployment zone costs twice as many scp.
Strategic Maneuver
Once all Terrain element have been placed, each player rolls 1d6, with a +1 bonus for the player who placed the most scp(+2 if they placed twice as many). If a player rolls a higher result than their opponent, they can choose to reverse the deployment zones.
Reroll
You may reroll terrain rolls of 5 or less once.
Defensive X
The defender may choose Xscp worth of terrain directly from the terrain table by paying the cost associated with each piece of terrain. And he can place them in his deployment zone and in no man's land.
Offensive X
The attacker may choose Xscp worth of terrain directly from the terrain table by paying the cost associated with each piece of terrain. However, they cannot place any terrain inside the opponent’s deployment zone.
Deployment Type
Deployment Type
The way an army enters the battlefield can decide the flow of the first exchanges — a well-timed deployment often wins the battle before the first strike is even made.Reserve
During deployment, if your deployment area is adjacent to at least one table edge, instead of placing a unit on the battlefield, you may place it in Reserve. This counts as a pose.
Delayed deployment: Starting on round 1, if this unit has not yet been deployed, once per battle, when it is activated, you may deploy it anywhere fully within your deployment area.
Some units have special deployment rules that allow them to be deployed advantageously during battle. In such cases, replace the basic rule with their specific deployment rule.
Scenario deployement rules
Form your squads (with associated characters) in turn before the start of deployment, beginning with the player who has the most entities. For deployment purposes, each complete squad counts as one unit.
Some scenarios apply only one type of deployment for both armies, or a different one for each side. If multiple types of deployment are applied to the same army, you may adjust the proportions accordingly — for example when playing a campaign.
Alternating
The player who has the most entities places their first unit within their deployment zone. Then, the opponent places 2 units. The first player then places 3 units, and so on, alternating until all units have been deployed.
Attack-Defense
The defender places all of their entities first, followed by the attacker.
During the movement phase of the round 1, the defender may force the attacker to activate all their units first (without any reaction from the defender).
During the shooting phase of the rounds 0 and 1, the defender may activate all their units first (without any reaction from the attacker).
Reinforcement X
This portion of the army’s units is deployed at the beginning of round X on a 6+ on 1d6, or at round X + 1 on a 5+, or at round X + 2 on a 4+, and so on. Roll separately for each army.
Reinforcements on the way still count toward the total points of the army. However, if at the end of a round none of your units occupy the battlefield, you automatically lose the game.
Contextual Objectives
Contextual Objectives
Victory is not always about annihilation — it is often the subtle pursuit of objectives that defines true mastery on the battlefield.Scenario Objectives
During a scenario-based game, unless otherwise specified, all the standard objectives from the Victory chapter apply as normal. The following rules expand upon these base conditions, allowing each scenario to adjust the importance of certain objectives or introduce new, context-specific ones. These variations reflect the strategic priorities and narrative focus unique to each battle.
Primary Objectives
Primary objectives award three times more Vp.
Additional Objectives
Additional objectives award Vp to both armies.
Disabled Objectives
Disabled objectives do not award any Vp.
Absolute Objectives
If a player meets the conditions of an Absolute Objective, they immediately win the game.
Stand Firm
In scenarios where one player is designated as the defender and the other as the attacker, at the end of round 10, the defender gains +1Vp; at the end of round 11, +2Vp; at the end of round 12, +3Vp; and so on.
Anticipatory Skills
Anticipatory Skills
Some skills are used before the battle or deployment begins. When both players have such skills, resolve them as follows.
First Player
Before deployment and even the choice of the terrain, determine the First Player. This is the player who controls the unit with the highest Pts value.
Alternating Activation
Players then alternate activating their units’ anticipatory skills, starting with the First Player.
If a player chooses to pass, they cannot activate any more anticipatory skills during this step. The opposing player may then resolve all of their remaining anticipatory skills.
Scenario Rules
Scenario Rules
Each scenario carries its own twists — unexpected ambushes, night assaults, desperate stands — that shape the rhythm and chaos of battle.Scenario Overview
Each scenario offers a unique gameplay experience. For every scenario, you’ll find a battlefield map that shows the deployment zones, along with a summary table detailing the key rules that apply — Terrain, Deployment, and Objectives.
The description provides a narrative overview of how the battle unfolds and what victory conditions apply. If you’re already familiar with the scenario rules, you can skip it — all essential information is summarized in the table above. The description exists primarily to help new players understand the scenario flow without needing to cross-reference the rulebook before playing.
If a scenario includes a custom rule, it applies only to that specific scenario. Be sure to read it carefully, as it may significantly alter your strategy.
Surprise Attack
Until round 2, the defender cannot activate his units during the Movement and Shooting Phases but may attempt to react during the Shooting Phase of round 1.
Any units that could have moved in round 0 will instead act in round 1 without penalties.
Add +1d6 to all Rout rolls and all Control rolls made during rounds 0 and 1.
Skirmish
This scenario follows Skirmish rules.
Night
All Control rolls are made with one additional d6. All Shooting weapon Hit rolls suffer a -2 penalty.
Desperation Energy
Defender's units that are not removed from play after a rout roll with at least 2d6 gain the Exhalted rule until the end of the battle.
Custom
Refer to the scenario description to determine which specific rules apply.
A1 - Pitched Battle
A1 - Pitched Battle
In this scenario, the two armies will clash on chosen terrain to settle their conflict. There will be few pieces of terrain to favor large maneuvers.Battlefield
| 1’ – Deployment zone – Player 1 |
| 2’ – No man’s land |
| 1’ – Deployment zone – Player 2 |
| Terrain | No man’s land 2 Strategic Maneuver |
|---|---|
| Deployment | Alternating |
| Primary Objective | Land Domination |
| Additional Objective | Symbolic Victory |
| Balance | 1 / 1 |
Description
This scenario is perfect for testing the basic mechanics of the game, especially if you are not yet familiar with the rules of terrain. Although it is balanced, specialized units with bonuses related to terrain will be at a disadvantage.
Terrain
The two players alternately place 2/4/6 scp of randomly selected terrain (1D10). Terrain placed outside of their deployment zone costs twice as many scp.
Deployement
Then players each roll 1d6, and the one who rolls the highest result places their first unit in their deployment zone. The opponent then places 2 units. The first player places 3 units next, and so on, until all units have been deployed.
Objectives
The main objective of the battle is Land Domination, which means you gain +3Vp if no enemy units with at least 8W are closer to your deployment zone than to theirs.
The Symbolic Victory objective is also active, granting +1Vp if you have captured more banners than your opponent.
A2 - Unexpected Encounter
A2 - Unexpected Encounter
In this scenario, two armies marching towards each other encounter each other on terrain they haven’t really chosen.Battlefield
| 1’ – Deployment zone – Player 1 |
| 2’ – No man’s land |
| 1’ – Deployment zone – Player 2 |
| Terrain | Random and Alternating 4 Strategic Maneuver |
|---|---|
| Deployment | Alternating |
| Primary Objective | cut retreat |
| Additional Objective | instill fear |
| Balance | 1 / 1 |
Description
This scenario is ideal for balanced battles with various terrains that give all troop types a fair chance.
Terrain
The two players alternately place 4/8/12 scp of randomly selected terrain (1D10).
Deployement
Then players each roll 1d6, and the one who rolls the highest result places their first unit in their deployment zone. The opponent then places 2 units. The first player places 3 units next, and so on, until all units have been deployed.
Objectives
The primary objective, cut retreat, focuses on penetrating the enemy’s defenses to gain +3Vp by positioning any of your units with at least 8W in the opponent’s deployment zone. A more ambitious goal awards +6Vp in total if one of your units with at least 8W occupies a Cover or Upland within the opponent’s deployment zone, highlighting the importance of aggressive maneuvers and terrain exploitation.
Additionally, the instill fear objective is active, rewarding +1Vp for routing more enemy units than your opponent since the battle began, encouraging tactics that demoralize and disperse enemy forces.
A3 - Junction
A3 - Junction
In the Junction scenario, two armies clash while awaiting reinforcements that will arrive at a random round, turning the tide of the battle.Battlefield
| 1’ – Deployment zone – Player 1 |
| 2’ – No man’s land |
| 1’ – Deployment zone – Player 2 |
| Terrain | Random and Alternating 5 Strategic Maneuver |
|---|---|
| Deployment | Alternating [70%] Reinforcement 3 [30%] |
| Primary Objective | Disorganization |
| Balance | 1 / 1 |
Description
This scenario features two armies engaging in battle while the reinforcements have the potential to drastically shift the balance of power, making every move and decision critical.
Terrain
Players alternately place 5/10/15 scp of randomly selected terrain (1d10).
Deployement
Then players each roll 1d6, and the one who rolls the highest result places his first unit in their deployment zone. The opponent then places 2 units. The first player places 3 units next, and so on, until units worth max 70% of their pts have been deployed.
At the beginning of round 3, each player rolls 1d6. On a roll of 6+, the player can now deploy his remaining troops. If unsuccessful, he rolls again at the beginning of round 4 on a 5+, at the beginning of round 5 on a 4+, and so on.
Objectives
The primary objective, Disorganization, highlights the crucial importance of maintaining a functional chain of command when communication lines are stretched thin. You gain +3Vp if your opponent has more characters out of combat than you.
A4 - Incursion
A4 - Incursion
In the Incursion scenario, two armies vie for control of a table filled with defensible terrain features while awaiting reinforcements to tip the scales of battle.Battlefield
| 1’ x 50% Deployment zone Player 1 | |
| 2’ – No man’s land | |
| 1’ x 50% Deployment zone Player 2 | |
| Terrain | Disputed land 7 |
|---|---|
| Deployment | Alternating [50%] Reinforcement 3 [50%] |
| Primary Objective | Land Domination |
| Disabled Objective | They have fallen |
| Balance | 1 / 1 |
Description
This scenario features two armies engaging in battle while the reinforcements have the potential to drastically shift the balance of power, making every move and decision critical.
Terrain
Players alternately place randomly selected terrain (1d10), worth 7/14/21 scp. Placing a piece of terrain inside their own deployment zone costs twice as many scp.
Deployement
Then players each roll 1d6, and the one who rolls the highest result places his first unit in their deployment zone. The opponent then places 2 units. The first player places 3 units next, and so on, until units worth max 50% of their pts have been deployed.
At the beginning of round 3, each player rolls 1d6. On a roll of 6+, the player can now deploy his remaining troops. If unsuccessful, he rolls again at the beginning of round 4 on a 5+, at the beginning of round 5 on a 4+, and so on.
Objectives
The primary objective, Land Domination, means you gain +3Vp if no enemy units with at least 8W are closer to your deployment zone than to theirs.
The disabled objective, They Have Fallen, means that you do not gain +1Vp when taking out of combat the most expensive unit of the opposing army.
A5 - Vengeance
A5 - Vengeance
This battle is not about territory, banners, or careful maneuvering. It is about settling a score. Both armies march straight into each other, driven by vengeance and the will to break the enemy by force alone.Battlefield
| 1’ – Deployment zone – Player 1 |
| 2’ – No man’s land |
| 1’ – Deployment zone – Player 2 |
| Terrain | No man’s land 1d6 Strategic Maneuver |
|---|---|
| Deployment | Alternating |
| Primary Objective | Destruction |
| Additional Objective | Priority Threat |
| Scenario Rule | Custom rule |
| Balance | 1 / 1 |
Description
The Vengeance scenario is designed as a simplified and aggressive battle, ideal for learning the core mechanics of the game or for fast, decisive confrontations. Most of the time terrain and global moral plays a limited role, favoring direct engagements and frontal assaults. Victory is achieved not through complex scoring or board control, but by pure violence. There is no need to track victory points during the first 9 turns.
Terrain
The two players alternately place 1d6/2d6/3d6 scp of randomly selected terrain (1D10). The same result on d6 applies to both players. Terrain placed outside of their deployment zone costs twice as many scp.
Deployement
Then players each roll 1d6, and the one who rolls the highest result places their first unit in their deployment zone. The opponent then places 2 units. The first player places 3 units next, and so on, until all units have been deployed.
Objectives
With Destruction as primary objective, you score +3Vp for every 10% of your opponent's army points that you have knocked out.
The additional objective, Priority Threat, means that, in addition to the normal objectives, you gain +1Vp when the opposing unit you designated before the start of the battle is out of action.
Custom Rules
Act first
Panic rolls are not taken before Round 10. Starting from Round 10, resolve panic tests normally.
Fortune favors the bold
Starting from Round 2, at the beginning of each round, the initiative goes to the player who controls the unit that is closest to the opponent’s table edge. If several units are tied, the player with the highest number of models among those units gains the initiative. If still tied, roll 1d6.
Exalted Avengers
If a unit completes the Priority Threat objective, it becomes Exalted until the end of the battle.
A6 - Raid
A6 - Raid
In the Raid scenario, an attacking army launches an assault on a fortified position such as a village, defended by a few defenders awaiting reinforcements to repel the attack.Battlefield
| 1’ – Deployment zone – Attacker |
| 2’ – No man’s land |
| 1’ – Deployment zone – Defender |
| Terrain | Defensive 10 |
|---|---|
| Deployment | Attack-Defense [100%-50%] Reinforcement 5 [50%] |
| Primary Objectives | instill fear They have fallen |
| Scenario Rules | Desperation Energy Night – first 1d3 Rounds surprise attack |
| Balance | 1 / 1 |
Description
The defender must hold their position until reinforcements arrive, maximizing the use of fortifications and cover to slow down and weaken the assaulting forces.
Terrain
The defender places 10/20/30 scp of terrain of its choice on the table.
Deployement
The defender places his units worth max 50% of his pts first, then the attacker places all his units. During the round 1 movement phave the attacker activate all his units first. The defender may activate all their units first during the round 1 shooting phase.
At the beginning of round 5, the defender rolls 1d6. On a roll of 6+, he can deploy his remaining units. If unsuccessful, they roll again at the beginning of round 6 on a 5+, at the beginning of round 7 on a 4+, and so on.
Objectives
The primary objectives, Instill Fear and They Have Fallen, reward +3Vp for routing more enemy units than your opponent since the battle began and/or taking out of combat the most expensive unit of the opposing army, encouraging tactics that demoralize enemy forces and focus on the main threat.
At the end of round 10, the defender gains +1Vp, then +2Vp at round 11, etc...
Scenario rule
Defender's units that are not removed from play after a rout roll with at least 2d6 gain the Exhalted rule until the end of the battle.
Until round 2, the defender cannot activate his units during the Movement and Shooting Phases but may attempt to react during the Shooting Phase of round 1.
Any units that could have moved in round 0 will instead act in round 1 without penalties.
Add +1d6 to all Rout rolls and all Control rolls made during rounds 0 and 1.
All Control rolls are made with one additional d6.
A7 - Race
A7 - Race
In this scenario, both armies seek to claim control over the central high grounds, where holding the most advantageous positions will determine the outcome of the battle.Battlefield
| 1’ – Deployment zone – Player 1 |
| 2’ – No man’s land |
| 1’ – Deployment zone – Player 2 |
| Terrain | Disputed land 7 Strategic Maneuver |
|---|---|
| Deployment | Alternating |
| Primary Objectives | Home field advantage Strategic position |
| Balance | 1 / 1 |
Description
In this scenario, both armies will face off to occupy the advantageous positions in the middle of the battlefield.
Terrain
The two players alternately place 7/14/21 scp of randomly selected terrain (1d10). Placing a piece of terrain inside their own deployment zone costs twice as many scp.
Deployement
Then players each roll 1d6, and the one who rolls the highest result places his first unit in their deployment zone. The opponent then places 2 units. The first player places 3 units next, and so on, until all units have been deployed.
Objectives
The primary objective, Home Field Advantage, means that you gain +3Vp if you occupy with units of at least 8W more cover and uplands than your opponent.
The additional objective, Strategic Position, means that you gain +3Vp when you occupy the place outside your deployment zone that you designated before the battle began.
A8 - Profanation
A8 - Profanation
The defender must balance between holding the sacred position at all cost, and meeting the oncoming attack. While the attacker must use cunning and strength to penetrate and profane the sacred land.Battlefield
| 1’ – Deployment zone – Attacker |
| 2’ – No man’s land |
| 1’ – Deployment zone – Defender |
| Terrain | Defensive 12 |
|---|---|
| Deployment | Attack-Defense |
| Primary Objectives | Home field advantage |
| Absolute Objectives | Strategic position – Attacker |
| Scenario Rules | Custom rule |
| Balance | 1 / 1 |
Description
Terrain
The defender places 12/24/36 scp of terrain of their choice on the table.
Deployement
Then the defender places all his units first, followed by the attacker placing all his units.
During the movement phase of the round 1, the defender may force the attacker to activate all their units first (without any reaction from the defender).
During the shooting phase of the rounds 0 and 1, the defender may activate all their units first (without any reaction from the attacker).
Objectives
The primary objective, Home Field Advantage, means that you gain +3Vp if you occupy with units of at least 8W more cover and uplands than your opponent.
The absolute objective, Strategic Position, means that the attacker wins the battle when they occupy the place outside their deployment zone that they designated before the battle began.
Custom Rule
The defender must place at least one position outside their deployment zone. The defender is forbidden from placing any terrain within 6’’ of this position.
During deployment, the defender may place units in the position designated by the strategic objective, even if this position is not within their deployment zone.
Lastly, this position does not count toward the Home Field Advantage objective.
A9 - Treasure hunt
A9 - Treasure hunt
Two armies have come searching for something at all cost, but only one of them will leave with it.Battlefield
| 6" – Deployment zone – Player 1 |
| 3’ – No man’s land |
| 6" – Deployment zone – Player 2 |
| Terrain | No man’s land 4 |
|---|---|
| Deployment | Alternating |
| Primary Objective | Cut retreat |
| Disabled Objective | Destruction |
| Scenario Rule | Custom rule |
| Balance | 1 / 1 |
Description
In this scenario, the battlefield becomes a dangerous arena of ambition and peril. Both armies are drawn into a frantic hunt for a hidden treasure — the very key to their victory. The challenge lies not only in locating the treasure amidst the covers and ruins, but also in securing it long enough to carry it back to safety. As the search intensifies, squads must navigate the risk of enemy ambushes and relentless attacks.
Finding the treasure is just the beginning; the true test comes in the escape, with the entire battlefield turning into a deadly gauntlet. The treasure itself becomes a beacon of hope and danger, for whoever holds it becomes the target of every sword, arrow, and spell on the field. Victory hinges on clever tactics, nerve, and the courage to push through to the bitter end.
Terrain
The two players alternately place 4/8/12 scp of randomly selected terrain (1D10). Terrain placed outside of their deployment zone costs twice as many scp.
Deployement
Then players each roll 1d6, and the one who rolls the highest result places their first unit in their deployment zone. The opponent then places 2 units. The first player places 3 units next, and so on, until all units have been deployed.
Objectives
The primary objective, Cut Retreat, focuses on penetrating the enemy’s defenses to gain +3Vp by positioning any of your units with at least 8W in the opponent’s deployment zone. A more ambitious goal awards +6Vp in total if one of your units with at least 8W occupies a cover or upland within the opponent’s deployment zone.
Both armies are focused on the treasure hunt at all costs and are prepared to accept significant losses, so the Destruction objective is disabled. You do not earn Vp for destroying 10% of the opposing army.
Custom Rule
Before placing other terrain features, the players must place X Basic Covers or Light Covers equidistant from the two deployment zones. No unit may be deployed in these positions before turn 2. X being the size of the battlefield.
During its activation, one squad inside one of these positions can perform the special action Search. If it does so, it cannot be activated or react for the remainder of the turn.
Each time the unit performs the Search action, roll 1d6 and add the number of times it has previously performed the Search action. On a 6+, the unit has found the treasure. No other unit can perform the Search action for the remainder of the battle.
Once the unit has the treasure, its maximum M is reduced to 4. And she cannot use any special rule to be removed from the battlefield. If it successfully reaches its deployment zone, its army wins the battle. While an army has the treasure, it automatically passes all panic rolls.
If the unit carrying the treasure is routed or destroyed in melee combat, the unit that defeated it gains the treasure, and the above rules now apply to it. If the unit carrying the treasure is destroyed or routed by shooting, place a token at the center of the destroyed unit. The first unit that reaches this token gains the treasure.
A10 - Strategic position
A10 - Strategic position
In this scenario, two armies clash over a fortification at the center of the battlefield. The army that captures and holds this stronghold long enough will deny its opponents access to the terrain.Battlefield
| 6" – Deployment zone – Player 1 |
| 3’ – No man’s land |
| 6" – Deployment zone – Player 2 |
| Terrain | No man’s land 2 |
|---|---|
| Deployment | Alternating |
| Primary Objective | Strategic position |
| Scenario Rule | Custom rule |
| Balance | 1 / 1 |
Description
Terrain
The two players alternately place 2/4/6 scp of randomly selected terrain (1D10). Terrain placed outside of their deployment zone costs twice as many scp.
Deployement
Then players each roll 1d6, and the one who rolls the highest result places their first unit in their deployment zone. The opponent then places 2 units. The first player places 3 units next, and so on, until all units have been deployed.
Objectives
The main objective, Strategic Position, means that you gain +3Vp when you occupy the Fortification.
Custom Rule
Before deploying the terrain, the players place a Fortification with X levels at the center of the battlefield. X being the size of the battlefield. Both players automatically designate this Fortification as the objective for the Strategic Position.
If at least one of your units occupies the Fortification and no enemy unit occupies it at the end of the turn, add as many Vp as the number of consecutive turns you have held control of it, including the current turn.
A11 - Assassination
A11 - Assassination
Under the cover of night, a small strike force advances through enemy lines, its goal clear and ruthless: eliminate the enemy commander before dawn. The defender, caught between confusion and urgency, must rally their troops, secure the perimeter, and protect their leader at all costs. Every shadow may conceal death, and every second lost could turn the tide of the war.Battlefield
| 6" | ||||||
| 6" – No man’s land | ||||||
| 24" Deployment zone Defender | ||||||
| 6" – No man’s land | ||||||
| Deployment zone – Attacker | ||||||
| Size | 2 – 4 x 4' |
|---|---|
| Terrain | Random and Alternating 8 Defensive 12 |
| Deployment | Attack-Defense |
| Absolute Objective | Bringer of Hope – Attacker Stand Firm – Defender |
| Scenario Rule | surprise attack Desperation Energy - Bringer of Hope |
| Balance | 1 / 1 |
Description
Terrain
Both players alternately place 8 scp of randomly selected terrain (1d10). Then the defender places 12 scp of terrain of its choice on the table.
Deployement
The defender places all his units first, then the attacker places all his units.
Scenario Rule
During the first 1d6 rounds, all Control rolls are made with one additional d6, and all Shooting weapon Hit rolls suffer a -2 penalty.
Until round 2, the defender cannot activate his units during the Movement and Shooting Phases but may attempt to react during the Shooting Phase of round 1.
Any units that could have moved in round 0 will instead act in round 1 without penalties.
Add +1d6 to all Rout rolls and all Control rolls made during rounds 0 and 1.
If the Bringer of Hope is not removed from play after a rout roll with at least 2d6 he gain the Exhalted rule until the end of the battle.
Objectives
Defender Victory: At the end of the round 10 the defender wins.
Attacker Victory: If the Bringer of Hope is killed or routed, the attacker wins the battle immediately.
B1 - River Crossing
B1 - River Crossing
In the River Crossing scenario, one army must navigate through or across a significant water obstacle to engage the enemy forces positioned on the opposite side.Battlefield
| 1’ – Deployment zone – Attacker |
| 1’ – No man’s land |
| 6" – River Dangerous area – Water |
| 6" – No man’s land |
| 1’ – Deployment zone – Defender |
| Terrain | Defensive 4 Random and Alternating 4 Terrain set (except Flat area) on the river zone negate the Dangerous area rule. |
|---|---|
| Deployment | Alternating |
| Primary Objective | cut retreat |
| Additional Objective | Strategic Position |
| Balance | 5 / 4 |
Description
Terrain
The defender places 4/8/12 scp of terrain of its choice on the table. Then both players alternately place 4/8/12 scp of randomly selected terrain (1d10). The terrain placed on the river replaces the Dangerous area rule. This allows to place bridges or fords.
Deployement
Then players each roll 1d6, and the one who rolls the highest result places his first unit in their deployment zone. The opponent then places 2 units. The first player places 3 units next, and so on, until all units have been deployed.
Objectives
The primary objective, Cut Retreat, focuses on penetrating the enemy’s defenses to gain +3Vp by positioning any of your units with at least 8W in the opponent’s deployment zone. A more ambitious goal awards +6Vp in total if one of your units with at least 8W occupies a cover or upland within the opponent’s deployment zone.
The additional objective, Strategic Position, means that you gain +1Vp when you occupy the place outside your deployment zone that you designated before the battle began.
At the end of round 10, the defender gains +1Vp, then +2Vp at round 11, etc...
B-2 Flank Attack
B-2 Flank Attack
In the Flank Attack scenario, one army must outmaneuver the other by executing a strategic assault on their flank, exploiting weaknesses and aiming to disrupt their battle line.Battlefield
| 1’ Deployment zone Attacker | 2’ x 25% |
| 2’ – No man’s land | |
| 1’ x 25% Deployment zone Defender |
| Terrain | Random and Alternating 3 Defensive 6 |
|---|---|
| Deployment | Attack-Defense |
| Primary Objective | Cut the head |
| Additional Objective | Priority threat |
| Scenario Rule | Desperation Energy |
| Balance | 5 / 4 |
Description
Terrain
Both players alternately place 3/6/9 scp of randomly selected terrain (1d10). Then the defender places 6/12/18 scp of terrain of its choice on the table.
Deployement
The defender places all his units first, then the attacker places all his units.
During the movement phase of the round 1, the defender may force the attacker to activate all their units first (without any reaction from the defender).
During the shooting phase of the rounds 0 and 1, the defender may activate all their units first (without any reaction from the attacker).
Objectives
During this complex and uncertain maneuver, each army relies on the overarching vision of its supreme leader to secure victory. The primary objective, Cut the Head, grants +3Vp for taking out of combat the most expensive characters of the opposing army.
The additional objective, Priority Threat, means that, in addition to the normal objectives, you gain +1Vp when the opposing unit you designated before the start of the battle is out of action. This represents the morale boost when the main threat has been removed.
At the end of round 10, the defender gains +1Vp, then +2Vp at round 11, etc...
Scenario Rule
Defender's units that are not removed from play after a rout roll with at least 2d6 gain the Exhalted rule until the end of the battle.
C1 - Invasion
C1 - Invasion
In this scenario, one army attempts to stop an invasion on terrain that is to their advantage. There are many pieces of terrain and asymmetrical victory objectives.Battlefield
| 1’ – Deployment zone – Attacker |
| 2’ – No man’s land |
| 1’ – Deployment zone – Defender |
| Terrain | Defensive 10 |
|---|---|
| Deployment | Attack-Defense |
| Additional Objectives | Strategic position Priority threat |
| Balance | 4 / 3 |
Description
In this scenario, an attacking force of superior strength faces a defender who has the advantage of the terrain. The defender must ensure they have good firepower and recruit troops that benefit from cover and terrain. The attacker should favor offensive troops with advantages for assault.
Terrain
The defender places 10/20/30 scp of terrain of its choice on the table.
Deployement
The defender places all his units first, then the attacker places all his units.
Objectives
The additional objectives, Strategic position and Priority threat mean that, in addition to the normal objectives, you gain +1Vp when the opposing unit you designated before the start of the battle is out of action and when you occupy the place outside your deployment zone that you designated before the battle began. This is to represent the morale boost when the defender still holds their advanced position and the main threat has been removed.
At the end of round 10, the defender gains +1Vp, then +2Vp at round 11, etc...
Scenario Rule
During the movement phase of the round 1, the defender may force the attacker to activate all their units first (without any reaction from the defender).
During the shooting phase of the rounds 0 and 1, the defender may activate all their units first (without any reaction from the attacker).
C2 - Convoy Attack
C2 - Convoy Attack
Caught in a sudden ambush, the convoy must break through hostile lines and reach safety, while raiders strike from both ends to seize the prize and vanish before a proper battle can even form.Battlefield
| 6" – Deployment zone – Attacker | |||
| 1' – No man’s land | |||
| 1' x 50% Deployment zone Defender | 1' x 50% | ||
| 1' – No man’s land | |||
| 6" – Deployment zone – Attacker | |||
| Terrain | Offensive 10 |
|---|---|
| Deployment | Attack-Defense |
| Disabled Objectives | All |
| Scenario Rule | surprise attack Custom rule |
| Balance | 3 / 4 |
Description
In this scenario, a valuable convoy is caught in the midst of a surprise attack. The defender must escort the treasure across the battlefield and reach safety, while the attacker strikes from both directions, attempting to destroy the carrier or seize the prize. The battle unfolds under intense pressure, with limited control during the opening moments and rapidly shifting momentum as the convoy changes hands. Victory is not achieved through attrition or territory control, but by securing the treasure and escaping the battlefield before the enemy can regroup.
Terrain
The attacker places 10/20/30 scp of terrain of its choice on the table.
Deployement
Then the defender places all his units first, followed by the attacker placing all his units.
Scenario rule
Until round 2, the defender cannot activate his units during the Movement and Shooting Phases but may attempt to react during the Shooting Phase of round 1.
Any units that could have moved in round 0 will instead act in round 1 without penalties.
Add +1d6 to all Rout rolls and all Control rolls made during rounds 0 and 1.
Custom Rule
During the deployement, the defender must place an unit in their deployment zone, within 1" of the left table edge. This starts the battle carrying the tresure token and is designated as the carrier.
While a unit is carrying the tresure token, its maximum M is reduced to 6. A unit carrying the token cannot use any special rule to be removed from the battlefield.
Seizing the Convoy: If the unit carrying the token is killed or routed by a melee Attack, the unit that defeated it immediately gains the token and becomes the new carrier. If the carrier is destroyed or routed by shooting, place the tresure token on the table at the center of the carrier’s last position. The first unit that moves into base contact with the token gains it and becomes the new carrier.
During this scenario, no panic roll is initiated. Vp are not counted. The player with the treasure is considered to have the most victory points, and the other player has the initiative.
Defender Victory: If the carrier ends a round within 1" of the right table edge, the defender immediately wins the battle.
Attacker Victory: If an attacker unit carrying the tresure token ends a round within 1" of either attacker table edge (top or bottom deployment edge), the attacker immediately wins the battle.
C3 - Ambush
C3 - Ambush
In this scenario, the defender is caught off guard and must survive a sudden assault from both flanks, scrambling to reorganize before being overwhelmed.Battlefield
| 6" – Deployment zone – Attacker |
| 15" – No man’s land |
| 6" – Deployment zone - Defender
Road Flat area |
| 15" – No man’s land |
| 6" – Deployment zone – Attacker |
| Terrain | Offensive 16 |
|---|---|
| Deployment | Attack-Defense |
| Primary Objectives | instill fear They have fallen |
| Additional Objective | Bringer of Hope |
| Scenario Rule | Surprise attack Desperation Energy Custom rule |
| Balance | 3 / 4 |
Description
Terrain
The attacker places 16/32/48 scp of terrain of its choice on the table.
Deployement
Then the defender places all their units first, followed by the attacker placing all their units.
Objectives
The primary objectives, Instill Fear and They Have Fallen, reward +3Vp for routing more enemy units than your opponent since the battle began and/or taking out of combat the most expensive unit of the opposing army — encouraging tactics that demoralize enemy forces and focus on the main threat.
Designate a character in the enemy army for the additional objective, Bringer of Hope; if this character is put out of action, you gain +1Vp.
At the end of round 10, the defender gains +1Vp, then +2Vp at round 11, etc...
Scenario Rule
Until round 2, the defender cannot activate his units during the Movement and Shooting Phases but may attempt to react during the Shooting Phase of round 1.
Any units that could have moved in round 0 will instead act in round 1 without penalties.
Add +1d6 to all Rout rolls and all Control rolls made during rounds 0 and 1.
Defender's units that are not removed from play after a rout roll with at least 2d6 gain the Exhalted rule until the end of the battle.
Custom rule
All defender units deployed before the start of the battle must be deployed facing the center of the right edge of the table.
C4 - Landing
C4 - Landing
Before dawn, the sea was calm. Then the horizon filled with sails, smoke, and iron. Waves crash against the shore as the invaders attempt a desperate landing under enemy eyes. Every step on the sand must be earned, every position seized before reinforcements arrive. For one side, victory means securing a foothold. For the other, it means throwing the enemy back into the sea.Battlefield
|
6'' Sea Dangerous Area -Water |
|
6'' – Deployment zone – Attacker Beach Difficult Area - Sand |
| 2’ – No man’s land |
| 1’ – Deployment zone – Defender |
| Terrain | Defensive 12 |
|---|---|
| Deployment | Attack-Defense [0%-100%] |
| Absolute Objective | Strategic Position |
| Primary Objectives | Land Domination Home Field Advantage |
| Disabled Objectives | Destruction They Have Fallen |
| Scenario Rules | Custom rule |
| Balance | 5 / 3 |
Description
Landing is an asymmetrical assault scenario where the attacker begins with their army in reserve and must establish a beachhead under pressure. The defender controls the battlefield from prepared positions and gains increasing victory points as time passes. The attacker must rapidly capture a designated strategic position inland, while both sides fight for control of key ground along the shore.
Terrain
The defender places 12/24/36 scp of terrain of its choice on the table and inside the No man's Land and his Deployement zone.
Deployement
The defender places his units. All of the attacker's units are placed in reserve.
Objectives
The absolute objective, Strategic Position, means that the attacker wins the battle when they occupy the place outside their deployment zone that they designated before the battle began.
The main objectives of the battle are Land Domination and Home Field Advantage, which means you gain +3Vp if no enemy units with at least 8W are closer to your deployment zone than to theirs and/or if you occupy more valuable positions (with units totaling at least 8W) than your opponent, based on their total scp value.
The Destruction and They Have Fallen objectives do not award any Vp in this scenario.
At the end of round 10, the defender gains +1Vp, then +2Vp at round 11, etc...
Scenario rule
During the Tactical phase of each round, starting with round 0, the attacker must deploy 3/6/9 units (infantrymen and Rider characters do not count) into their deployment zone, provided they have units in reserve.
Units that can be deployed in the opponent's deployment zone do not count towards the remaining units to be deployed and can be deployed in addition to the 3/6/9 limit.
A roll of 1 on an arrival roll for an attacker unit deployed in their zone means that the unit has sunk and is removed from play.
The defender's reserve units can be deployed into no man's land, but each model of these units suffers a critical damage roll upon deployment.
If the attacker has no units left on the table, they do not automatically lose the game if they have at least one unit remaining in reserve. If the attacker has no units on the table at the end of two consecutive round, they lose the battle.
Cover the retreat
Cover the retreat
Evacuation
Evacuation
In this scenario, the defender is caught off guard and must survive a sudden assault from both flanks, scrambling to reorganize before being overwhelmed.Battlefield
| 6" – Deployment zone – Attacker |
| 15" – No man’s land |
| 6" – Deployment zone - Defender
Road Flat area |
| 15" – No man’s land |
| 6" – Deployment zone – Attacker |
Camp Siege
Camp Siege
Fortress Siege
Fortress Siege
Suicide Squad
Suicide Squad
Apendix
Dialectic & Victory
Dialectic & Victory
Sometimes during a battle, an army receives unexpected reinforcements, fallen warriors return to the fray, or new champions emerge at the decisive moment.These situations can affect how VP are calculated. The following rules clarify how redeployed, summoned, or returning units interact with the Primary Objectives.
Redeployed Units
When a specific unit is redeployed on the battlefield, it no longer counts towards VP for the objectives Disorganization, Cut the Head, Destruction, and Priority Threat.
However, redeployed units that are destroyed or routed still count towards VP for They Have Fallen and Symbolic Victory. If such a unit is destroyed multiple times, it may count multiple times for Symbolic Victory.
Summoned Units
Some characters may generate or reserve Pts to summon new troops during the battle. These units may use miniatures of previously destroyed units, but they are always considered new units. Destroying summoned units never grants VP nor does it count towards the calculation of any objective.
Returning Units
Some units are immediately returned to play or regenerate their W after being removed. These units only count towards VP when they are actually removed from the battlefield. Until they are definitively removed, they are not considered as losses for VP calculation.
Maximum Roll
Maximum Roll
Even the strongest armor or the most unyielding spirit can be undone by a strike of sheer destiny—an attack so perfect that no defense can deny it.Unless the target has a specific special rule stating otherwise, a successful attack roll with a result of 11 (rolling a 6 and then another 6) is always considered successful.
If a special rule allows the target to avoid a result of 11, for example Armored units, you may roll a third d6 to enhance your result. Add 10 to the result of this third roll. Whatever the target’s special rule, a final natural result of 16 (rolling three consecutive 6) is always considered successful.
Re-roll
Re-roll
Some rules allow certain rolls to be rerolled. These rerolls are not recursive: for example, if you must reroll failed rolls, only the results that failed the first time are rerolled — do not reroll dice that failed a reroll.
Also a reroll always replaces the entire roll sequence. For example, if you roll a 6 on your first roll but fail the Improved Roll, you must start again from the first roll when rerolling.
Wounds negated by a save roll are not considered a fail roll and therefore cannot be rerolled.
Multiple Re-roll
When fortune doubles back on itself, failed strikes are given an extra push, turning near misses into decisive blows.If during an attack roll, at least two rules simultaneously allow you to reroll failed rolls, roll 2d6 for each failed roll instead, and add +1 to the results of the rerolled dice.
Contradictory Rolls
When opposing forces of fate cancel each other out, the dice remain as they fall—no success overturned, no failure redeemed. This rule prevents endless contradictions and keeps the flow of battle smooth and intuitive.If one rule instructs you to reroll successful rolls and another rule instructs you to reroll failed rolls, do not reroll either successful or failed rolls.
Resolving roll
Resolving roll
Even the clearest of rules cannot cover every edge case, and in the heat of battle not every detail will be remembered. Rather than break the flow of the game or sour its spirit, fate itself may decide.If the players encounter a situation not clearly covered by the rules, or if a rule is forgotten or misinterpreted in the heat of the game, both players roll a d6. The player with the highest result is considered correct for that situation.
This decision applies only for the current game. After the battle, players are encouraged to review the case and, if necessary, report it to the author to improve the rules appendix. In the meantime, let the dice decide and keep the battle moving.
Once per batlle
Once per batlle
Certain powers or tactics can only be unleashed once, marking a pivotal moment in the battle. Limiting their use ensures they remain rare and decisive, without slowing play with repeated exploitation.Some special rules can only be used once per battle. In this case, even if the unit is redeployed, it cannot use this rule a second time.
Reactivation
Reactivation
Some warriors can press beyond normal limits, striking again with relentless fury or regrouping to seize the moment. To keep the flow of battle fair and clear, their second wind follows strict limits.Some special rules allow a unit to be activated a second time during the same round phase.
A unit can only be activated a maximum of 2 times per round phase.
All bonuses and penalties of the unit are refreshed at the time of the second activation. For example, a Fresh or Charging unit will no longer be considered Fresh or Charging for its second activation. And you may gain or lose bonuses depending on the updated conditions of your unit and its target at the time of the second activation.
Rounding
Rounding
When you need to round a value, round it to the nearest whole number.
If your unit has a value of X.5 (for example: 2.5), roll X normal Attack Rolls and 1 Attack Roll with the target’s defense improved by +2. To make the game flow more smoothly, you may roll all the dice at the same time and identify the half-attack roll with a different color.
0.5A & Reload
If a ranged weapon grants 0.5A per model, you can either apply the standard rounding rules or choose to reload instead of shooting.
To reload, the unit selects a Shoot action but does not designate a target or make any attack rolls with that weapon. It will still be exhausted.
During its next Shoot action, the unit can attack with 1A per model with that weapon.
Once this bonus has been used, the unit must reload again during a Shoot action to benefit from it again.
Cost Calculation
Cost Calculation
General Principles
Unit cost reflects the balance between offensive power, defensive resilience, and the concentration of force. Stronger units may dominate isolated enemies, but coordinated opposition can quickly neutralize even the most powerful warrior.The point calculation system takes into account the combination of attack power and defense strength. For example, if we disregard safeguards and other subtleties of survivability calculation, a unit with a hypothetical attack score of 4 and a defense score of 1 will be worth roughly the same as a unit with a score of 2|2 or a unit with a score of 1|4.
In a game environment where several units interact, to ensure balance, the system also considers the concentration of forces. For example, broadly speaking, a unit with a score of 4|4 will be worth the same as two units with a score of 2|2 or 4|1, 1|4. When it comes to the concentration of forces in a unit, a balance must be struck between battlefield presence and impact. The best unit can easily destroy opponents arriving one by one, but will fall easily if pinned down by a tank and attacked from behind by assassins.
Playstyle choices, implications, and balance
No unit is universally superior. Each troop type is designed to counter specific threats, and success on the battlefield depends on recognizing these strengths and weaknesses.There are mechanisms that increase the cost of troops that can withstand attacks, such as tanks, and reduce the cost of assassins based on their ability to survive until they can attack themselves. This means that in practice, if you charge a fast, fire-resistant unit against a slower, more powerful attacking unit, the point cost calculation will result in the slower unit winning if points are equal. Conversely, a poorly protected unit with good attack power and slow speed will generally stand no chance against a gun line. Whereas, obviously, a fast, well-protected unit with low attack power will be perfect for breaking through a gun line.
It's really up to you to choose your play style. If you only use one type of troop against an opponent who does the same, you risk winning or losing easily without much fun. Because if an army doesn't have what it takes to deal with a threat, it will only be able to win through a miracle or tactical genius. The principle, therefore, is to identify the specializations of each of the opposing troops and prioritize destroying those that will pose a problem for your army.
Options and Optimization
Additional offensive power provides diminishing returns. While options allow units to specialize, stacking too many of them can slightly increase their cost compared to a profile designed with those weapons from the start.Note that a unit whose attack power increases pays for this power in decreasing order of magnitude. For example, if a unit has a cost of 1 in a 1|1 ratio, a unit in a 4|1 ratio costs 2, and a unit in a 7|1 ratio costs 2.65. This takes into account the fact that an over-equipped unit with weak defense will likely be destroyed first before it can attack.
The player selecting options must consider this. For example, if he chooses an offensive option, the system will recalculate his points correctly, but if he chooses more than one, he risks ending up with a point cost very slightly higher than what he would have paid if all these weapons were included by default in his profile.
FAQ
About the game rules
About the game rules
What kind of game is Damocles Wars?
Damocles Wars is a tactical tabletop wargame focused on alternating activation, fast decision-making, and meaningful choices. It is designed to create intense, cinematic battles where positioning, timing, and adaptability matter more than raw statistics.
The system places strong emphasis on the balance between different tactical roles, ensuring that each unit has a purpose on the battlefield. At the same time, it aims to provide a fair and consistent point system, where choices feel justified and intuitive. All of this is built around clear, precise rules designed to minimize ambiguity, reduce interpretation, and prevent unfair advantages, so that outcomes depend on decisions rather than loopholes.
Who is this game for?
Damocles Wars is designed for both experienced wargamers and newcomers. If you enjoy tactical depth, reactive gameplay, and building your own strategies rather than following fixed metas, this game is for you.
It is made for players who seek a balance between immersion and gameplay clarity, with rules that are grounded enough to support creative thinking, yet streamlined enough to keep battles fast and engaging. The system is also designed for competitive players who value fairness and consistency, where victory comes from better decisions rather than exploiting hidden rules or unclear interactions. Above all, it rewards creativity, adaptability, and the freedom to approach the game in your own way.
Why are all rules and updates free?
The goal is to remove barriers to entry and keep the community unified. A constantly updated, centralized ruleset ensures that all players share the same experience, without outdated books or hidden changes.
More fundamentally, the philosophy behind Damocles Wars is that rules should be accessible to everyone. The purpose of creating a game is to have as many people as possible enjoy it, and making the rules freely available is the most direct way to achieve that. Wargaming already comes with natural entry barriers, especially through miniatures and terrain, and adding an additional cost for rules only limits access further. By keeping the rules free, the game becomes more open, more inclusive, and easier to adopt, allowing players to focus on what truly matters: playing, creating, and enjoying the experience with friends.
Why is the game built around alternating activation?
Alternating activation keeps both players involved at all times. There is no long period where one player simply waits while the other resolves an entire turn. Every decision matters, every action can be answered, and the battle remains alive from start to finish.
This choice is also rooted in the origins of the game. When Damocles Wars began more than twenty years ago, alternating activation was far less common than it is today. Even back then, the goal was already to move away from the passive structure of traditional “I play my whole turn, then you play yours” systems. I wanted battles to feel faster, more interactive, and more realistic.
Alternating activation also creates a battlefield where reactions matter. Some units respond quickly, others slowly, others not at all, depending on their training, position, and condition. This makes the battle feel more dynamic and believable. It also prevents players from relying too heavily on rigid turn-based planning. Reinforcements, sudden movements, and counterplays become much more interesting when the opponent is always able to respond.
From a gameplay perspective, it also makes the learning curve less punishing. In a traditional full-turn system, a mistake can cost you an entire turn, sometimes a very long one, before you even get a chance to correct it. In Damocles Wars, because activations alternate, errors can often be answered or adjusted more quickly. This keeps the game fairer, more engaging, and much more enjoyable, especially for newer players.
In short, alternating activation was chosen because it makes the game more fun, more reactive, more tactical, and in many ways more believable as a simulation of battle.
Why does Damocles Wars use Dodge or Block instead of a traditional hit-then-wound sequence?
In truth, Damocles Wars still contains both a hit roll and a wound roll. The difference is that they are merged into a single decision and a single resolution. If the defender chooses to Dodge, the attack is resolved as a hit roll against G. If the defender chooses to Block, it is resolved as a wound roll against T.
This means that, conceptually, both layers still exist. The system simply resolves the one that actually matters, the hardest one to overcome from the defender’s point of view. In practice, this makes combat much faster without removing tactical depth. Instead of rolling to hit and then rolling again to wound, the game reaches the same meaningful result in one step.
This design came from a simple observation made very early in development: a huge amount of time in wargames is spent preparing and resolving dice rolls. Some preparation is necessary, because it is part of what makes rules rich and interesting, but reducing the number of rolls without losing depth was one of the clearest ways to make the game faster and more fluid.
The system also serves a deeper gameplay purpose. It allows different weapons to specialize against different kinds of defense. High Precision weapons are better against evasive targets, while high Strength weapons are better against resistant ones. This creates two meaningful forms of survivability, agility and resilience, instead of reducing everything to a single defensive logic.
That distinction is important, because it allows lightly protected but agile troops to remain useful and relevant. A durable tank is not defended in the same way as a fast infantry unit hidden in terrain, and the same weapon should not be equally optimal against both. This creates a battlefield where offensive profiles matter, defensive profiles matter, and the interaction between them matters even more.
So the goal was not only to simplify the game. It was to simplify it in a way that also creates more tactical variety, more meaningful specialization, and a more interesting relationship between weapons and targets.
Is the game balanced?
Balance is one of the foundations of Damocles Wars. It is not an afterthought, and it is not something left to instinct alone. A very large part of the development of the game, over more than two decades, has been dedicated to building and refining a system capable of reflecting the real battlefield value of units, weapons, options, and synergies as accurately as possible.
At the heart of that work is the point system. It is not based on rough approximations or broad categories alone. It is built to evaluate what a unit can actually do, what role it is meant to fulfill, what it is strong against, what it is weak against, how durable it is, how it interacts with other battlefield roles, and what support it can give or receive. Behind that, there is a very large amount of calculation designed to simulate impact as precisely as possible.
This is important because true balance does not mean making everything identical. It means making specialized things worth what they should be worth. A unit that is extremely good against one type of target should also be weaker against others. That is why balance in Damocles Wars exists at several levels. Units must be balanced within their own role, but roles themselves must also be balanced against one another. On top of that, characters and support elements must be costed according to the synergies they can bring to an army. This is one of the hardest parts of wargame design, and also one of the areas I am the most proud of in Damocles Wars.
For me, balance is not only important for competition, although I care deeply about that side of the hobby. It is also essential for fun. When a game is badly balanced, victories and defeats often feel predetermined by list selection, undercosted units, or obvious meta choices. When a game is well balanced, battles are harder fought, reversals are more frequent, and decisive moments come from bold decisions, good timing, a duel, a charge, or an unexpected action, not from exploiting something obviously broken.
Perfect balance may be impossible in an absolute sense, especially in a system this broad, but Damocles Wars is built with the explicit goal of getting as close to it as possible. That pursuit of balance is one of the main reasons the game took so long to mature, and one of the reasons I believe it can produce both a strong competitive environment and truly cinematic battles.
Why do some characters cost more depending on the faction?
Character costs in Damocles Wars are not determined by their personal combat value alone. While some characters are designed as lone operatives, adventurers, duelists, or units with a more direct offensive impact, most characters are valued primarily for what they bring to the troops around them. In many cases, their true role is not simply to fight better than a regular soldier, but to enhance the units they lead through tactical abilities, morale support, special rules, or command effects.
Because of that, the value of a character depends heavily on context. The same character can have a very different impact depending on the faction or army list he belongs to. If one faction contains many powerful or highly synergistic units that can benefit from his support, that character naturally becomes more valuable there than in a simpler or more basic force. In other words, what is being costed is not just the character himself, but the potential influence he can have on the army around him.
This is especially important for support-oriented characters. If a character grants bonuses that are already widely present in one faction, his impact may be limited. But if the same bonuses are rare or especially effective in another faction, his presence may be much more valuable. That is why some characters do not have exactly the same cost across all lists.
That said, this is also one of the parts of the system I am still refining. I am already very satisfied with the current results, and in practice this has only a limited impact on a small number of factions, but I still want to improve the precision of this area further. In particular, I want to better account for practical limits such as base size and the real scope of the units a character can effectively support. So this part of the game is already very strong, but it is also one of the areas where I still see room for improvement.
Is Damocles Wars meant for competitive play?
Yes, absolutely, but probably not in the narrow sense some players may associate with the word. Damocles Wars is designed with a strong competitive foundation because, in my view, that is one of the best ways to make a game consistently fun. A well-balanced game creates harder-fought battles, more meaningful decisions, and more memorable turning points. It prevents victories from feeling predetermined by obviously broken units, abusive list-building, or obscure interactions hidden in the rules.
For me, competitive design does not mean building a game for exploiters, rules lawyers, or players who simply want to copy the strongest list and repeat the same pattern until it wins. On the contrary, the kind of competition I value is one where players improve over time, discover new tactics, respond to new threats, and develop their own style. That is the kind of competitive mindset that has always interested me, both in tabletop games and in strategy video games.
That is also why I do not see competitive play and narrative play as opposites. In fact, I believe a healthy competitive foundation strengthens the narrative side of the game. If the system is balanced, players are freer to bring the armies they actually want to play, including unusual armies or highly thematic forces, without feeling that they are automatically handicapping themselves. As long as those forces cover enough tactical roles, they can still be effective, and if they do not, the points system should compensate for that.
At the same time, I did not want to sacrifice every cinematic or dramatic element in the name of pure optimization. A small number of rules are kept because they make the game more alive, more memorable, and more fun, even if they are not the easiest things in the world to model with perfect mathematical precision. Duels are a good example of that. So the overall philosophy is very clearly competitive, but not dogmatically so. I would say the game aims for the highest level of balance possible while still preserving the moments that make battles feel alive.
How long does a game take?
The length of a game depends less on a fixed format than on the size of the battlefield and the number of units involved. Damocles Wars is designed to scale, which means you can play on relatively small tables and still have a complete and satisfying tactical experience. A compact battle on a 24" by 48" table can already offer meaningful strategic choices and usually lasts around an hour.
If you want a deeper and more developed battle, a 48" by 48" table allows for more units, more tactical layers, and generally a playtime of around one and a half to two hours. For larger and more epic battles, a 72" by 48" table gives the game room to breathe fully, with more forces on the field and more strategic complexity. In that format, a game will often take around two to three hours, depending on the armies and the players’ familiarity with the system.
The important point is that the system does not try to make games long for the sake of being long. Battles are designed to last as long as they remain interesting. The panic and morale mechanics help a lot with that. When one side is truly collapsing and the battle has clearly turned, the game naturally pushes the losing army toward withdrawal instead of forcing players to grind through a long and pointless endgame just to remove the last few models. This keeps the ending more believable, but also more enjoyable.
So the short answer is that Damocles Wars can be played in about an hour, or expanded into much larger battles, but in all cases the system is built to make the game last as long as it is fun, and no longer than necessary.
Why is there a focus on movement trays?
Because they save a huge amount of time and make the game much more enjoyable to play. One of the design goals of Damocles Wars is to reduce all the parts of tabletop gaming that are slow without being interesting. Movement trays help enormously with that. Instead of moving every soldier one by one, players can move an entire unit quickly and clearly, which makes the Movement phase far faster and more practical.
They also improve clarity. Tokens placed directly on trays are easier to read than markers scattered around the table, and circular trays make it much easier to handle facing, rear arcs, encirclement, line of sight, and unit orientation in a clean and intuitive way. In short, movement trays are not just a convenience, they are one of the tools that make the game smoother, clearer, and more focused on fun rather than on tedious handling.
Do I need to learn all the rules before playing?
No, and in fact that would be the worst way to start. Damocles Wars is designed to be learned progressively. The best approach is to begin with simple battles close to the initiation format, play with the core rules, and then look up the more specific rules only when the situation comes up in a real game.
This way, the rules are learned naturally, through play, instead of all at once. After seeing the same situation two or three times, most players remember the rule without effort. The game is built around that idea, which is why everything is accessible from a phone in just a few clicks. You are not expected to memorize the entire system before having fun with it.
Why are there no hidden rules?
Because the game is meant to reward decisions over unfair information advantage. All army lists, profiles, and special rules are accessible, so players are never supposed to lose simply because they did not buy the right book or because their opponent knew an obscure interaction they could not reasonably check.
Special rules are shared across many armies, which also makes the learning curve much easier than it may first appear. Once you know part of the system, you already know a large part of what other armies can do. The goal is to avoid pay-to-know, reduce opportunities for abuse, and make the game as fair, transparent, and readable as possible.
What happens if a rule interaction seems unclear?
Even though the rules are designed to cover as many situations as possible, Damocles Wars remains a living system that was originally built through actual games between friends. Which implies its share of unconscious gentleman's agreements. Because of that, there may still be rare situations where an interaction is not perfectly defined or where multiple interpretations seem possible.
When this happens, the priority is to keep the game flowing. Resolve the situation in the simplest and most logical way, or use a quick resolution method such as a roll-off if needed. The goal is not to interrupt the battle for too long, but to move forward in a fair and reasonable way for both players.
After the game, players are encouraged to report the situation. This allows me to clarify the rule based on how it fits within the overall system and its point calculations. If necessary, both the wording and the underlying balance will be adjusted to ensure consistency. The system improves through these edge cases, and every unclear interaction is an opportunity to make it stronger.
Is this game designed for tournaments?
Yes. Damocles Wars is fully designed with tournament play in mind, both in terms of balance and practical execution. Games are meant to be played within a reasonable time frame, on tables that are flexible in size, and with a structure that allows events to run smoothly without unnecessary delays or ambiguity.
Terrain placement, scenarios, and deployment are all designed to strike a balance between controlled structure and variability. The goal is to avoid situations where the battlefield itself breaks the game, while still ensuring that each match feels different and engaging. This creates a competitive environment that remains fair, readable, and consistent across multiple games.
At the same time, this competitive foundation does not limit creativity. The system is built so that different army styles, unusual compositions, and personal strategies remain viable. In that sense, tournament play is not about enforcing a narrow meta, but about providing a stable and fair framework where players can fully express their tactical choices.
Can I modify or homebrew rules?
Yes, absolutely.
Damocles Wars is designed to be robust enough to support adjustments and variations. You are free to adapt the rules to better fit your playstyle, whether you prefer more realism or a faster, more streamlined experience.
Some players may choose to simplify certain mechanics, while others may want to push the system further toward simulation. Both approaches are valid. The official rules represent a carefully balanced compromise between realism, clarity, and playability, but they are not meant to restrict creativity.
That said, the official version exists to provide a balanced and consistent shared experience across the community. If you modify the rules, make sure your opponent agrees beforehand so that the game remains fair and enjoyable for both players.
What makes Damocles Wars different from other wargames?
Damocles Wars is not built on the idea that it is “better” than other games, but on a long search for balance between several key elements: fun, realism, immersion, clarity, and fairness. Every game system is ultimately a series of trade-offs, and over time, this one was shaped to reach a point where those elements reinforce each other instead of competing.
One of the core differences lies in how time is used during a game. Many traditional systems spend a large portion of playtime on actions that are not especially engaging, such as moving models one by one or resolving multiple layers of dice rolls. Here, those elements are streamlined as much as possible so that more time is spent on meaningful decisions, positioning, timing, and tactical choices. The goal is simple: maximize the parts of the game that are actually fun.
Another important aspect is clarity. Movement trays, terrain rules, and position systems are designed to remove ambiguity and avoid situations where the outcome depends on imprecise measurements or unclear interpretations. This does not reduce realism, it supports it. By simplifying what does not matter, the system allows players to focus on what does: the flow of the battle, the intent behind each action, and the key moments that define a fight.
The game also places a very strong emphasis on balance, not as a restriction, but as a source of freedom. When units are accurately costed and roles are clearly defined, players are not forced into a narrow meta. They can choose the units they like, experiment with different strategies, and still remain competitive. This balance is supported by an extensive underlying system that attempts to reflect not only raw power, but also context, survivability, and interaction with other units.
At the same time, the system is designed to create cinematic moments. Duels, last stands, decisive strikes, and high-risk plays are not only possible, they are encouraged. A battle that seems lost can sometimes be turned by a bold decision, such as targeting a key character at the right moment. Morale and panic mechanics also ensure that battles end naturally, without dragging on once the outcome is clear.
Finally, objectives are designed to feel meaningful rather than arbitrary. Victory does not come from standing on abstract points without context, but from controlling key areas of the battlefield, breaking enemy forces, and achieving tactical superiority. This creates a more natural connection between what players do and why they do it.
In the end, what defines Damocles Wars is not a single mechanic, but the way all these elements come together: a system that aims to stay fast without being shallow, realistic without being heavy, balanced without being restrictive, and competitive without losing its sense of spectacle.
The Proxywars Project
The Proxywars Project
Do I need specific miniatures to play?
No. Damocles Wars is completely miniature-agnostic. You can play with any models you already own, whether they are fantasy, science-fiction, historical, plastic, metal, or 3D printed. The system is designed to adapt to your collection, not the other way around.
This is especially important because a large part of the available army lists does not have official miniatures associated with them. The game includes hundreds of units and thousands of potential models, and it would make no sense to restrict players to a limited official range. The goal is to let you use what you already have, or what you truly enjoy collecting and painting.
More importantly, miniatures are a personal part of the hobby. we often have a strong connection to our collections, and Damocles Wars is built to respect that. You should be able to play with the models you love, not the ones you are forced to buy.
What does “proxy-friendly” really mean?
Being proxy-friendly means that you are free to use miniatures from any brand or creator, without restriction. There is no requirement to use official models, and no limitation based on origin, style, or range.
However, this freedom comes with a simple expectation: respect for your opponent’s immersion. Your models should reasonably represent what they are supposed to be on the battlefield. The goal is not strict visual accuracy, but clarity and coherence. If a unit is meant to represent a specific type of soldier or creature, it should be recognizable enough that your opponent can follow the battle without confusion.
In other words, proxy-friendly does not mean anything goes without limits, it means freedom within a shared understanding of the game experience. The battlefield should remain readable, and the cinematic aspect of the game should not be broken by completely unrelated representations.
Can I create and sell miniatures for Damocles Wars?
Yes, absolutely. Creators are encouraged to design and sell miniatures compatible with Damocles Wars. The game is built with an open mindset, and a healthy creative ecosystem around it is something I strongly support.
You are free to create models based on the factions, units, or characters of the game, as long as it is clearly stated that they are “compatible with Damocles Wars” and not official products. This distinction is important to avoid confusion for players who may wish to directly support the project.
Beyond that, competition is not something to avoid, it is something that benefits everyone. If other creators produce amazing miniatures for the game, that is a good thing for players and for the hobby as a whole. My role is simply to keep improving my own work and contribute to the growth of the universe. Shielding one's own mediocrity with absurd IP rules is the best shortcut to greater mediocrity...
You can use this logo if you make miniatures compatible with the Univers of Damocles.
What is the most important advice for new players?
The most important thing is simple: start playing.
Do not try to learn all the rules at once. That is the fastest way to get overwhelmed and lose interest. Instead, put some miniatures on the table, start with the basics, and let the game grow naturally as you play.
Use proxies, experiment freely, and even play solo if needed. Test different factions before committing time and energy into building or painting an army. It is far better to discover what you enjoy through play than to invest heavily into something that does not suit your style.
Once the game clicks, everything else follows naturally. Painting, collecting, and building armies become far more meaningful when they are driven by actual gameplay experience.
Damocles Wars is designed to be learned through action. Play first, refine later.
What is the philosophy behind the design?
The philosophy behind Damocles Wars is to put the gameplay experience first.
Many systems prioritize miniature sales over game design, often resulting in visually impressive ranges supported by shallow or unbalanced rules. Damocles takes the opposite approach. The goal is to create a system that is fun, fair, immersive, and deeply tactical, even if players use miniatures they already own.
The design is built around a careful balance between clarity, depth, realism, and speed. Rules are written to minimize ambiguity, reduce unnecessary downtime, and focus on meaningful decisions rather than mechanical overhead.
At the same time, the system aims to create cinematic and memorable moments, where positioning, timing, and bold choices matter more than exploiting obscure interactions or hidden rules.
Ultimately, the game is about giving players the freedom to express their creativity while ensuring that every battle remains fair, engaging, and rewarding.
How did the game start?
Damocles Wars began over twenty years ago, born from frustration.
As a young competitive player, I experienced many systems where rules were unclear, interactions were easy to exploit, and balance often felt secondary to commercial goals. These experiences left a lasting impression and sparked a simple idea: what if a wargame could be both fair and truly enjoyable to play?
What started as informal games between friends slowly evolved into a long-term project. Over the years, countless versions were tested, refined, and rebuilt from the ground up, always with the same objective: to find the right balance between competitive integrity and cinematic immersion.
One key inspiration was the ability of certain films and stories to combine realism with spectacle, creating moments that feel both believable and epic. Damocles Wars was built with that same intention, to deliver battles that are not only tactical, but also memorable.
After two decades of iteration, the system you see today is the result of that ongoing search for balance, clarity, and meaningful gameplay.
Why is the game designed to be played from a smartphone?
The goal is simple: reduce friction and preserve immersion.
Traditional wargaming often requires multiple books, army lists, and constant page flipping. This breaks the flow of the game and slows down decision-making. By centralizing rules, profiles, and abilities on a smartphone, players can access the exact information they need in seconds.
This allows both players to stay focused on the battle rather than searching through documents. Special rules can be checked instantly, interactions resolved quickly, and gameplay remains fluid and engaging.
Printable formats will be supported as the system stabilizes, but the digital approach ensures that rules remain up-to-date, consistent, and easy to navigate.
Why provide free printable terrain and tools?
Because accessibility matters.
Wargaming already has a natural barrier to entry through miniatures, time investment, and hobby skills. Adding additional costs for essential tools only makes it harder for new players to get started.
By providing free printable terrain, movement trays, and game accessories, the goal is to make the game immediately playable with minimal investment. Players can test the system, explore its mechanics, and decide whether they enjoy it before committing further.
It also helps create a shared visual and functional standard. When players use similar tools, the battlefield becomes clearer, interactions are easier to read, and games run more smoothly.
Ultimately, these resources exist to remove unnecessary barriers and allow players to focus on what truly matters: playing the game and enjoying the experience.
What miniature scale should I use?
Damocles Wars is primarily designed for miniatures in the 28mm to 32mm range. The system works seamlessly with both scales, and mixing them within the same army or battlefield is perfectly acceptable.
In fact, slight variations in size are not a problem. On the contrary, they can enhance the visual realism of your army. In real life, individuals vary greatly in height and build, and the game embraces that diversity rather than enforcing strict uniformity.
You are therefore free to build your collection in 28mm, 32mm, or a mix of both, depending on your preferences and existing models. There is no “mandatory” scale within that range.
It is also worth noting that earlier versions of the game were extensively tested using smaller scales such as 22mm - 1/72. As a result, there are plans to support these formats in the future through adapted movement trays and basing systems.
While this is not the current standard, the long-term goal is to make the system flexible enough to accommodate different scales without compromising gameplay.
How important is narrative compared to gameplay?
In Damocles Wars, gameplay and narrative are not opposed, they are deeply connected.
The rules are designed to generate narrative through gameplay. Every decision, every clash, every risk taken on the battlefield contributes to a story that unfolds naturally as the game progresses.
A good battle is not defined by victory alone. It is defined by the moments it creates, desperate charges, last stands, unexpected duels, or turning points that neither player could fully predict.
The system places a strong emphasis on immersion, through morale, positioning, objectives, and faction identity. Units behave in ways that make sense, and this consistency allows players to emotionally invest in what is happening on the table.
Gameplay has been optimized to support this. By reducing unnecessary complexity and downtime, the game creates more space for meaningful moments. The result is a system where narrative does not need to be forced, it emerges naturally from play.
This becomes even more powerful in campaign play. As battles are chained together, players grow attached to their characters, their units, and the outcomes of previous engagements. Victories and defeats start to matter beyond a single game, and the story evolves over time.
It is in these long sessions, where one battle leads to another and players keep going late into the night, that Damocles Wars truly reveals its full potential.
In the end, the goal is simple: whether you win or lose, the battle should feel like a story worth remembering.
What about the lore?
The lore of Damocles is a core part of the project.
It has been developed over many years, alongside and even before the rules themselves. Each faction, each world, and each conflict is part of a larger timeline shaped by long-term history, evolving relationships, and internal tensions.
This depth is not here to constrain players, but to support immersion. The lore gives context to battles, explains why factions fight the way they do, and reinforces the identity of each army on the table.
At the same time, the universe is designed to remain open. It can accommodate different interpretations, homebrew additions, and new narratives created by the players themselves.
Damocles is not just a setting to read, it is a world to play in.
What makes Damocles unique?
What makes Damocles unique is the balance it seeks between depth, freedom, immersion, and accessibility.
It is a system designed to be both precise and flexible, allowing players to build the armies they want, use the miniatures they love, and explore different styles of play without being restricted by rigid structures.
The rules are also built to support multiple universes and time periods. Whether you play fantasy, science fiction, historical settings, or your own creations, the system adapts to your collection rather than forcing you into a single world.
This flexibility allows players to reuse and combine different miniature ranges, making it possible to explore a wide variety of battles with a single, consistent ruleset.
The game combines a strong focus on balance with a constant effort to keep battles fast, readable, and engaging. This creates an experience where tactical decisions matter, but where cinematic moments can still emerge naturally.
Damocles is also built around an open and accessible philosophy. Rules, tools, and a growing range of resources are made available freely to reduce barriers to entry and allow as many players as possible to experience the game.
Ultimately, it is not just about playing battles, but about creating an experience where strategy, creativity, and immersion come together in a meaningful way.
What's next
What's next
Is the system designed to evolve continuously?
Yes, from the very beginning, Damocles Wars was designed to evolve.
The core system is built around a structured calculation framework that allows new content to be added without breaking existing balance. Units, factions, and even entire worlds can be integrated while remaining consistent with the overall design.
This makes the system both stable and flexible. Improvements can still be made, especially in refining certain mechanics or edge cases, but the foundation is already strong and reliable.
Today, adding new units or characters is fast and efficient, which opens the door to continuous expansion without compromising the integrity of the game.
How does Damocles handle power creep?
Power creep is avoided by design.
All units are evaluated through a dedicated calculation system developed over many years. Their point cost is not assigned manually or adjusted for external reasons, but determined by their actual impact on the battlefield.
This means that new content does not become stronger by default. It simply becomes another option within the same balanced framework.
The goal is not to constantly introduce “better” units, but to introduce different ones, with distinct roles, strengths, and weaknesses.
What is the long-term vision of the project?
The long-term vision is to build a living, evolving system that remains both accessible and deeply engaging.
This includes expanding the number of playable factions, developing new worlds and settings, and refining the rules to reach even higher levels of precision and clarity.
At the same time, the project aims to grow its own identity through original factions and dedicated miniature ranges, especially for concepts that cannot easily be represented by existing models.
The goal is to create a complete ecosystem where players can explore different universes, styles, and experiences while relying on a single, consistent ruleset.
Will there be more content?
Yes, a lot more.
New factions, units, scenarios, and gameplay systems are planned. Additional tools, printable resources, and hobby content will also be developed over time.
The system is built to support this expansion naturally, allowing new elements to be added without disrupting the core experience.
The ambition is not just to expand the game, but to enrich it in meaningful ways.
Will new factions or armies be released?
Yes.
Some factions will come from existing universes that players can already represent with their own collections. Others, especially those deeply tied to the Damocles setting, will be developed more specifically, including dedicated miniature ranges.
This approach allows both freedom and identity: players can use what they already own, while also discovering new, unique concepts created specifically for the game.
How much does the future of the game depend on community support?
A great deal.
Damocles Wars exists because of the time and energy invested into it over many years, but its future depends on whether players engage with it, enjoy it, and help it grow.
Community feedback is essential. It helps identify issues, refine mechanics, and improve the system far more efficiently than isolated development ever could.
Beyond that, continued development requires time. The more the project resonates with players, the more it justifies further investment into new content, new systems, and new ideas.
In the end, the goal is simple: if the game brings value to a growing community, it will keep growing with it.
Will Damocles Wars include historical settings? What can players expect?
Yes, historical settings are a major part of the project’s future.
The next major step is the integration of a large historical system centered around the campaigns of Alexander the Great. This includes a wide range of factions based on extensive historical research, built over many years.
Most of this content already exists in a previous version of the system and will be adapted to the current ruleset. Once the conversion tools are complete, it will be possible to integrate a very large amount of historical content relatively quickly.
Beyond that, other periods are planned, including medieval settings such as the Hundred Years’ War or the Reconquista, and potentially even earlier concepts like World War II, which was part of the original vision of the game.
The main limitation is not ideas, but time and available support to develop them properly.
Are there plans to expand the fantasy side of the game? Will new universes be introduced?
Yes.
The fantasy side of the game, especially through the Reign of Might setting, is planned to expand significantly. Around fifteen new factions are already envisioned, including classic high-fantasy archetypes such as undead, beastmen, orcs, knightly orders, and more.
In addition to that, new original universes are also planned. In the longer term, earlier eras of the Damocles timeline will be introduced, bringing new factions, technologies, and narratives into the system.
The goal is to allow players to explore multiple worlds and playstyles within a single unified ruleset.
Are collaborations, events, or organized play planned?
Yes, this is a key part of the project’s future.
Discussions with stores, communities, and content creators are already underway. Many people have shown interest in supporting and developing the game locally.
However, these initiatives take time to structure properly. The game has only recently reached a stage where it can be shared widely, and partners first need to experience it themselves before building events or communities around it.
The long-term goal is to encourage local groups, stores, and creators to organize events, demo games, and play sessions, making the game accessible to as many players as possible.
Is this project driven by commercial goals? What motivates its long-term development?
No, this project is not driven by commercial goals.
Given the amount of time invested over more than two decades, it would make little sense to approach it from a purely financial perspective.
The core motivation is simple: to create a game that people genuinely enjoy playing, and to see it shared and appreciated by a growing community.
The long-term development of Damocles Wars is driven by passion, by the desire to refine the system, and by the satisfaction of seeing players create memorable experiences on the battlefield.
How can players and creators get involved?
The simplest way to support the project is to play the game and share feedback. Community feedback is essential to improve the system, identify edge cases, and refine the rules efficiently. It has already played a major role in shaping the game into what it is today.
More importantly, continued development requires time and energy. The more the game is played, shared, and appreciated, the more it justifies further investment into new content and improvements.
For players, every game played and every constructive comment helps improve the system.
For creators, especially miniature designers, contributing is as simple as making their work compatible with the game and clearly indicating it. This helps both the project and their own visibility, creating a mutually beneficial ecosystem.
Damocles Wars is designed as an open and collaborative environment, where players and creators can grow together around a shared experience. The future of Damocles Wars is directly tied to the community that grows around it.
